Using an eSIM (embedded SIM) offers several advantages over traditional physical SIM cards, catering to both business and leisure travelers. Here are some key benefits:
1. Convenience: eSIMs are embedded directly into devices, eliminating the need to physically insert or remove a SIM card. This is particularly useful for devices with limited physical space or for users who frequently switch between different carriers or plans.
2. Flexibility: With an eSIM, it’s easy to switch between carriers or plans without needing to swap out a SIM card. This is especially beneficial for travelers, allowing them to quickly change to a local carrier when abroad.
3. Security: eSIMs utilize encryption to protect user data and prevent unauthorized access. Since there is no physical SIM card to lose or steal, the risk of unauthorized usage is significantly reduced.
4. Cost-Effectiveness: As eSIMs are built into devices, users save on the costs associated with purchasing or replacing physical SIM cards. This can lead to long-term savings, particularly for those who frequently switch carriers or plans.
5. Environmental Benefits: eSIMs are more eco-friendly than traditional physical SIM cards, as they do not require plastic or other materials that contribute to waste. This helps reduce the environmental impact of mobile connectivity.
Overall, eSIMs provide a range of benefits that enhance convenience, flexibility, and cost-effectiveness, making them an appealing option for users seeking reliable mobile connectivity.
eSIMs (embedded SIMs) are widely regarded as very secure, utilizing similar security features as traditional physical SIM cards while also offering additional benefits. They leverage the same networks and technologies as conventional SIM cards, providing the same functionalities with enhanced security measures.
However, like any technology, eSIMs carry a small risk of security breaches. It’s crucial for users to take appropriate precautions to safeguard their QR codes, eSIMs, and mobile devices.
Key Security Features and Benefits of eSIM
• Remote Activation:
• eSIMs can be activated remotely, allowing programming and activation without needing a physical SIM card. This significantly reduces the risk of fraud and theft associated with lost or stolen physical SIM cards.
• Tamper-Proof Design:
• eSIMs are embedded directly into the device’s hardware, making them virtually impossible to remove or tamper with. This design minimises vulnerability to physical attacks or damage.
• Secure Storage:
• eSIMs employ secure storage modules designed to protect against unauthorised access and tampering. This feature ensures that your eSIM data remains secure even if your phone is lost or stolen.
Conclusion
Overall, eSIMs provide a secure alternative to traditional SIM cards, with several built-in features aimed at enhancing security. Nonetheless, users should remain vigilant and adopt good security practices to protect their devices and personal information.
An eSIM, or embedded SIM, is a programmable chip embedded in mobile devices that functions like a traditional SIM card. Unlike a physical SIM card, an eSIM does not need to be inserted or removed, as it is built directly into the device.
With an eSIM, users can activate a data plan without the need to purchase a physical SIM card or visit a retail store. The eSIM can be programmed with the data plan details via a QR code, a mobile app, or a website, providing a more streamlined and convenient process for activating and managing cellular plans.
Benefits of eSIM Technology:
• Increased Flexibility: Users can easily switch between different data plans or carriers without needing to physically change SIM cards.
• Cost Savings: Eliminates the need for purchasing physical SIM cards.
• Convenience: Simplifies the activation and management of cellular plans.
• Compact Design: Devices can be made smaller and more compact, as they do not require a traditional SIM card slot.
Overall, eSIM technology enhances the user experience by offering more flexibility and convenience in mobile connectivity.
No, installing an eSIM will not lock your phone. An eSIM (embedded SIM) is a digital SIM integrated into your phone’s hardware, allowing for activation through device settings without the need for a physical card.
The lock status of your phone is determined by your primary SIM carrier, usually the provider from whom you purchased the device. This status indicates whether your phone is locked to a specific carrier. Installing an eSIM does not alter this lock status; your phone will remain locked or unlocked based on your carrier’s policies.
What devices support eSIM?
To use an eSIM, your device must be carrier-unlocked and eSIM-compatible. Please reference the list below to see if your device supports eSIM technology (country and carrier-specific restrictions may apply).*
Please note:
• The list will be updated as more eSIM-compatible devices are released.
• While we aim to make the list as complete as possible, it is not exhaustive — your device may be eSIM compatible if it is not listed.
As of October 2024, the following devices are eSIM-compatible:
APPLE*
iPhone
• iPhone 16, 16 Plus, 16 Pro, 16 Pro Max
• iPhone 15, 15 Plus, 15 Pro, 15 Pro Max
• iPhone 14, 14 Plus, 14 Pro, 14 Pro Max
• iPhone 13, 13 Mini, 13 Pro, 13 Pro, 13 Pro Max
• iPhone 12, 12 Mini, 12 Pro, 12 Pro Max (only 1 eSIM can be active)
• iPhone 11, 11 Pro, 11 Pro Max (only 1 eSIM can be active)
• iPhone XS, XS Max (only 1 eSIM can be active)
• iPhone XR (only 1 eSIM can be active)
• iPhone SE (2020 and 2022) (only 1 eSIM can be active)
iPad
• iPad (from 7th generation)
• iPad Air (from 3rd generation)
• iPad Pro, 11-inch (from 1st generation)
• iPad Pro 12.9-inch (from 3rd generation)
• iPad Mini (from 5th generation)
*The following Apple devices DO NOT have eSIM capability:
• iPhone devices from Mainland China.
• iPhone devices from Hong Kong and Macao (except for the iPhone 13 Mini, iPhone 12 Mini, iPhone SE 2020, and iPhone XS).
*For iPhones and iPads purchased in TURKEY:
• If you're setting up your device after June 23, 2020, your eSIM will activate after installation — contact your carrier if you don't have eSIM enabled.
• For devices set up before the June 23, 2020, follow the steps in this link to activate your eSIM. The procedure may require you to erase your device's data – please make sure you back up your device beforehand.
*Only iPad devices with Wi-Fi + Cellular features are supported.
*The following Samsung Galaxy devices DO NOT have eSIM capability:
• All Galaxy devices originating from China, Hong Kong, and Taiwan.
• All Galaxy FE "Fan Edition" models, except the Galaxy S23 FE.
• USA models of the Galaxy S20, S21*, and Note 20 Ultra.
*Most Samsung Galaxy devices purchased in South Korea do not support eSIMs, except for the Galaxy S24, S23, Z Fold 5, Z Fold 4, Z Flip 5, Z Flip 4, and A54 5G variants.
GOOGLE PIXEL
• Pixel 9, 9 Pro, 9 Pro XL, 9 Pro Fold
• Pixel 8, 8a, 8 Pro
• Pixel 7, 7a, 7 Pro
• Pixel 6, 6a, 6 Pro
• Pixel 5, 5a
• Pixel 4, 4a, 4 XL
• Pixel 3, 3a, 3 XL, 3a XL
• Pixel Fold
*The following Google Pixel devices DO NOT have eSIM capability:
• Pixel 3 models originating from Australia, Taiwan, and Japan, and those purchased with service from US or Canadian carriers other than Sprint and Google Fi.
• Pixel 3a models purchased in South East Asia and with Verizon service.
HAMMER*
• Explorer PRO
• Blade 3
• Blade 5G
• myPhone NOW eSIM
• myPhone Hammer Construction
*eSIM support is only available in certain regions. Please contact your carrier or device manufacturer to confirm that your Hammer device is eSIM-capable.
HONOR*
• HONOR Magic6 Pro
• HONOR Magic Vs
• HONOR Magic V2*
• HONOR Magic V3
• Magic5 Pro
• Magic4 Pro
• Honor 90
• HONOR 200, 200 Pro
*eSIM support is only available in certain regions. Please contact your carrier or device manufacturer to confirm that your Honor device is eSIM-capable.
HUAWEI
• P40
• P40 Pro*
• Mate 40 Pro
*The following HUAWEI devices DO NOT have eSIM capability:
• Huawei P40 Pro+
• All Huawei devices purchased in China are not eSIM capable.
MOTOROLA*
• Moto G54
• Moto G85
• Edge Fusion
• Edge 50 Pro
• Edge 50 Neo
• Edge 40 Neo
• Edge 40 Pro
• Edge+
• Razr 40 Ultra
• Razr 2022
• Razr 2019
• Razr 5G
• G53 5G
*eSIM support is only available in certain regions. Please contact your carrier or device manufacturer to confirm that your Motorola device is eSIM-capable.
NOKIA*
• G60
• XR21
• X30
*eSIM availability may vary depending on country/region and carrier. Please contact your carrier or device manufacturer to confirm that your Nokia device is eSIM-capable.
ONEPLUS*
• OnePlus 12
• OnePlus 11
*eSIM support is only available in certain regions. Please contact your carrier or device manufacturer to confirm that your OnePlus device is eSIM-capable.
OPPO*
• Reno6 Pro 5G
• A55s 5G
• Find N2 Flip
• Find N2 Flip
• Find X5
• Find X5 Pro
• Reno A
*eSIM support is only available in Japan and certain regions. Please contact your carrier or device manufacturer to confirm that your Oppo device is eSIM-capable.
RAKUTEN*
• Rakuten Big
• Rakuten Big S
• Rakuten Mini
• Rakuten Hand
*eSIM support is only available in Japan and certain regions. Please contact your carrier or device manufacturer to confirm that your Rakuten device is eSIM-capable.
SHARP*
• AQUOS Sense 8
• AQUOS Sense 7
• AQUOS Sense 6
• AQUOS Sense 4 Lite
• AQUOS R8 Pro
• AQUOS R8
• AQUOS R7
• AQUOS R6
• AQUOS Wish
• AQUOS Zero 6
**eSIM support is only available in Japan and certain regions. Please contact your carrier or device manufacturer to confirm that your Sharp device is eSIM-capable.
SONY*
• Xperia 1 V
• Xperia 1 IV
• Xperia 5 IV
• Xperia 10 III Lite
• Xperia 10 IV*
*eSIM availability may vary depending on country/region and carrier. Please contact your carrier or device manufacturer to confirm that your Xperia device is eSIM-capable.
*Sony Xperia 10 IV eSIM support is only available in Europe. Please contact your carrier or device manufacturer to confirm that your Sony Xperia 10 IV device is eSIM-capable.
VIVO*
• X100 Pro
• X90 Pro*
• V29 (European Version)*
• V29 Lite 5G (European Version)*
• V29 Lite 5G (European Version)*
• V40
*eSIM availability may vary depending on country/region and carrier. Please contact your carrier or device manufacturer to confirm that your Vivo device is eSIM-capable.
XIAOMI*
• 14T, 14T Pro
• 14 Pro
• 13T, 13T Pro
• 13, 13 Pro
• 13 Lite
• 12T Pro
• Redmi Note 14 Pro, 14 Pro+
• Redmi Note 13 Pro, 13 Pro +
• Redmi Note 11 Pro 5G*
*eSIM availability may vary depending on country/region and carrier. Please contact your carrier or device manufacturer to confirm that your device is eSIM-capable.
*For Windows 10: Your PC needs to have Windows 10 version 1703 or later for you to use an eSIM. The device also needs to be LTE-ready.
OTHERS*
• Nuu Mobile X5
• Gemini PDA 4G+Wi-Fi
• Fairphone 4
*Surface: Any AT&T-locked devices will not support eSIMs. If your device was purchased through another carrier, the carrier may have disabled eSIM capability in the Surface Duo.
WINDOWS 10*/ WINDOWS 11 LAPTOPS
ACER
• Acer Swift 3
• Acer Swift 7
• Acer TravelMate P2
• Acer TravelMate Spin P4
• Acer TravelMate P6
ASUS
• ASUS Mini Transformer T103HAF
• ASUS NovaGo TP370QL
• ASUS Vivobook Flip 14 TP401NA
DELL
• Dell Latitude 7440
• Dell Latitude 7210 2-in-1
• Dell Latitude 9410
• Dell Latitude 7310
• Dell Latitude 7410
• Dell Latitude 9510
• Dell Latitude 5410
• Dell Latitude 5411
• Dell Latitude 5511
HP
• HP Elitebook G5
• HP Probook G5
• HP Zbook G5
• HP Spectre Folio 13
LENOVO
• ThinkPad X1 Titanium Yoga 2 in 1
• ThinkPad X1 Carbon Gen 9
• ThinkPad X1 Fold
• ThinkPad X1 Nano
• ThinkPad X12 Detachable
• Lenovo Flex 5G
• Lenovo Yoga C630
• Lenovo Miix 630
• Lenovo Yoga 520
• Lenovo Yoga 720 (2-in-1 models)
SURFACE*
• Surface Pro 9
• Surface Go 3
• Surface Pro X
• Surface Duo 2
• Surface Duo
*For Windows 10: Your PC needs to have Windows 10 version 1703 or later for you to use an eSIM. The device also needs to be LTE-ready.
*Surface: Any AT&T-locked devices will not support eSIMs. If your device was purchased through another carrier, the carrier may have disabled eSIM capability in the Surface Duo. Please contact the carrier to confirm.
About Telemeteor
An eSIM is a type of SIM card that is built directly into your eSIM-compatible device. It offers a smarter, more convenient way to stay connected, as you can download data plans directly onto your phone—no need for physical SIM cards anymore, and no risk of losing your original card!
However, please remember that eSIMs only work on devices that are eSIM-compatible and unlocked for any network. To make sure you can use eSIM plans on your device, check our list of eSIM-compatible devices or go to your device settings to confirm if it supports eSIM.
If your device can use eSIMs, simply get an eSIM plan from Telemeteor and enjoy all the benefits of your device!
If you have any questions, please feel free to contact support.
Telemeteor provides reliable and affordable internet services for travelers worldwide, specializing in eSIM solutions. Starting from our success in Hungary, we now offer easy connectivity across the World and beyond—all without the need for physical SIM cards. Our goal is to make travel simpler by keeping you connected wherever you go.
What devices support eSIM?
To use an eSIM, your device must be carrier-unlocked and eSIM-compatible. Please reference the list below to see if your device supports eSIM technology (country and carrier-specific restrictions may apply).*
Please note:
• The list will be updated as more eSIM-compatible devices are released.
• While we aim to make the list as complete as possible, it is not exhaustive — your device may be eSIM compatible if it is not listed.
As of October 2024, the following devices are eSIM-compatible:
APPLE*
iPhone
• iPhone 16, 16 Plus, 16 Pro, 16 Pro Max
• iPhone 15, 15 Plus, 15 Pro, 15 Pro Max
• iPhone 14, 14 Plus, 14 Pro, 14 Pro Max
• iPhone 13, 13 Mini, 13 Pro, 13 Pro, 13 Pro Max
• iPhone 12, 12 Mini, 12 Pro, 12 Pro Max (only 1 eSIM can be active)
• iPhone 11, 11 Pro, 11 Pro Max (only 1 eSIM can be active)
• iPhone XS, XS Max (only 1 eSIM can be active)
• iPhone XR (only 1 eSIM can be active)
• iPhone SE (2020 and 2022) (only 1 eSIM can be active)
iPad
• iPad (from 7th generation)
• iPad Air (from 3rd generation)
• iPad Pro, 11-inch (from 1st generation)
• iPad Pro 12.9-inch (from 3rd generation)
• iPad Mini (from 5th generation)
*The following Apple devices DO NOT have eSIM capability:
• iPhone devices from Mainland China.
• iPhone devices from Hong Kong and Macao (except for the iPhone 13 Mini, iPhone 12 Mini, iPhone SE 2020, and iPhone XS).
*For iPhones and iPads purchased in TURKEY:
• If you're setting up your device after June 23, 2020, your eSIM will activate after installation — contact your carrier if you don't have eSIM enabled.
• For devices set up before the June 23, 2020, follow the steps in this link to activate your eSIM. The procedure may require you to erase your device's data – please make sure you back up your device beforehand.
*Only iPad devices with Wi-Fi + Cellular features are supported.
*The following Samsung Galaxy devices DO NOT have eSIM capability:
• All Galaxy devices originating from China, Hong Kong, and Taiwan.
• All Galaxy FE "Fan Edition" models, except the Galaxy S23 FE.
• USA models of the Galaxy S20, S21*, and Note 20 Ultra.
*Most Samsung Galaxy devices purchased in South Korea do not support eSIMs, except for the Galaxy S24, S23, Z Fold 5, Z Fold 4, Z Flip 5, Z Flip 4, and A54 5G variants.
GOOGLE PIXEL
• Pixel 9, 9 Pro, 9 Pro XL, 9 Pro Fold
• Pixel 8, 8a, 8 Pro
• Pixel 7, 7a, 7 Pro
• Pixel 6, 6a, 6 Pro
• Pixel 5, 5a
• Pixel 4, 4a, 4 XL
• Pixel 3, 3a, 3 XL, 3a XL
• Pixel Fold
*The following Google Pixel devices DO NOT have eSIM capability:
• Pixel 3 models originating from Australia, Taiwan, and Japan, and those purchased with service from US or Canadian carriers other than Sprint and Google Fi.
• Pixel 3a models purchased in South East Asia and with Verizon service.
HAMMER*
• Explorer PRO
• Blade 3
• Blade 5G
• myPhone NOW eSIM
• myPhone Hammer Construction
*eSIM support is only available in certain regions. Please contact your carrier or device manufacturer to confirm that your Hammer device is eSIM-capable.
HONOR*
• HONOR Magic6 Pro
• HONOR Magic Vs
• HONOR Magic V2*
• HONOR Magic V3
• Magic5 Pro
• Magic4 Pro
• Honor 90
• HONOR 200, 200 Pro
*eSIM support is only available in certain regions. Please contact your carrier or device manufacturer to confirm that your Honor device is eSIM-capable.
HUAWEI
• P40
• P40 Pro*
• Mate 40 Pro
*The following HUAWEI devices DO NOT have eSIM capability:
• Huawei P40 Pro+
• All Huawei devices purchased in China are not eSIM capable.
MOTOROLA*
• Moto G54
• Moto G85
• Edge Fusion
• Edge 50 Pro
• Edge 50 Neo
• Edge 40 Neo
• Edge 40 Pro
• Edge+
• Razr 40 Ultra
• Razr 2022
• Razr 2019
• Razr 5G
• G53 5G
*eSIM support is only available in certain regions. Please contact your carrier or device manufacturer to confirm that your Motorola device is eSIM-capable.
NOKIA*
• G60
• XR21
• X30
*eSIM availability may vary depending on country/region and carrier. Please contact your carrier or device manufacturer to confirm that your Nokia device is eSIM-capable.
ONEPLUS*
• OnePlus 12
• OnePlus 11
*eSIM support is only available in certain regions. Please contact your carrier or device manufacturer to confirm that your OnePlus device is eSIM-capable.
OPPO*
• Reno6 Pro 5G
• A55s 5G
• Find N2 Flip
• Find N2 Flip
• Find X5
• Find X5 Pro
• Reno A
*eSIM support is only available in Japan and certain regions. Please contact your carrier or device manufacturer to confirm that your Oppo device is eSIM-capable.
RAKUTEN*
• Rakuten Big
• Rakuten Big S
• Rakuten Mini
• Rakuten Hand
*eSIM support is only available in Japan and certain regions. Please contact your carrier or device manufacturer to confirm that your Rakuten device is eSIM-capable.
SHARP*
• AQUOS Sense 8
• AQUOS Sense 7
• AQUOS Sense 6
• AQUOS Sense 4 Lite
• AQUOS R8 Pro
• AQUOS R8
• AQUOS R7
• AQUOS R6
• AQUOS Wish
• AQUOS Zero 6
**eSIM support is only available in Japan and certain regions. Please contact your carrier or device manufacturer to confirm that your Sharp device is eSIM-capable.
SONY*
• Xperia 1 V
• Xperia 1 IV
• Xperia 5 IV
• Xperia 10 III Lite
• Xperia 10 IV*
*eSIM availability may vary depending on country/region and carrier. Please contact your carrier or device manufacturer to confirm that your Xperia device is eSIM-capable.
*Sony Xperia 10 IV eSIM support is only available in Europe. Please contact your carrier or device manufacturer to confirm that your Sony Xperia 10 IV device is eSIM-capable.
VIVO*
• X100 Pro
• X90 Pro*
• V29 (European Version)*
• V29 Lite 5G (European Version)*
• V29 Lite 5G (European Version)*
• V40
*eSIM availability may vary depending on country/region and carrier. Please contact your carrier or device manufacturer to confirm that your Vivo device is eSIM-capable.
XIAOMI*
• 14T, 14T Pro
• 14 Pro
• 13T, 13T Pro
• 13, 13 Pro
• 13 Lite
• 12T Pro
• Redmi Note 14 Pro, 14 Pro+
• Redmi Note 13 Pro, 13 Pro +
• Redmi Note 11 Pro 5G*
*eSIM availability may vary depending on country/region and carrier. Please contact your carrier or device manufacturer to confirm that your device is eSIM-capable.
*For Windows 10: Your PC needs to have Windows 10 version 1703 or later for you to use an eSIM. The device also needs to be LTE-ready.
OTHERS*
• Nuu Mobile X5
• Gemini PDA 4G+Wi-Fi
• Fairphone 4
*Surface: Any AT&T-locked devices will not support eSIMs. If your device was purchased through another carrier, the carrier may have disabled eSIM capability in the Surface Duo.
WINDOWS 10*/ WINDOWS 11 LAPTOPS
ACER
• Acer Swift 3
• Acer Swift 7
• Acer TravelMate P2
• Acer TravelMate Spin P4
• Acer TravelMate P6
ASUS
• ASUS Mini Transformer T103HAF
• ASUS NovaGo TP370QL
• ASUS Vivobook Flip 14 TP401NA
DELL
• Dell Latitude 7440
• Dell Latitude 7210 2-in-1
• Dell Latitude 9410
• Dell Latitude 7310
• Dell Latitude 7410
• Dell Latitude 9510
• Dell Latitude 5410
• Dell Latitude 5411
• Dell Latitude 5511
HP
• HP Elitebook G5
• HP Probook G5
• HP Zbook G5
• HP Spectre Folio 13
LENOVO
• ThinkPad X1 Titanium Yoga 2 in 1
• ThinkPad X1 Carbon Gen 9
• ThinkPad X1 Fold
• ThinkPad X1 Nano
• ThinkPad X12 Detachable
• Lenovo Flex 5G
• Lenovo Yoga C630
• Lenovo Miix 630
• Lenovo Yoga 520
• Lenovo Yoga 720 (2-in-1 models)
SURFACE*
• Surface Pro 9
• Surface Go 3
• Surface Pro X
• Surface Duo 2
• Surface Duo
*For Windows 10: Your PC needs to have Windows 10 version 1703 or later for you to use an eSIM. The device also needs to be LTE-ready.
*Surface: Any AT&T-locked devices will not support eSIMs. If your device was purchased through another carrier, the carrier may have disabled eSIM capability in the Surface Duo. Please contact the carrier to confirm.
Loyalty Program Overview
The Telemeteor loyalty program rewards returning customers with “TeleMoney” credits in their user accounts. These credits can be used for discounts on future purchases, with 1 TeleMoney equal to 1 USD. TeleMoney cannot be exchanged for cash and can only be used for eSIM purchases on the Telemeteor website. TeleMoney does not expire.
TeleMoney is credited in the following cases:
• Purchases made while logged into a user account (based on loyalty level).
• Account registration.
• Using a promotional code.
• Sharing an invitation code that leads to a purchase by the invited user.
Loyalty Levels
The more a customer spends, the higher their loyalty level, which increases the TeleMoney they earn per purchase. The total purchase amount (before redeeming TeleMoney) is used to calculate loyalty levels. For example, if a customer spends $10 and redeems 10 TeleMoney, the purchase still counts as $10.
The system reviews loyalty levels daily, considering the total amount spent in the past 365 days to determine the user’s current level.
Premium Level
• Criteria: Available to all registered users.
• Reward: 5% of the purchase amount credited as TeleMoney.
• This level is permanent and does not expire.
Exclusive Level
• Criteria: Spend $100 or more in the past 365 days (before redeeming TeleMoney).
• Reward: 10% of the purchase amount credited as TeleMoney.
Elite Level
• Criteria: Spend $300 or more in the past 365 days (before redeeming TeleMoney).
• Reward: 15% of the purchase amount credited as TeleMoney.
Privilege Level (Custom Partner Loyalty Level)
• Criteria: Assigned by admin for selected users or partners.
• A custom percentage of TeleMoney credit or a percentage discount on the total purchase.
• The Privilege Level can have an expiry date according to agreement with partner. After that regular loyalty levels apply.
Using TeleMoney
TeleMoney acts as a virtual credit replacing percentage-based or fixed-amount discounts in the loyalty program.
• Value: 1 TeleMoney equals 1 USD.
• Usage: Registered users automatically receive TeleMoney credits after purchases, visible in their profiles.
• Redemption: TeleMoney can be used during checkout, up to the total purchase amount. It cannot be exchanged for cash.
TeleMoney for Registration
If there is a “New Registration” bonus campaign, every new user will get a bonus. If there is no campaign, no bonus will be given.
TeleMoney for Referrals
If there is a “Referral Bonus” campaign users can invite others to join telemeteor.com. They will earn TeleMoney bonuses if the invited user registers and makes a purchase within one week.
TeleMoney for Promotional Codes or Coupons
Sometimes, special promotional codes are available for specific users or everyone. Each code can be used only once per user. Visit telemeteor.com regularly to find new discounts or codes.
Affiliates & Partnerships
Yes, Telemeteor has an affiliate program.
We offer social media influencers, content creators, and other digital publishers the opportunity to earn commissions from promoting Telemeteor eSIMs to their audiences. You might be a good fit if you:
Run a blog with readers who are interested in travel and/or technology.
Are a content creator with an audience that would benefit from using eSIMs.
Run an eSIM, tech trends, or discovery/comparison site.
Have an online business with users/customers who are interested in travel.
Telemeteor also offers other partnership models to leverage our services, including co-marketing/branding partnerships and sponsorships tailored to your customer’s journey.
To learn more about available partnership options, or to initiate a partnership discussion, please visit our partnerships hub.
If you have questions or are interested in pursuing other partnership opportunities, please reach out to our partnerships team at partnerships@telemeteor.com.
Loyalty Program Overview
The Telemeteor loyalty program rewards returning customers with “TeleMoney” credits in their user accounts. These credits can be used for discounts on future purchases, with 1 TeleMoney equal to 1 USD. TeleMoney cannot be exchanged for cash and can only be used for eSIM purchases on the Telemeteor website. TeleMoney does not expire.
TeleMoney is credited in the following cases:
• Purchases made while logged into a user account (based on loyalty level).
• Account registration.
• Using a promotional code.
• Sharing an invitation code that leads to a purchase by the invited user.
Loyalty Levels
The more a customer spends, the higher their loyalty level, which increases the TeleMoney they earn per purchase. The total purchase amount (before redeeming TeleMoney) is used to calculate loyalty levels. For example, if a customer spends $10 and redeems 10 TeleMoney, the purchase still counts as $10.
The system reviews loyalty levels daily, considering the total amount spent in the past 365 days to determine the user’s current level.
Premium Level
• Criteria: Available to all registered users.
• Reward: 5% of the purchase amount credited as TeleMoney.
• This level is permanent and does not expire.
Exclusive Level
• Criteria: Spend $100 or more in the past 365 days (before redeeming TeleMoney).
• Reward: 10% of the purchase amount credited as TeleMoney.
Elite Level
• Criteria: Spend $300 or more in the past 365 days (before redeeming TeleMoney).
• Reward: 15% of the purchase amount credited as TeleMoney.
Privilege Level (Custom Partner Loyalty Level)
• Criteria: Assigned by admin for selected users or partners.
• A custom percentage of TeleMoney credit or a percentage discount on the total purchase.
• The Privilege Level can have an expiry date according to agreement with partner. After that regular loyalty levels apply.
Using TeleMoney
TeleMoney acts as a virtual credit replacing percentage-based or fixed-amount discounts in the loyalty program.
• Value: 1 TeleMoney equals 1 USD.
• Usage: Registered users automatically receive TeleMoney credits after purchases, visible in their profiles.
• Redemption: TeleMoney can be used during checkout, up to the total purchase amount. It cannot be exchanged for cash.
TeleMoney for Registration
If there is a “New Registration” bonus campaign, every new user will get a bonus. If there is no campaign, no bonus will be given.
TeleMoney for Referrals
If there is a “Referral Bonus” campaign users can invite others to join telemeteor.com. They will earn TeleMoney bonuses if the invited user registers and makes a purchase within one week.
TeleMoney for Promotional Codes or Coupons
Sometimes, special promotional codes are available for specific users or everyone. Each code can be used only once per user. Visit telemeteor.com regularly to find new discounts or codes.
Getting started with Telemeteor
Telemeteor offers eSIMs for locations worldwide, categorized by:
• Country
• Region
• Global coverage
To find an eSIM for your destination, visit our website and enter your destination in the search bar. You can also browse through all listed countries and regions. For regional and global eSIMs, be sure to check COVERAGE to confirm that your destination is included.
If you have any questions, please contact support—we’re happy to help!
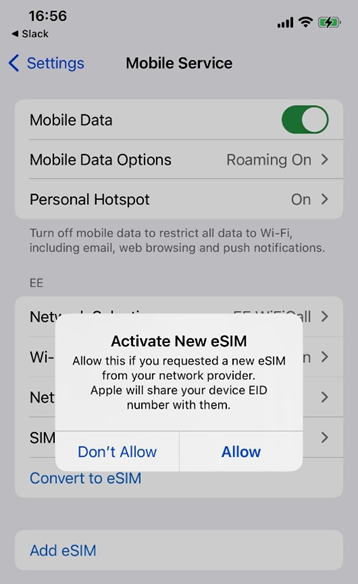
How do I activate the eSIM on an iPhone or iPad in Turkey? Some iPhones and iPads purchased in Turkey are reported to have eSIM disabled by default. If you have purchased and activated your device after June 23, 2020, your eSIM will be activated after setup, and you don't need to follow these instructions. If you don't have eSIM enabled, get in touch with your mobile carrier. The instructions below will help you activate your eSIM for devices that were purchased before June 23, 2020. You must reset your device to complete the following procedure, so create a backup before continuing.
Back up your device. Then make sure it's updated to the latest iOS or iPadOS.
Tap Settings > General > Transfer or Reset
Tap Erase All Content and Settings.
When asked, enter your passcode or Apple ID password. Then confirm that you want to erase your device.
After erase is complete, restore your iPhone or iPad from your backup.
Once done, you can now set up an eSIM on your iPhone or iPad. In addition, please be advised that according to Turkey's local regulation, to use roaming data services for 91 days (accumulated) or more per 120 days period, the device's IMEI should be registered with the Central Equipment Identity Register of Turkey. We kindly advise you to contact the CEIR for more information. If you have any questions, please feel free to contact our support channels. Source: https://support.apple.com/en-us/HT211023
With our unlimited bundles, you’ll never run out of data while your bundle is active, so no need to constantly check your usage. Just select the number of days you need, and you’re set to roam freely.
Unlimited bundle options:
• 1 day
• 3 days
• 5 days
• 7 days
• 10 days
• 15 days
• 30 days
For each active day, you’ll get 1GB of data at full network speed. After using the daily 1GB, data speed will be limited to 1,2Mbps (or the best of current available cellular network) for the rest of that day.
We likely have the eSIM you’re looking for! Telemeteor offers coverage in over 200 countries and regions. Just visit our homepage and enter your desired country to view the available eSIM plans.
If you have any questions, please feel free to contact support.
We accept these payment methods:
• Credit and debit cards (VISA, Mastercard, American Express, and UnionPay)
• Telemoney (Telemeteor reward currency)
• Apple Pay (availability may vary by country)
• Pay with LINK (a created Link to provide a faster and easier way to check out and manage saved financial accounts.)
You can also combine any payment method with Telemoney. Simply choose your payment method, then select “Apply Code/Use Telemoney” to enter the amount of Telemoney you’d like to use.
If you have any questions, please contact our support team.
The timing for installing your eSIM depends on its activation policy. Most eSIMs activate only when they connect to a supported network in your destination. However, some eSIMs will activate instantly upon installation, regardless of location.
How to check your eSIM’s activation policy (Auto Start):
Before Purchase:
1. Search for the country where you need an eSIM.
2. Select the eSIM plan you want.
3. Go to Additional Information and tap Show more to view the Activation Policy (Auto Start).
After Purchase:
1. Go to My eSIMs > Details > Show more > Activation Policy (Auto Start).
Activation Policy (Auto Start) Types:
• “The validity period starts when the eSIM connects to any supported network(s)”: You can install the eSIM before you travel, and it will activate when you connect to a supported network at your destination. Just turn on your eSIM line upon arrival (be sure to follow the setup instructions on your eSIM installation page).
• “The validity period starts at installation”: Your eSIM will activate immediately upon installation, and the validity period will start, even if you are not yet at your destination.
The expiration of your eSIM data package depends on its validity period or when the data is fully used. The validity period begins as soon as the eSIM activates. For most eSIMs, activation occurs when your eSIM connects to a supported network in your destination country. However, some eSIMs activate as soon as they are installed, no matter where you are.
To check the activation policy before purchasing, go to Additional Information > Activation Policy (Auto Start) on the product page. For guidance on the best time to install your eSIM, see When can I install my eSIM?
If you have any questions, please feel free to contact support.
Installing eSIM(s) On An Apple Device
This help guide walks you through the steps required to install an eSIM on an Apple Device.
There are three install options offered in this help guide, either "install using a QR code", "install using Apple Quick Install URL" or "manual install"
Before starting the install, it is important you have the following three components:
A strong internet connection - Ideally using a Wifi network or a good 4G connection
An eSIM compatible device - If unsure, a list of compatible devices is provided here
The device is not locked to one particular network - If unsure, an article has been provided to talk you through how to determine the "locked / unlocked" status of a device, click here (ellenőrizni)
Don't forget to turn on "Data Roaming" after install!
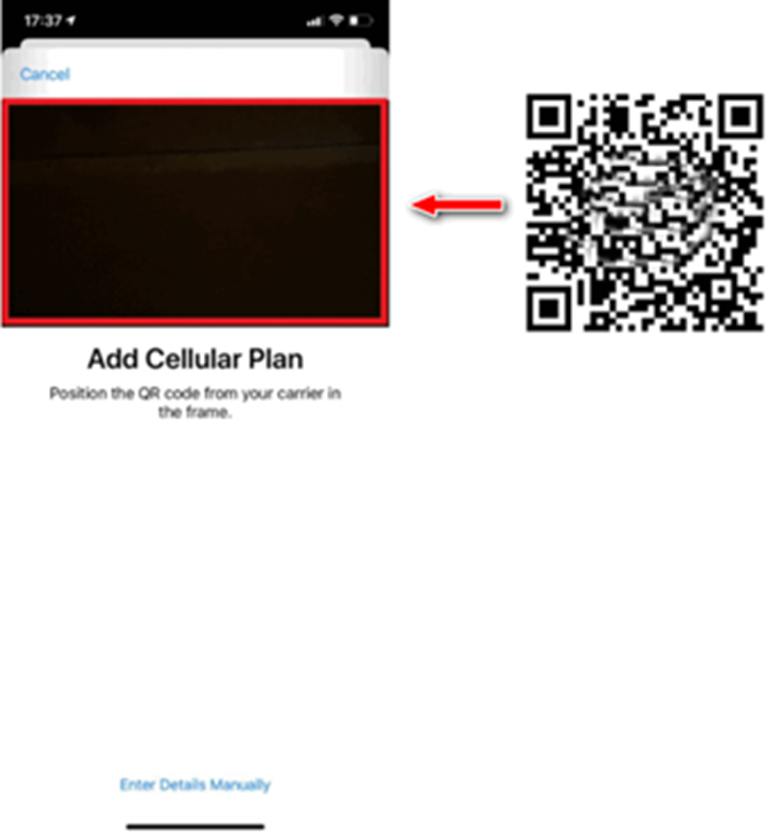
Install Using A QR Code
There are two options available when scanning the QR code to install an eSIM;
Step 1.
Either
1.1) Open the camera on your device > Scan the QR code > Tap "Mobile Plan"
Or
1.2) Go to "Settings" > Tap "Mobile / Cellular Data" > Tap "Add eSIM" > Tap "Use QR Code" > Scan the QR code provided
Step 2. Tap "Continue" > Allow up to 10 minutes for the eSIM to Activate > Tap "Done"
Step 3. There are two options available at this stage, we advise proceeding with option 3.1)
Either
3.1) Tap "Continue" and then move to Step 4.
or
3.2) You have the option to modify the "eSIM Label" (the name of the eSIM) instead of using the default name.
If you would like to modify the eSIM label before moving to the next step;
Tap ">" (the right hand arrow) > Then either choose one of the preset label's or type the name you want to use in the "Custom Label" box > Tap "Done" > Tap "Continue"
In this example the name of the esim was changed to "My eSIM" using the custom label box.
Please note; Option 3.2) won't be offered to you if you have more than one eSIM already installed on your device, so a custom label can only be altered after the SIM install is complete.
Step 4. Configure the following settings as suggested:
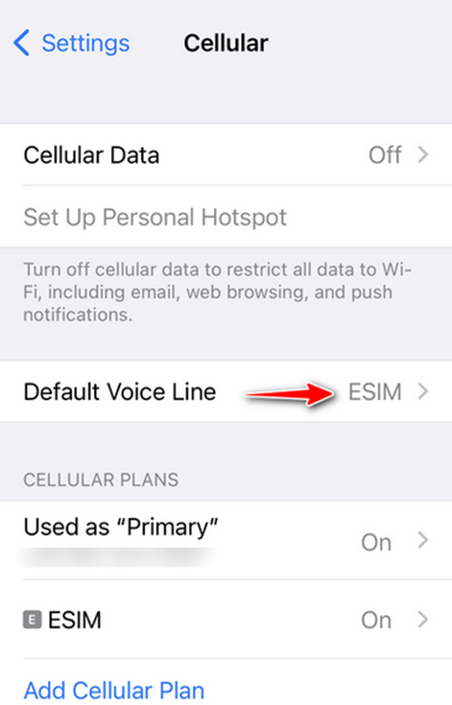
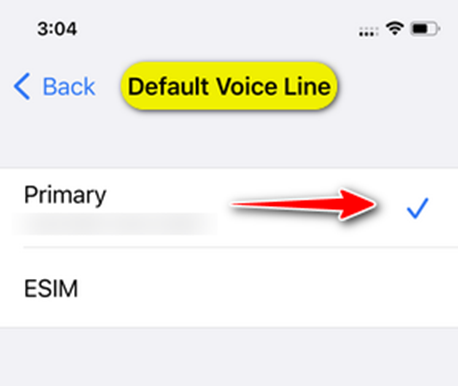
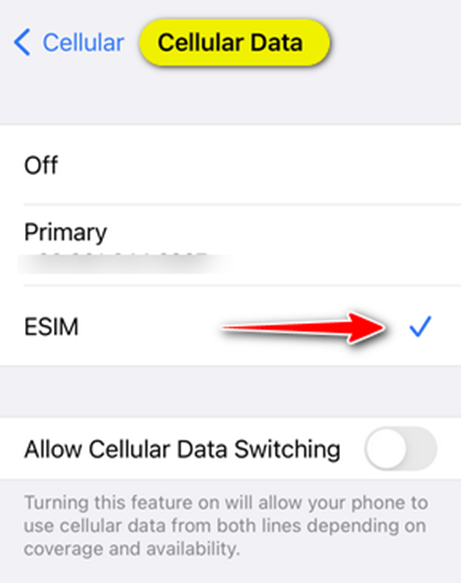
Set Default Line to "Primary" > Tap "Continue"
Set iMessage & FaceTime to "Primary" > Tap "Continue"
Set Mobile Data to your previously chosen esim label, in this example "My eSIM"
Allow Mobile Data Switching is defaulted to off, choose you preference using the toggle > Tap "Done"
"Allow Mobile Data Switching" will allow your device to use mobile data from both lines depending on coverage and availability. You can change your selection later in settings.
Step 5. The eSIM is now installed and configured.
Important: Data Roaming MUST be ENABLED in order for the eSIM to work
Go to "Settings" > Tap "Mobile / Cellular Data" > Select desired SIM > Move the toggle switch to "On"
Don't forget to turn on "Data Roaming" after install!
Manual eSIM Install
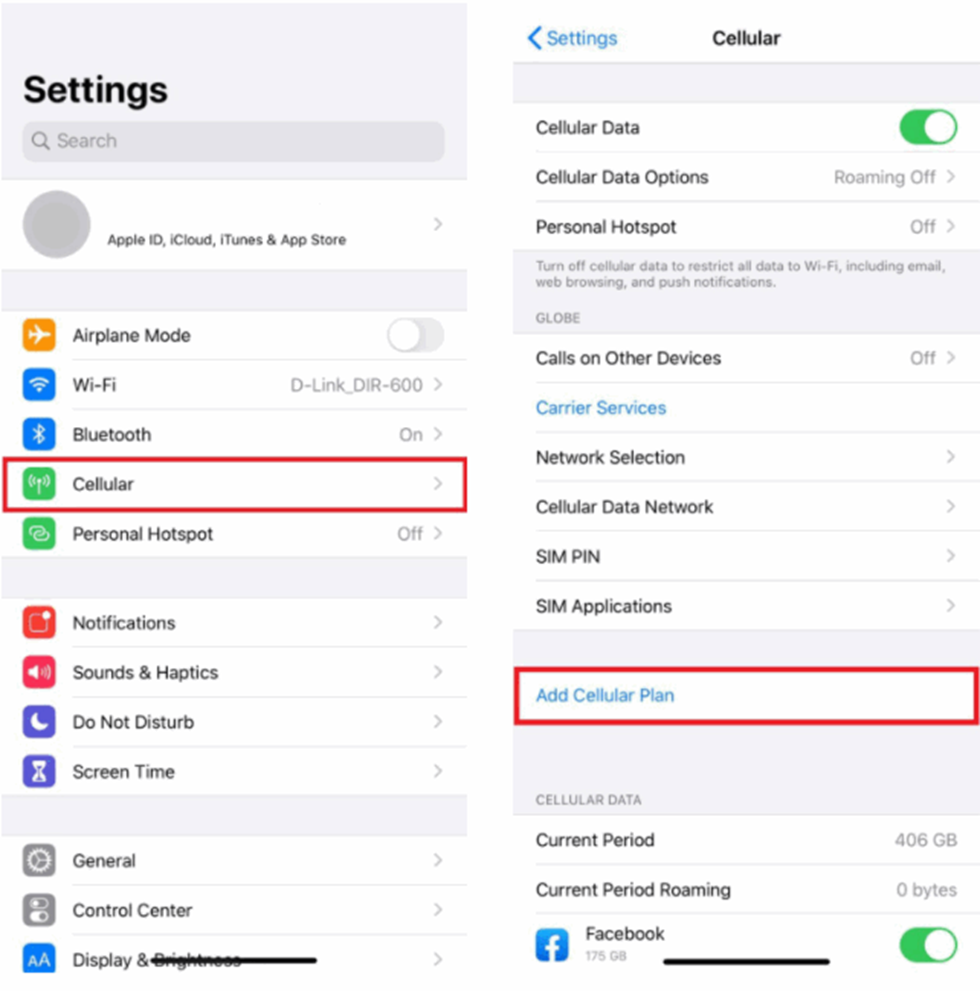
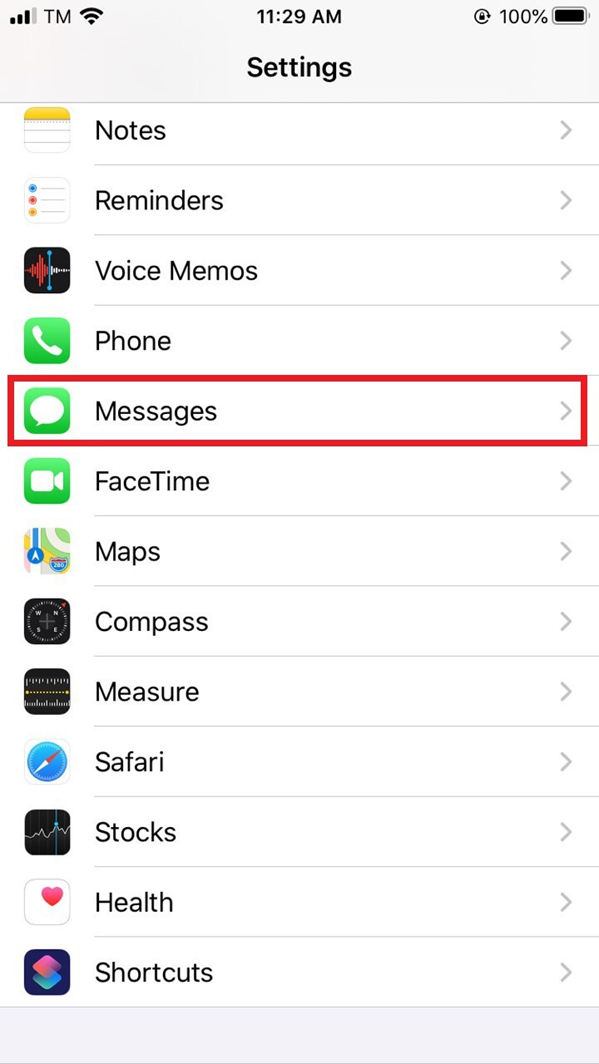
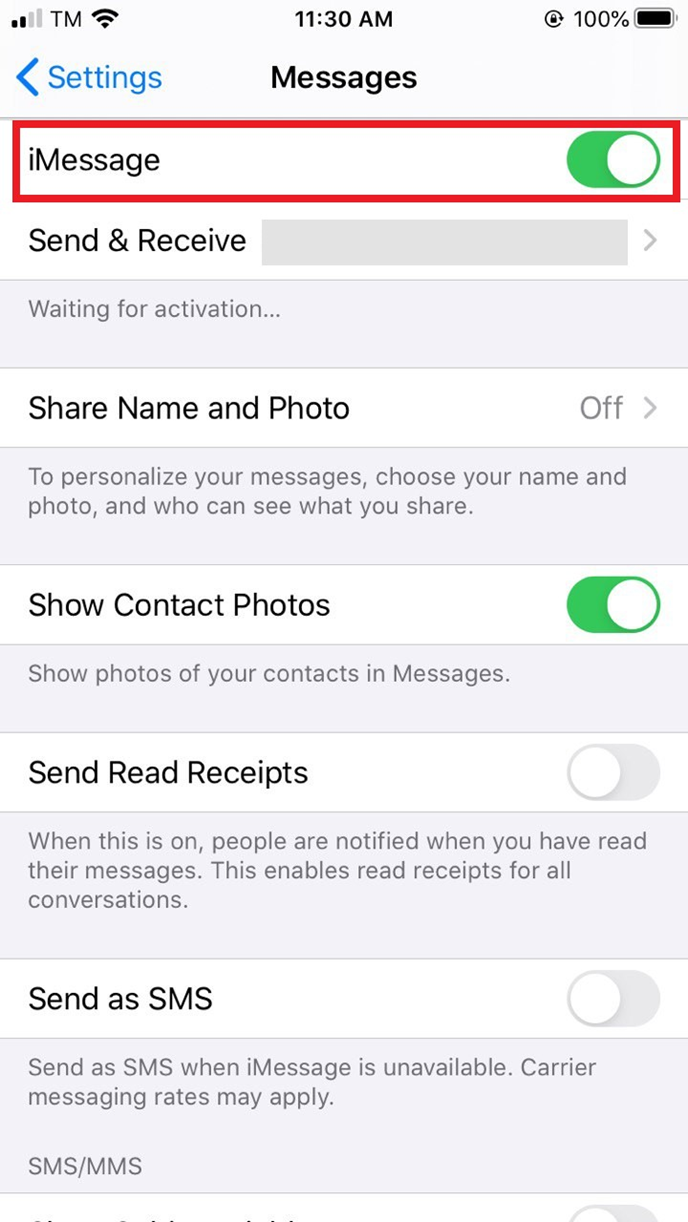
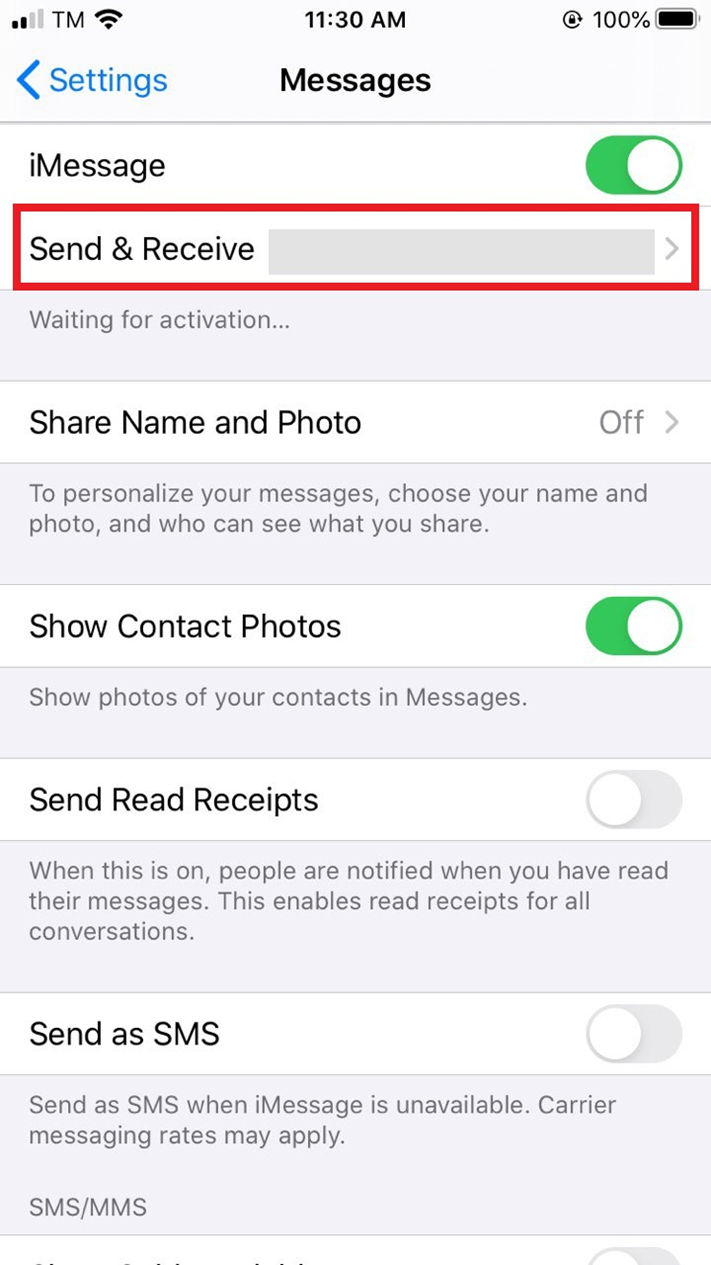
Step 1. Go to "Settings" > Tap "Mobile / Cellular Data"
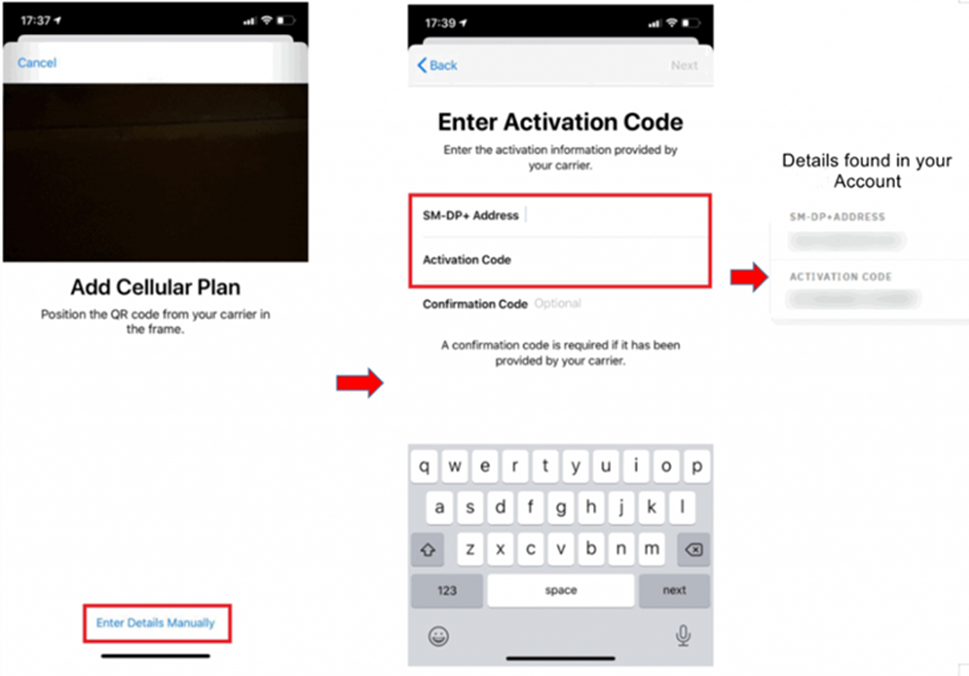
Step 2. Tap "Add eSIM" > Tap "Use QR Code" > Tap "Enter Details Manually"
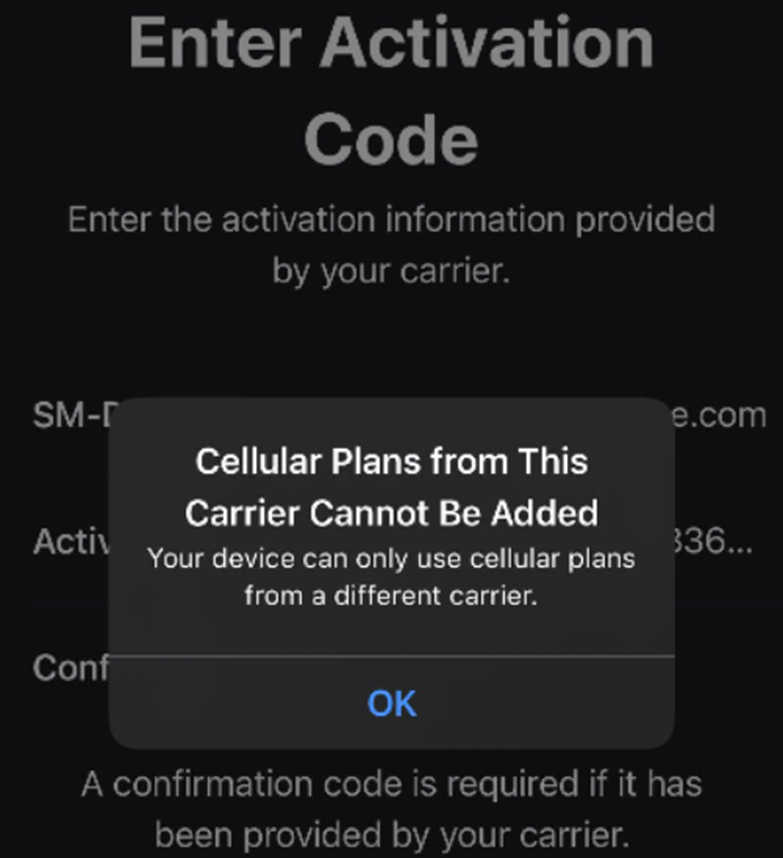
Step 3. Enter the "SMDP Address" and the "Activation Code" provided > Tap "Next"
Leave "Confirmation Code" blank
Step 4. Tap "Continue" > Allow up to 10 minutes for the eSIM to Activate > Tap "Done"
Step 5. There are two options available at this stage, we advise proceeding with option 5.1)
Either
5.1) Tap "Continue" and then move to Step 6.
or
5.2) You have the option to modify the "eSIM Label" (the name of the eSIM) instead of using the default name.
If you would like to modify the eSIM label before moving to the next step;
Tap ">" (the right hand arrow) > Then either choose one of the preset label's or type the name you want to use in the "Custom Label" box > Tap "Done" > Tap "Continue"
In this example the name of the esim was changed to "My eSIM" using the custom label box.
Please note; Option 5.2) won't be offered to you if you have more than one eSIM already installed on your device, so a custom label can only be altered after the SIM install is complete.
Step 6. Configure the following settings as suggested:
Set Default Line to "Primary" > Tap "Continue"
Set iMessage & FaceTime to "Primary" > Tap "Continue"
Set Mobile Data to your previously chosen esim label, in this example "My eSIM"
Allow Mobile Data Switching is defaulted to off, choose you preference using the toggle > Tap "Done"
"Allow Mobile Data Switching" will allow your device to use mobile data from both lines depending on coverage and availability. You can change your selection later in settings.
Step 7. The eSIM is now installed and configured.
Important: Data Roaming MUST be ENABLED in order for the eSIM to work
Go to "Settings" > Tap "Mobile / Cellular Data" > Select desired SIM > Move the toggle switch to "On"
How do I check if my Android device supports eSIM?
Whether a device is eSIM-compatible depends on whether the manufacturer includes an eSIM in their devices. That is why we have a list of eSIM-compatible devices for easy checking.
However, there are some cases when a device doesn't support eSIM technology, even if it is listed as eSIM-capable.
Android is an open-source operating system, meaning any mobile device manufacturer or carrier can customize it. In some countries and regions, there may be models released without eSIM capability. Or the carrier you purchased your device from may not have an eSIM feature enabled.
Follow the steps below to check if your Android device supports eSIM technology. Please keep in mind the steps may or may not be applicable to your device. The best way to confirm eSIM capability is still through your device manufacturer, vendor, or primary carrier.
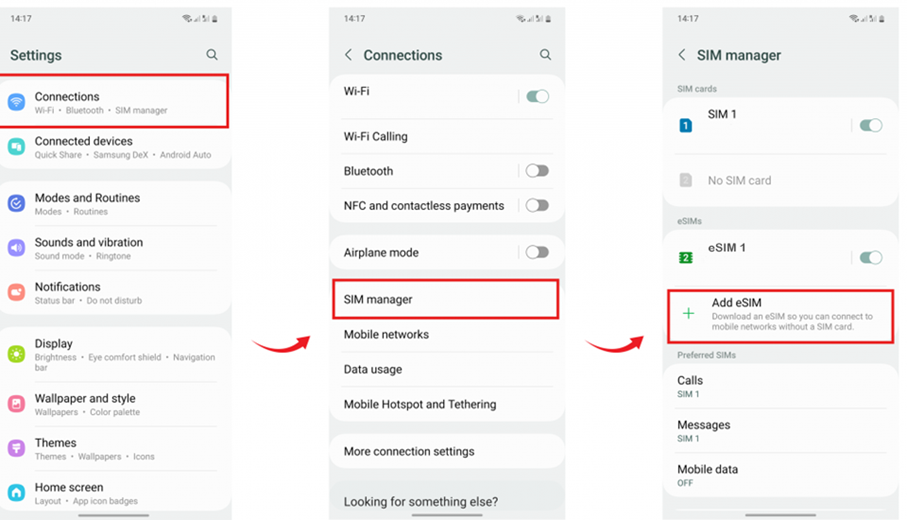
For Samsung Galaxy devices:
1. OPEN the Settings app, then TAP Connections.
2. TAP SIM Manager.
3. If Add eSIM is available, your device likely supports eSIMs.
image.png327.94 KBRemember to contact your provider or device manufacturer to confirm if the above steps are possible for your device.
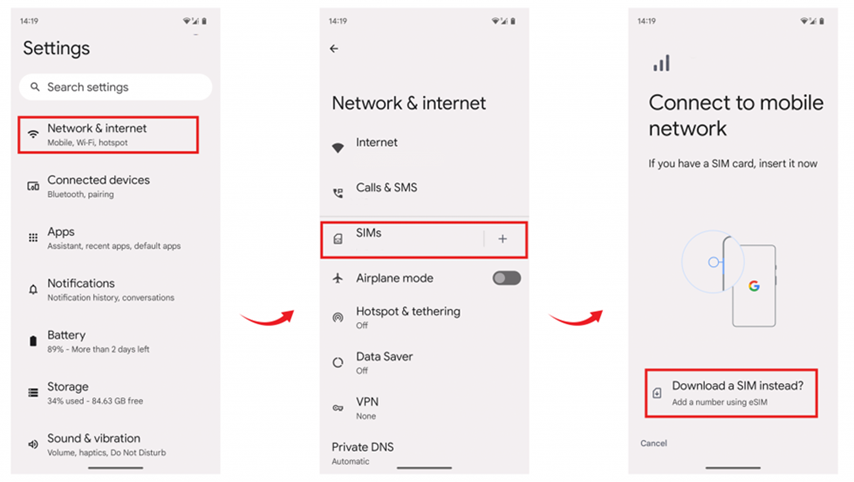
For Google Pixel devices:
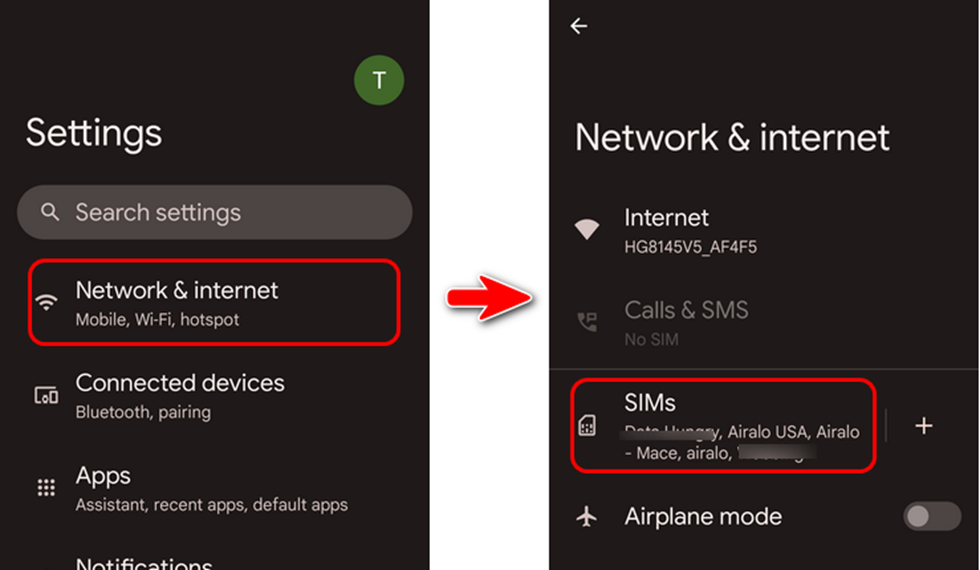
1. OPEN the Settings app, then TAP Network & Internet.
2. TAP the + sign beside SIMs.
• If the Connect to mobile network page has a "Download a SIM instead?" option, your device is eSIM-capable.
image.png311.19 KBRemember to contact your provider or device manufacturer to confirm if the above steps are possible for your device.
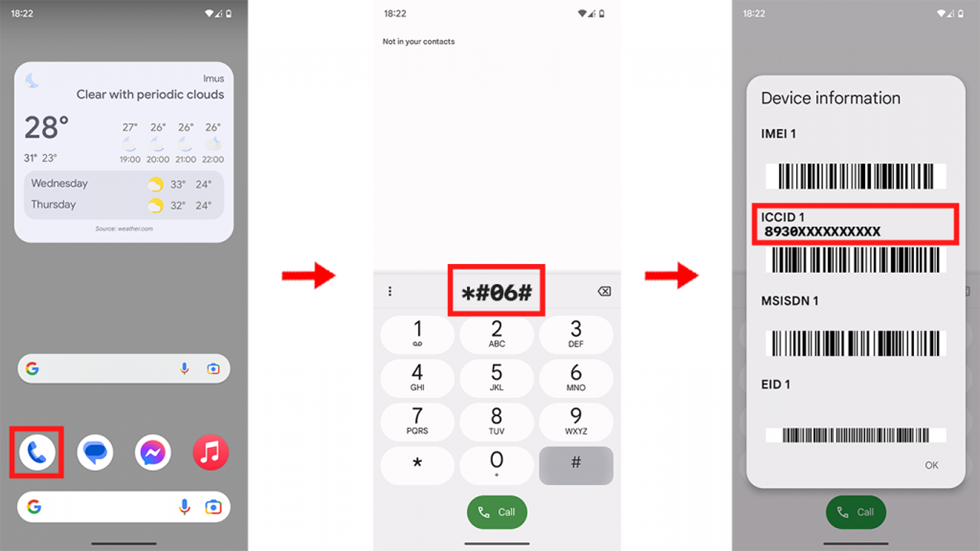
For other Android devices:
1. DIAL *#06# and press the call button.
2. If your device is eSIM-compatible, you should be able to view your device's eSIM unique identification number (EID).
image.png471.75 KBYour device also must be carrier-unlocked to use an eSIM. This enables you to use multiple SIM and/or eSIMs from different carriers. Follow these steps to check if your Android device is unlocked.
1. Remove your phone's SIM card.
2. Replace the SIM card with the other SIM card from a different carrier.
3. You can now see that the carrier's name at the top of your home screen has changed.
4. Now dial a call.
If the call connects, your phone is unlocked. If you can't make a call right now, the phone is locked to the first carrier. At this moment, you may also see a notice on the screen saying that the phone is locked.
Remember to check with your device manufacturer, vendor, or primary carrier to confirm eSIM capability if you're still unsure.
If you have any questions, please feel free to contact our support team, and we'll be happy to help!
How do I check if my iOS device supports eSIM?
Whether a device is eSIM-compatible depends on whether the manufacturer includes an eSIM. That's why we have a list of eSIM-compatible devices for easy checking.
In some countries and regions, there may be models released without eSIM capability. Or, the carrier you purchased your device from may not have an eSIM feature enabled.
Follow the steps below to check if your iOS device supports eSIM technology. Please remember that the steps may or may not apply to your device. The best way to confirm eSIM capability is still through your device manufacturer, vendor, or primary carrier.
For iPhone:
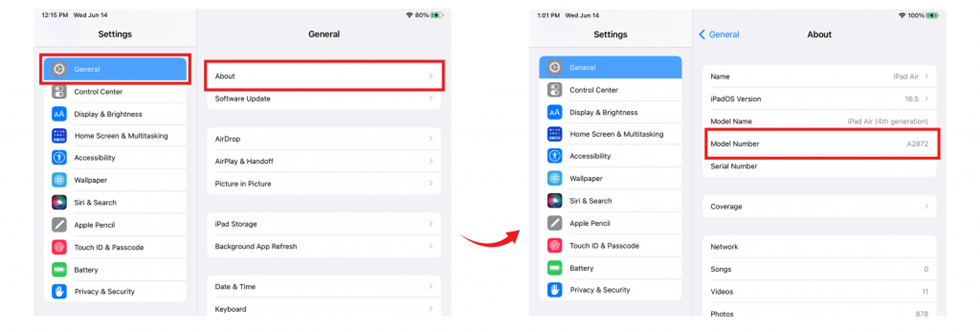
1. OPEN the Settings app, then TAP General.
2. TAP About.
3. TAP the Model Number until it changes to an AXXXX combination.
4. VERIFY that the Model Number of your iPhone does not originate from a Chinese region. This information can be found in this link.
image.png410.87 KBIf the model number does not match any of the China mainland, Hong Kong, and Macao devices, your device should be eSIM-compatible. Next, find out if your iPhone is carrier-locked or -unlocked by following the steps below.
1. OPEN the Settings app, then TAP General.
2. TAP About.
3. SCROLL and look for the Carrier Lock field. Your iPhone is unlocked if No SIM restrictions appear next to Carrier Lock.
3. TAP the Model Number until it changes to an AXXXX combination.
4. VERIFY that the Model Number of your iPad does not originate from a Chinese region. This information can be found in this link.
image.png196.31 KBIf the model number does not match any of the China mainland, Hong Kong, and Macao variants, your device should be eSIM-compatible as long as it supports cellular functionality.
Remember to check with your device manufacturer, vendor, or primary carrier to confirm eSIM capability if you're still unsure.
If you have any questions, please feel free to contact our support team, and we'll be happy to help!
How do I install and set up an eSIM on my iOS device?
Please check the following items in order to guarantee that you are able to successfully install and set up your eSIM:
Use your printed QR code or another device that displays the QR code to scan your eSIM QR Code
image.png166.69 KB5. If prompted, enter the 4-digit confirmation code. You can skip this step if you are not provided with the confirmation code.
6. Choose a label or customized label for your eSIM.
7. Under the Default Line page, select your eSIM for cellular data only
8. You should see your new eSIM under your Cellular Data or Mobile Data Plans.
IV. ACCESSING DATA (QR CODE OR MANUAL METHOD)
After installing your eSIM, you must also make the necessary adjustments for connecting as required on your eSIM installation page.
1. On your device, go to Settings>Cellular or Settings>Mobile.
2. Tap on your newly installed eSIM plan.
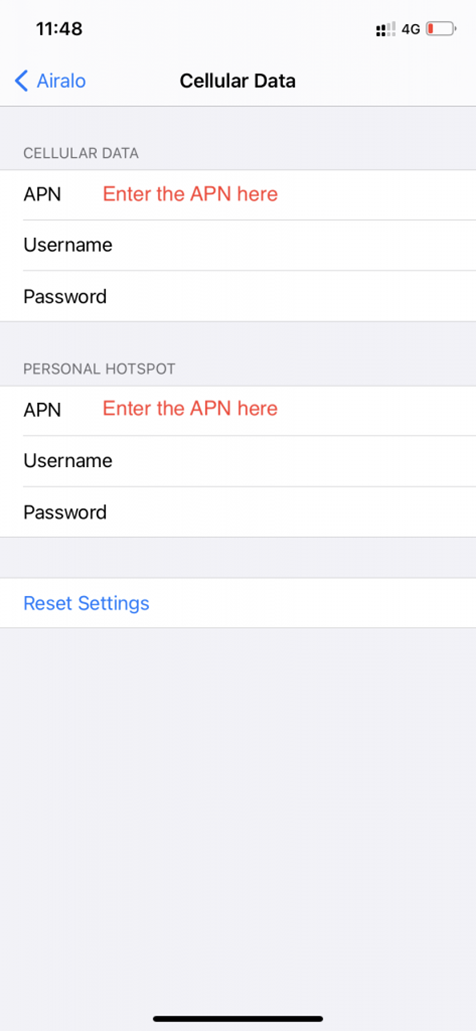
image.png111.9 KB3. Toggle TURN ON THIS LINE for your eSIM and enable the Data Roamingimage.png308.41 KB4. On the same page, tap on CELLULAR DATA NETWORK OR MOBILE DATA NETWORK. Type the APN(access point name) on the field provided on your device if required. You can find the APN details in the eSIM installation details on your Telemeteor Account.image.png328.39 KB
5. Go back to Settings>Cellular or Settings>Mobile.
6. Select your eSIM for Cellular Data or Mobile Data. Be sure to turn OFF "Allow Cellular Data Switching" to avoid charges on your other line.
7. Go to your eSIM settings and select the supported network.
If you have any questions, please feel free to contact support.
Is there an eSIM for the country I need?
We likely have the eSIM you’re looking for! Telemeteor offers coverage in over 200 countries and regions. Just visit our homepage and enter your desired country to view the available eSIM plans.
If you have any questions, please feel free to contact support.
How do I install and set up an eSIM on my Android device?
This guide will walk you through installing an eSIM on an Android device. The steps are based on a Samsung Galaxy S21 running Android 13, but the process is similar for most Android devices.
Installation Methods
You can install the eSIM using one of two methods:
1. QR Code Installation (Recommended)
2. Manual Installation
Before You Start
Make sure you have:
✅ A strong internet connection (WiFi or stable 4G)
✅ An eSIM-compatible device (Check compatible devices [here])
✅ An unlocked device (Check if your device is unlocked [here])
🔹 Important: After installation, turn on Data Roaming for the eSIM to work properly.
Method 1: Install Using a QR Code
Step 1: Scan the QR Code
You can scan the QR code in two ways:
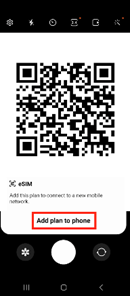
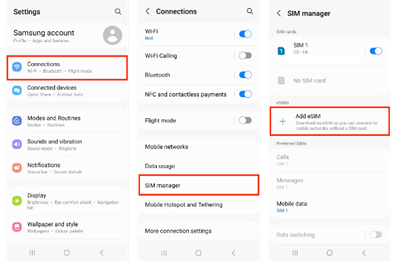
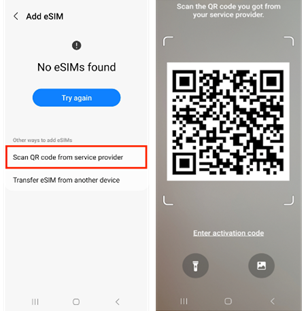
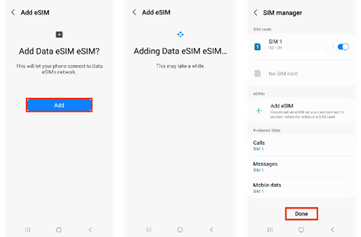
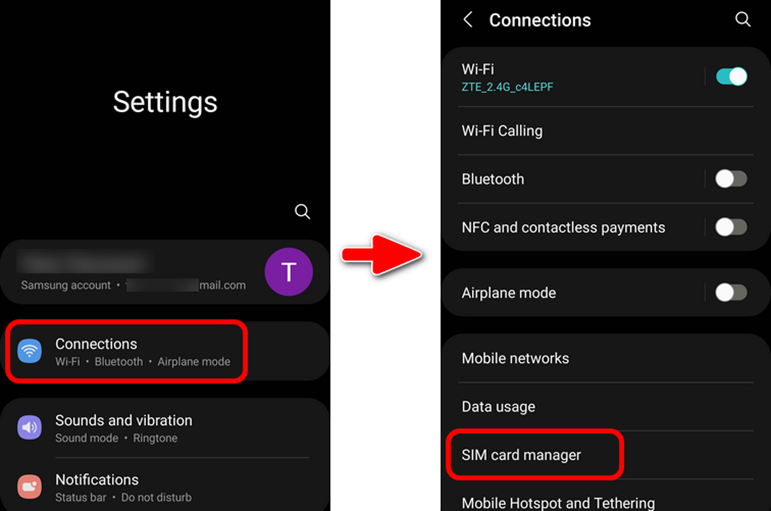
🔹 Option 1: Open Camera > Scan QR Code > Tap “Add plan to phone”
image.png17.68 KB🔹 Option 2: Go to Settings > Connections > SIM Manager > Add eSIMimage.png43.65 KBThen select “Scan QR code from service provider” and scan the QR code provided.image.png72.83 KBStep 2: Add the eSIMimage.png21.3 KBTap “Add”, then wait up to 10 minutes for activation. Once complete, tap “Done”.
Step 3: Configure eSIM Settings
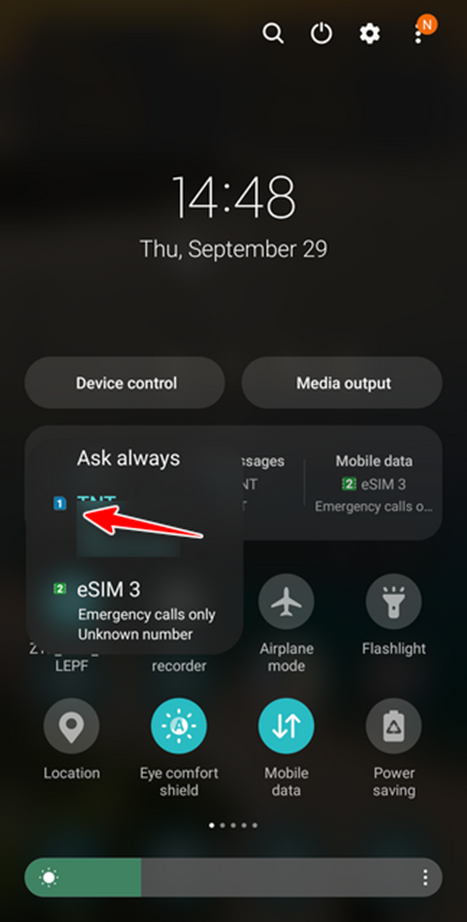
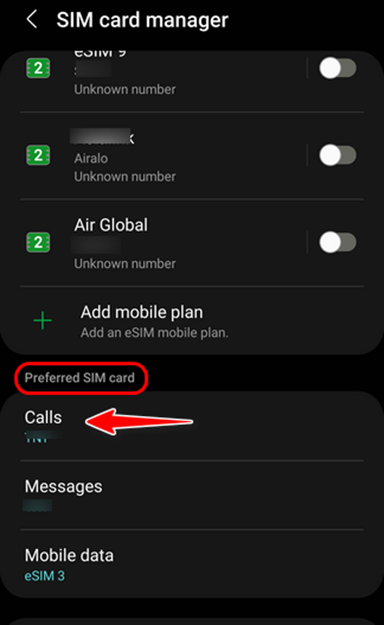
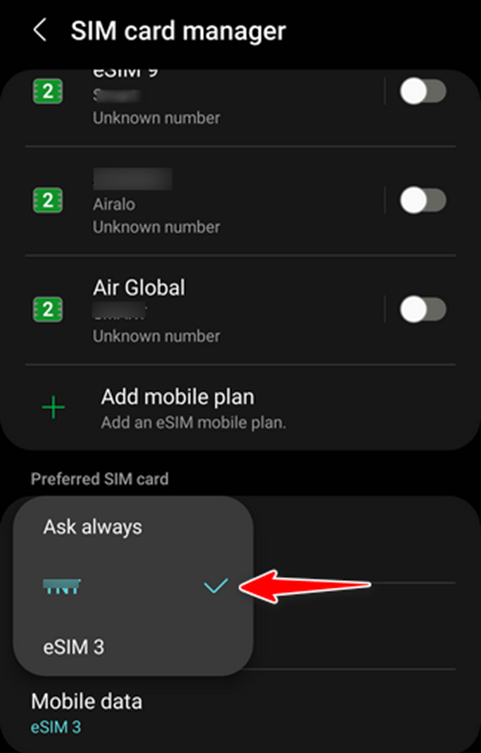
1. Calls & Messages: Keep these set to your primary SIM.
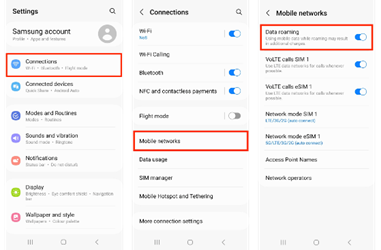
2. Mobile Data: Go to Settings > Connections > SIM Manager > Mobile Data > Select the eSIM > Tap “Change”.
All our eSIMs have an automatic Access Point Name (APN), so manual setup isn’t required.
However, if you’d like to check or configure it manually, follow these steps:
For iOS:
1️⃣ Settings > Mobile/Cellular Data
2️⃣ Select your eSIM under Mobile/Cellular Data Plans
3️⃣ Tap Mobile/Cellular Data Network
4️⃣ In the APN field, enter: data.esim
(Leave other fields blank)
For Android:
1️⃣ Settings > Network & Internet
2️⃣ Select Mobile Networks
3️⃣ Tap Access Point Names (APN)
4️⃣ Enter APN: data.esim
(Leave other fields blank)
Your eSIM should now be ready to connect! 🚀
My account & Telemoney
Telemoney is an in-app reward currency that can be used for future purchases. You earn Telemoney as a reward for:
Purchasing eSIMs
Topping-up your eSIMs
Referring friends
Promotional offers
It’s our way of saying thank you! If you would like to only use Telemoney to purchase a new eSIM, you can use the Telemoney Pay by selecting “Apply Code/Use Telemoney” at the checkout. If you wish to combine Telemoney with another payment method, you can simply choose the desired payment method and select "Apply Code/ Use Telemoney" to enter the Telemoney amount you wish to use. Your Telemoney does not expire, which means you can use it whenever you like!
Please note, Telemoney is marked to the United States dollar (USD). Telemeteor uses a third-party service to calculate exchange rates — if you update your currency, your Telemoney balance will convert based on the current rate.
If you have any questions, please feel free to contact support.
Loyalty Program Overview
The Telemeteor loyalty program rewards returning customers with “TeleMoney” credits in their user accounts. These credits can be used for discounts on future purchases, with 1 TeleMoney equal to 1 USD. TeleMoney cannot be exchanged for cash and can only be used for eSIM purchases on the Telemeteor website. TeleMoney does not expire.
TeleMoney is credited in the following cases:
• Purchases made while logged into a user account (based on loyalty level).
• Account registration.
• Using a promotional code.
• Sharing an invitation code that leads to a purchase by the invited user.
Loyalty Levels
The more a customer spends, the higher their loyalty level, which increases the TeleMoney they earn per purchase. The total purchase amount (before redeeming TeleMoney) is used to calculate loyalty levels. For example, if a customer spends $10 and redeems 10 TeleMoney, the purchase still counts as $10.
The system reviews loyalty levels daily, considering the total amount spent in the past 365 days to determine the user’s current level.
Premium Level
• Criteria: Available to all registered users.
• Reward: 5% of the purchase amount credited as TeleMoney.
• This level is permanent and does not expire.
Exclusive Level
• Criteria: Spend $100 or more in the past 365 days (before redeeming TeleMoney).
• Reward: 10% of the purchase amount credited as TeleMoney.
Elite Level
• Criteria: Spend $300 or more in the past 365 days (before redeeming TeleMoney).
• Reward: 15% of the purchase amount credited as TeleMoney.
Privilege Level (Custom Partner Loyalty Level)
• Criteria: Assigned by admin for selected users or partners.
• A custom percentage of TeleMoney credit or a percentage discount on the total purchase.
• The Privilege Level can have an expiry date according to agreement with partner. After that regular loyalty levels apply.
Using TeleMoney
TeleMoney acts as a virtual credit replacing percentage-based or fixed-amount discounts in the loyalty program.
• Value: 1 TeleMoney equals 1 USD.
• Usage: Registered users automatically receive TeleMoney credits after purchases, visible in their profiles.
• Redemption: TeleMoney can be used during checkout, up to the total purchase amount. It cannot be exchanged for cash.
TeleMoney for Registration
If there is a “New Registration” bonus campaign, every new user will get a bonus. If there is no campaign, no bonus will be given.
TeleMoney for Referrals
If there is a “Referral Bonus” campaign users can invite others to join telemeteor.com. They will earn TeleMoney bonuses if the invited user registers and makes a purchase within one week.
TeleMoney for Promotional Codes or Coupons
Sometimes, special promotional codes are available for specific users or everyone. Each code can be used only once per user. Visit telemeteor.com regularly to find new discounts or codes.
Tips & Tricks
Direct Install - Installing eSIM(s) On An Apple Device Using Universal Link (iOS 17.4 and above)
With iOS 17.4 and above, Apple have introduced the ability for users to install their eSIM directly onto their device by clicking a simple link.
The Universal Link install method works by adding the unique SMDP+ address and Activation Code onto the end of a universal link.
Clicking this link from an iOS 17.4 (or above) device begins the installation using the specific LPA information and you will be taken straight to the installation screen below.
Installing eSIM(s) On An Apple Device
This help guide walks you through the steps required to install an eSIM on an Apple Device.
There are three install options offered in this help guide, either "install using a QR code", "install using Apple Quick Install URL" or "manual install"
Before starting the install, it is important you have the following three components:
A strong internet connection - Ideally using a Wifi network or a good 4G connection
An eSIM compatible device - If unsure, a list of compatible devices is provided here
The device is not locked to one particular network - If unsure, an article has been provided to talk you through how to determine the "locked / unlocked" status of a device, click here (ellenőrizni)
Don't forget to turn on "Data Roaming" after install!
Install Using A QR Code
There are two options available when scanning the QR code to install an eSIM;
Step 1.
Either
1.1) Open the camera on your device > Scan the QR code > Tap "Mobile Plan"
Or
1.2) Go to "Settings" > Tap "Mobile / Cellular Data" > Tap "Add eSIM" > Tap "Use QR Code" > Scan the QR code provided
Step 2. Tap "Continue" > Allow up to 10 minutes for the eSIM to Activate > Tap "Done"
Step 3. There are two options available at this stage, we advise proceeding with option 3.1)
Either
3.1) Tap "Continue" and then move to Step 4.
or
3.2) You have the option to modify the "eSIM Label" (the name of the eSIM) instead of using the default name.
If you would like to modify the eSIM label before moving to the next step;
Tap ">" (the right hand arrow) > Then either choose one of the preset label's or type the name you want to use in the "Custom Label" box > Tap "Done" > Tap "Continue"
In this example the name of the esim was changed to "My eSIM" using the custom label box.
Please note; Option 3.2) won't be offered to you if you have more than one eSIM already installed on your device, so a custom label can only be altered after the SIM install is complete.
Step 4. Configure the following settings as suggested:
Set Default Line to "Primary" > Tap "Continue"
Set iMessage & FaceTime to "Primary" > Tap "Continue"
Set Mobile Data to your previously chosen esim label, in this example "My eSIM"
Allow Mobile Data Switching is defaulted to off, choose you preference using the toggle > Tap "Done"
"Allow Mobile Data Switching" will allow your device to use mobile data from both lines depending on coverage and availability. You can change your selection later in settings.
Step 5. The eSIM is now installed and configured.
Important: Data Roaming MUST be ENABLED in order for the eSIM to work
Go to "Settings" > Tap "Mobile / Cellular Data" > Select desired SIM > Move the toggle switch to "On"
Don't forget to turn on "Data Roaming" after install!
Manual eSIM Install
Step 1. Go to "Settings" > Tap "Mobile / Cellular Data"
Step 2. Tap "Add eSIM" > Tap "Use QR Code" > Tap "Enter Details Manually"
Step 3. Enter the "SMDP Address" and the "Activation Code" provided > Tap "Next"
Leave "Confirmation Code" blank
Step 4. Tap "Continue" > Allow up to 10 minutes for the eSIM to Activate > Tap "Done"
Step 5. There are two options available at this stage, we advise proceeding with option 5.1)
Either
5.1) Tap "Continue" and then move to Step 6.
or
5.2) You have the option to modify the "eSIM Label" (the name of the eSIM) instead of using the default name.
If you would like to modify the eSIM label before moving to the next step;
Tap ">" (the right hand arrow) > Then either choose one of the preset label's or type the name you want to use in the "Custom Label" box > Tap "Done" > Tap "Continue"
In this example the name of the esim was changed to "My eSIM" using the custom label box.
Please note; Option 5.2) won't be offered to you if you have more than one eSIM already installed on your device, so a custom label can only be altered after the SIM install is complete.
Step 6. Configure the following settings as suggested:
Set Default Line to "Primary" > Tap "Continue"
Set iMessage & FaceTime to "Primary" > Tap "Continue"
Set Mobile Data to your previously chosen esim label, in this example "My eSIM"
Allow Mobile Data Switching is defaulted to off, choose you preference using the toggle > Tap "Done"
"Allow Mobile Data Switching" will allow your device to use mobile data from both lines depending on coverage and availability. You can change your selection later in settings.
Step 7. The eSIM is now installed and configured.
Important: Data Roaming MUST be ENABLED in order for the eSIM to work
Go to "Settings" > Tap "Mobile / Cellular Data" > Select desired SIM > Move the toggle switch to "On"
Loyalty Program Overview
The Telemeteor loyalty program rewards returning customers with “TeleMoney” credits in their user accounts. These credits can be used for discounts on future purchases, with 1 TeleMoney equal to 1 USD. TeleMoney cannot be exchanged for cash and can only be used for eSIM purchases on the Telemeteor website. TeleMoney does not expire.
TeleMoney is credited in the following cases:
• Purchases made while logged into a user account (based on loyalty level).
• Account registration.
• Using a promotional code.
• Sharing an invitation code that leads to a purchase by the invited user.
Loyalty Levels
The more a customer spends, the higher their loyalty level, which increases the TeleMoney they earn per purchase. The total purchase amount (before redeeming TeleMoney) is used to calculate loyalty levels. For example, if a customer spends $10 and redeems 10 TeleMoney, the purchase still counts as $10.
The system reviews loyalty levels daily, considering the total amount spent in the past 365 days to determine the user’s current level.
Premium Level
• Criteria: Available to all registered users.
• Reward: 5% of the purchase amount credited as TeleMoney.
• This level is permanent and does not expire.
Exclusive Level
• Criteria: Spend $100 or more in the past 365 days (before redeeming TeleMoney).
• Reward: 10% of the purchase amount credited as TeleMoney.
Elite Level
• Criteria: Spend $300 or more in the past 365 days (before redeeming TeleMoney).
• Reward: 15% of the purchase amount credited as TeleMoney.
Privilege Level (Custom Partner Loyalty Level)
• Criteria: Assigned by admin for selected users or partners.
• A custom percentage of TeleMoney credit or a percentage discount on the total purchase.
• The Privilege Level can have an expiry date according to agreement with partner. After that regular loyalty levels apply.
Using TeleMoney
TeleMoney acts as a virtual credit replacing percentage-based or fixed-amount discounts in the loyalty program.
• Value: 1 TeleMoney equals 1 USD.
• Usage: Registered users automatically receive TeleMoney credits after purchases, visible in their profiles.
• Redemption: TeleMoney can be used during checkout, up to the total purchase amount. It cannot be exchanged for cash.
TeleMoney for Registration
If there is a “New Registration” bonus campaign, every new user will get a bonus. If there is no campaign, no bonus will be given.
TeleMoney for Referrals
If there is a “Referral Bonus” campaign users can invite others to join telemeteor.com. They will earn TeleMoney bonuses if the invited user registers and makes a purchase within one week.
TeleMoney for Promotional Codes or Coupons
Sometimes, special promotional codes are available for specific users or everyone. Each code can be used only once per user. Visit telemeteor.com regularly to find new discounts or codes.
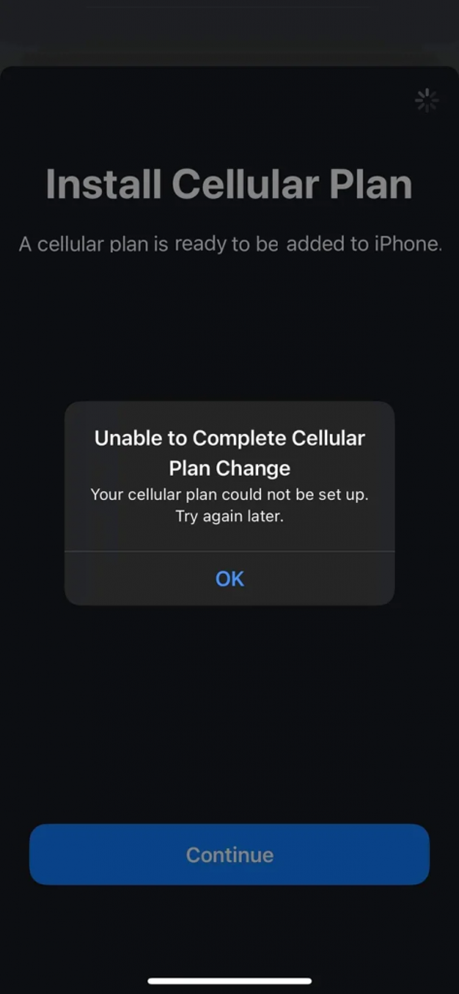
Can I Install One eSIM on Several Devices?
No, you cannot install one eSIM on multiple devices simultaneously. When you activate an eSIM, the mobile network provider registers the eSIM’s unique identification number (EID) with the device manufacturer. This EID is a unique identifier that cannot be duplicated or shared across different devices.
As a result, you can only use an eSIM on one device at a time. If you wish to use the same eSIM on a different device, you will need to uninstall it from the original device first and then install it on the new device.
Can I Keep Using the Same eSIM?
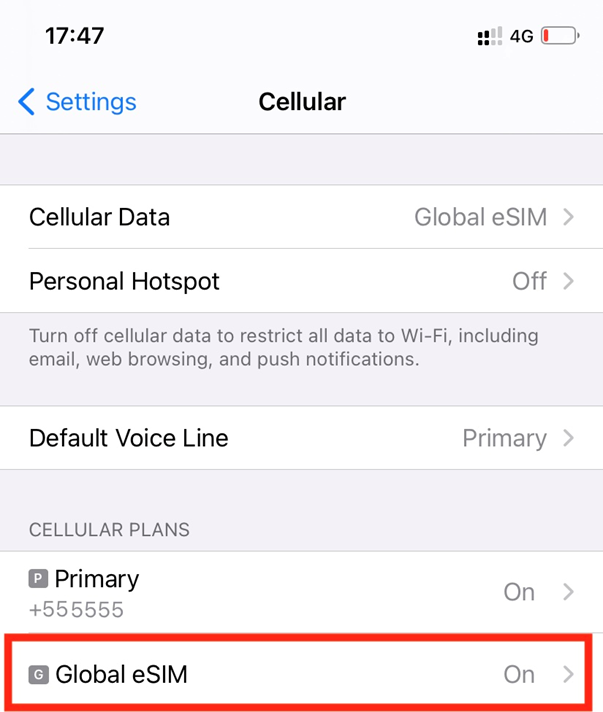
You can continue using your eSIM if:
✅ It is installed on your device.
✅ You are in a supported country.
✅ There are top-up options available for your eSIM.
If your eSIM allows top-ups, you can buy additional data and keep using it. Do not delete the eSIM—you can simply turn it OFF under Cellular Data Plans when not in use.
When you cannot reuse your eSIM:
❌ No top-up options are available.
❌ You want to use it in an unsupported country.
❌ Your eSIM has been expired
You can also check the expiration date of your eSIM under My eSIMs at telemeteor.com.
If your eSIM is for one-time use, you can remove it once the data is used up or expired.
🔹 Quick Tip:
• Local eSIMs work in one country.
• Regional & Global eSIMs support multiple countries.
Can I Send SMS or Make Phone Calls Using My eSIM?
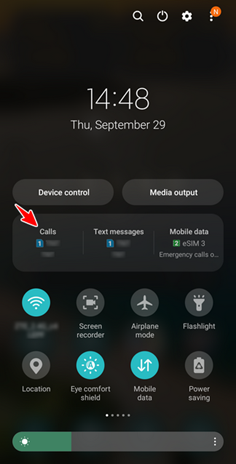
No, our eSIMs are data-only, meaning you cannot make phone calls or send SMS messages directly through them. However, you can use internet-based messaging and calling services, such as WhatsApp or FaceTime, by utilizing the mobile data provided by your eSIM.
Can I Still Use My Home SIM Card with My eSIM?
Yes, you can use your home SIM card along with an eSIM if your device supports dual SIM functionality. Dual SIM devices let you use both a physical SIM card and an eSIM, allowing you to manage two phone numbers or networks on one device.
To use both, make sure your device is compatible with dual SIM and eSIM functionality and is set up to support both simultaneously. Once both are active, you can choose which SIM to use for calls, messages, and data. You can set a default SIM for each function or decide on a per-call or per-message basis.
Keep in mind that using both SIMs at once may reduce battery life and could impact network performance if both are in heavy use. Many travelers find it useful to use an eSIM for data services while keeping voice and SMS on their home SIM, which can significantly reduce data roaming costs.
Can I Use My eSIM for a Personal Hotspot or Tethering?
Yes, you can use your eSIM’s data connectivity to create a personal hotspot and share your internet connection with other devices.
• On iOS: Go to the Settings app, then select Personal Hotspot to set it up.
• On Android: Navigate to Settings and then select Wi-Fi Hotspot to configure your hotspot settings.
This allows you to share your eSIM data with devices like laptops, tablets, or other smartphones.
Can I Use WhatsApp, Facebook, Instagram, and TikTok with an eSIM?
Yes, you can use WhatsApp, Facebook, Instagram, and TikTok with an eSIM. There are no restrictions on our data bundles, so once you have connectivity from the eSIM, you can connect to the internet and use these applications just as you would with a traditional SIM or Wi-Fi.
Direct Install - Installing eSIM(s) On An Apple Device Using Universal Link (iOS 17.4 and above)
With iOS 17.4 and above, Apple have introduced the ability for users to install their eSIM directly onto their device by clicking a simple link.
The Universal Link install method works by adding the unique SMDP+ address and Activation Code onto the end of a universal link.
Clicking this link from an iOS 17.4 (or above) device begins the installation using the specific LPA information and you will be taken straight to the installation screen below.image.png105.18 KB
Does Having Multiple eSIM Profiles Require Multiple Phone Numbers?
No, multiple eSIM profiles do not require multiple phone numbers. Our eSIMs are data-only, meaning they do not include a phone number and cannot be used for voice calls or SMS.
How You Can Use Multiple eSIMs:
📌 Multiple eSIMs: You can install several eSIMs, each with different data bundles for various regions. Some eSIMs also allow you to add multiple bundles.
📌 eSIM + Physical SIM: Use an eSIM for data while keeping your physical SIM for voice and SMS. Your carrier’s roaming rates will apply for calls and texts.
To stay connected without roaming fees, use data-based apps like WhatsApp for calls and messages.
Does Using an eSIM Use More Battery?
No, an eSIM itself does not drain more battery than a physical SIM. However, certain factors related to network usage can affect battery life:
🔋 What Can Increase Battery Drain?
• Weak Signal: Your device searching for a network in low-coverage areas.
• Heavy Data Use: Streaming, downloading, or frequent online activity.
⚡ Potential Battery Benefits of eSIM:
• No Physical SIM Tray: Allows for better space utilization, possibly leading to larger batteries.
• Smart Network Switching: Some devices optimize battery use by switching between 4G/5G based on signal strength.
📌 Tip: To conserve battery, use WiFi when possible and enable power-saving mode.
How Bundles Work?
Purchasing a Data Bundle
When buying a data bundle, you must select the country or region where you need service. A list of supported countries and networks will be shown during checkout—make sure your destination is included.
📌 Important: If you travel to an unsupported country, your eSIM will not work there.
Data Bundle Validity & Expiry
• Your eSIM profile and data bundle have separate expiration rules.
• eSIMs remain valid for up to 12 months of inactivity before being recycled.
• A data bundle starts its validity when first used and expires based on its time limit (e.g., 7 or 30 days).
🕒 Example:
• A 3GB bundle valid for 30 days starts counting once you begin using it. If you don’t use it, it still expires after 30 days.
• If you use up all your data before the time limit, the bundle expires immediately.
Topping Up Your eSIM
Once a bundle expires, you can top up your eSIM with a new data package to continue using it.
How Easy Is It to Switch Between Multiple SIM Profiles?
Switching between multiple SIM profiles on an eSIM-compatible device is generally quick and straightforward. Once you have set up your eSIM profiles, you can easily switch between them with just a few taps on your screen.
To change your active eSIM profile, go to your device’s settings menu and select the profile you want to activate. While the exact steps may vary based on your device and operating system, the overall process is user-friendly and intuitive.
In summary, switching between eSIM profiles is designed to be easy and seamless, allowing you to manage your connectivity without hassle.
How Long Does an eSIM Take to Arrive and Install?
After purchasing an eSIM bundle, it may take up to 5 minutes for the eSIM and data bundle to be set up. Please allow time for the order confirmation to be sent to the email used at checkout.
The eSIM installation itself is usually quick on most devices, but once installed, it may take a few minutes to activate and connect to a network. Avoid leaving or canceling the installation process, as this could lead to a partial or failed setup.
How Many eSIM Profiles Can Be Stored at Once?
The number of eSIM profiles you can store depends on your device model and region.
📌 Key Points:
• Some devices support only one eSIM profile.
• Others allow multiple profiles to be stored, but only one can be active at a time.
• Certain models let you switch between eSIM profiles for data, calls, and SMS as needed.
Check your device’s specifications to see how many eSIMs it can store and use.
How Many eSIMs Can I Store in My Phone?
The number of eSIMs your phone can store depends on the device model and region.
📌 General Guidelines:
• Apple Devices: Most iPhones and iPads (iPhone X and newer) support multiple eSIMs.
• Android Devices: Storage capacity varies by model and region—some support multiple eSIMs, while others allow only one.
To check your device’s eSIM capacity, refer to its specifications or user manual.
How Much Data Will I Need?
Telemeteor eSIM plans keep you connected during your travels, whether you’re browsing social media, using maps, or streaming. If you’re unsure how much data to purchase, here’s an estimate of data usage for common activities:
*Note: These are average figures, and actual data usage may vary. Streaming in higher definition (HD/UHD) will use significantly more data.
With this guide, you can estimate the right data plan for your needs based on your travel and activity habits.
How to Add Data Plans to an eSIM
To add a data bundle to your eSIM, simply visit the www.telemeteor.com, locate the eSIM you’d like to top-up, and select a data bundle to add. For detailed instructions on topping up with another data bundle, please see our article, How to Top-Up My eSIM.
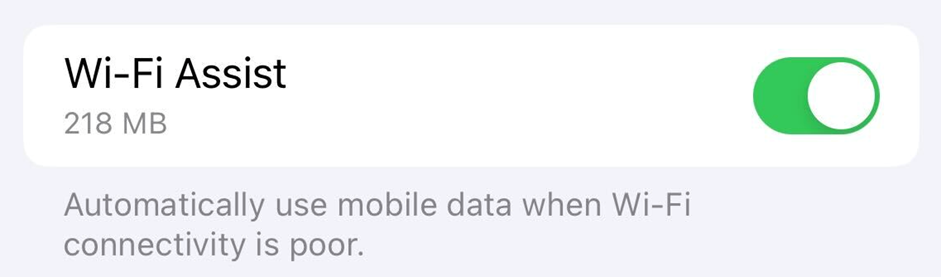
How to Prevent Bundles Starting Early on Apple Devices
Apple can sometimes use a very small amount of mobile data during the installation process. Turning off Wi-Fi Assist will prevent your bundle from starting prematurely.
There is a default setting on iOS devices which can cause bundles to start before they reach the intended destination of the bundle.
This default setting is only used when Wi-Fi connectivity is poor and will disable itself once a stronger Wi-Fi connection is being used.
The setting is called Wi-Fi assist at the bottom of the Mobile Service section.image.png86.85 KB
Tips & Tricks for Using Your eSIM
What is an eSIM?
An eSIM is a built-in digital SIM that works like a physical SIM but takes up no space. It’s eco-friendly and lets you buy, install, and activate mobile data instantly—no more searching for SIM vendors at the airport!
Optimizing Data Usage
Make the most of your data with these simple tips:
• Basic Use: Email, browsing, and social media typically use 1GB/month.
• Video Streaming: Streaming consumes large amounts of data—use SD quality to save data.
• Data-Saving Features:
• Apple: Enable Low Data Mode
• Android: Turn on Data Saver Mode
Avoiding Unexpected Costs
• Disable Data Roaming on your primary SIM to avoid extra charges.
• Your phone may switch networks automatically, so turn off unwanted roaming options.
Data-Saving Tips for Travelers
✅ Plan ahead: Download maps, music, and movies before your trip.
✅ Use offline tools: Consider a physical map or offline apps.
✅ Monitor your data: Set usage alerts or limits.
✅ Turn off Mobile Data when not in use.
✅ Limit video calls & streaming.
✅ Use free Wi-Fi, but avoid sensitive tasks on public networks.
Need unlimited data? Check out our Unlimited Plans for worry-free travel! 🚀
Top Tips for Using Your eSIM Efficiently
Using an eSIM for mobile data is convenient, but managing your data wisely can make it last longer. Follow these tips to optimize your usage:
1. Limit Video Streaming Quality
Streaming quickly consumes data. To reduce usage:
✅ Set video quality to Standard Definition (SD) / 480p in streaming app settings.
✅ Download videos over Wi-Fi instead of streaming.
2. Manage Background Data Usage
Apps running in the background can use data without you noticing. To minimize this:
✅ Disable automatic updates for apps and your operating system.
✅ Turn off background app refresh in settings.
3. Enable Low Data Mode
Low Data Mode helps pause automatic updates and background tasks, reducing unnecessary data use.
How to Enable Low Data Mode:
📱 iPhone
• Go to Settings > Mobile Data
• Select your eSIM
• Tap Data Mode
• Choose Low Data Mode
🤖 Android
• Go to Settings > System Apps Updater
• Tap the three dots in the top-right corner
• Select Settings > Auto Updates
• Set it to Don’t Update
By following these tips, you can maximize your data and avoid unexpected usage! 🚀
Using Mobile Data Abroad
On average, people spend about three hours online daily, but when traveling, this can increase significantly - navigating, finding restaurants, and using translation apps all require data.
For example:
📍 Google Maps: ~1MB per minute
📞 Video Call: Can use hundreds of MBs in one session
If you’re roaming with your regular carrier, data charges can be extreme—up to $15 per MB! That means a single video call could cost hundreds of dollars.
Why Choose a Telemeteor eSIM?
✅ No roaming fees—just pick a data plan that fits your trip
✅ Easy top-ups—add data anytime if needed
✅ Unlimited plans available for worry-free streaming and video calls
With a Telemeteor eSIM, you stay connected without unexpected costs! 🚀
What Happens to Your Voice & SMS When Using an eSIM for Data?
If your phone has a physical SIM for voice and SMS, adding a Telemeteor eSIM for data won’t disrupt your existing services. However, you may need to adjust your device settings to ensure smooth operation.
How to Use an eSIM for Data & Keep Voice/SMS on Your SIM:
Enable Data Roaming on your eSIM to allow data access.
Disable Data Roaming on your physical SIM to avoid unwanted charges.
Keep Calls & Texts on the Physical SIM by setting it as your default for voice and SMS.
💡 Tip: Most modern smartphones support dual-SIM functionality, allowing you to use your physical SIM for calls & texts while your eSIM handles mobile data seamlessly.
For step-by-step setup, check your device settings or refer to your phone’s user manual. 🚀
What Happens to Unused Data?
Each Telemeteor eSIM data bundle comes with a fixed validity period (e.g., 7 days or 30 days). Once this period expires, any unused data is lost.
How to Keep Using Your eSIM:
✅ Top up your eSIM before your current bundle expires.
✅ Reuse the same eSIM—no need to reinstall!
✅ Manage your eSIM & top-ups easily through our portal.
💡 Tip: Keep an eye on your data usage and expiration date under My eSIMs to avoid interruptions! 🚀
When Can I Remove an eSIM?
You can remove an eSIM from your device at any time. However, removing it will disable data services linked to that eSIM. If needed, you can reinstall the eSIM on the same device later.
How to Remove an eSIM:
Open your device’s Settings.
Go toCellular / Mobile Data.
Select the eSIM you want to remove.
Tap “Remove” or “Delete eSIM” and follow the prompts.
💡 Tip: Before removing an eSIM, check if you’ll need it again, as reinstallation is not possible!
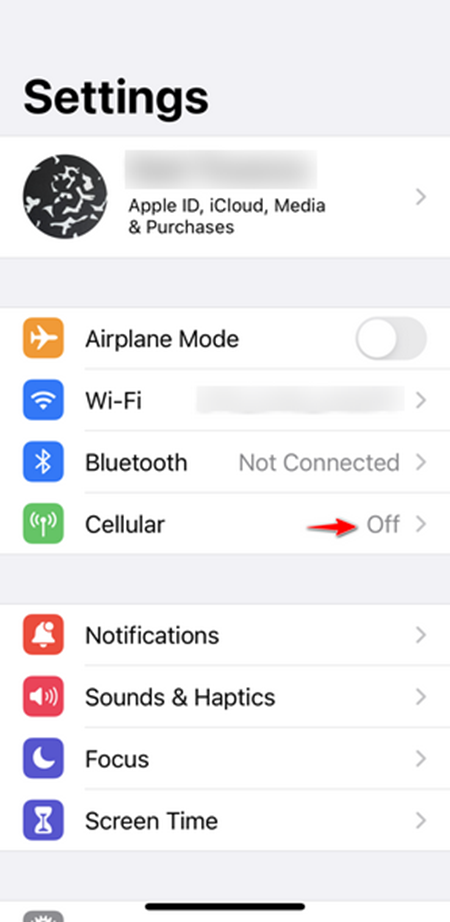
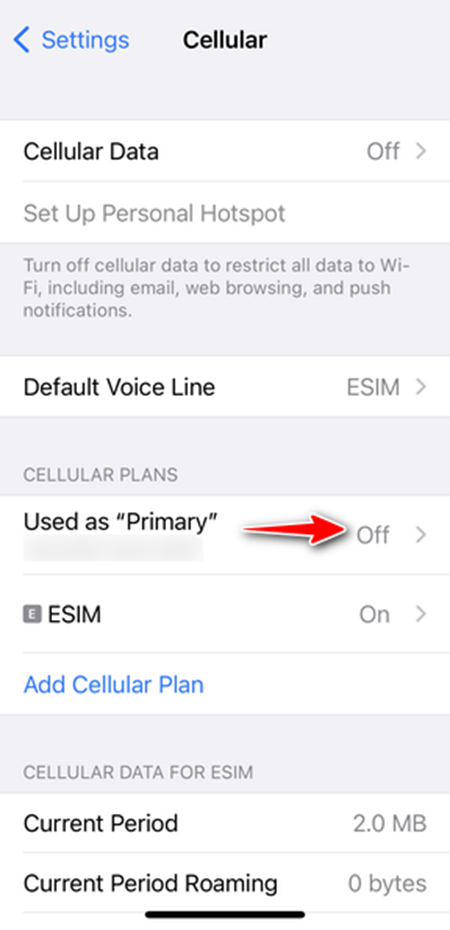
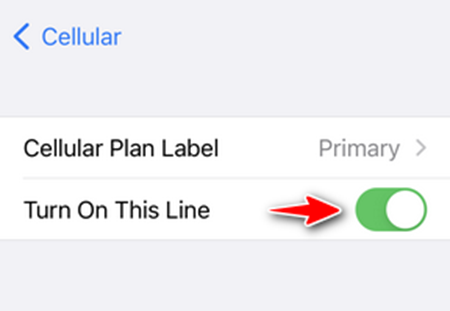
How to Enable or Disable an eSIM on iPhone
Need to temporarily turn off your eSIM? Follow these simple steps:
1️⃣ Open Settings → Tap Mobile Data (or Cellular)
2️⃣ Select Your eSIM from the list of plans
3️⃣ Toggle the Switch:
• Turn Off to disable the eSIM
• Turn On to reactivate it
✅ That’s it! You can now easily manage your eSIM connection.
How to Save and Use Less Data with Your eSIM
Want to make the most of your eSIM data? Here are some simple ways to reduce data usage and avoid overages:
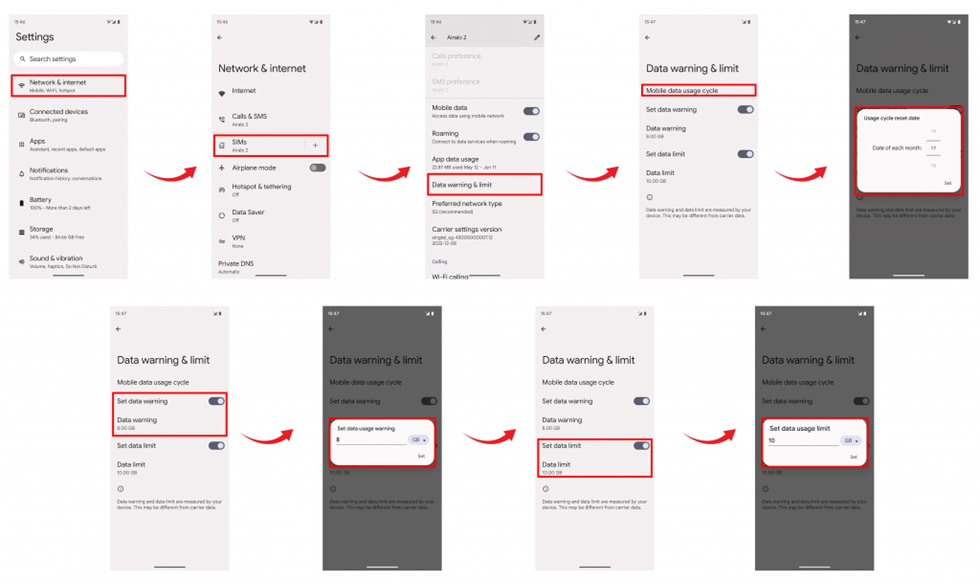
1. Monitor Your Data Usage
Check your phone settings to track data consumption.
Set alerts or limits to prevent excessive use.
2. Use Wi-Fi Whenever Possible
Connect to Wi-Fi for streaming, downloads, and updates.
Enable Wi-Fi Assist (iOS) or Adaptive Wi-Fi (Android) to avoid unnecessary mobile data use.
3. Limit Background Data
Some apps use data even when you’re not actively using them.
Disable background data for non-essential apps in settings.
4. Turn Off Auto-Play for Videos
Social media apps like Facebook, Instagram, and TikTok autoplay videos by default.
Disable auto-play in the app settings to save data.
5. Enable Data Compression
Use data-saving features in browsers like Google Chrome’s Lite mode.
Some messaging apps also offer lower data usage modes.
6. Download Content for Offline Use
Apps like Netflix, YouTube, and Spotify allow you to download content.
Download over Wi-Fi before traveling to save mobile data.
By following these tips, you can maximize your eSIM plan while keeping data usage under control.
How to Switch Between a Physical SIM and an eSIM
Switching between a physical SIM card and an eSIM can vary depending on the device you’re using. Here’s a general guide on how to switch between these SIM profiles.
Switching Between eSIM Profiles on iPhone
1. Open Settings: Go into your device’s Settings.
2. Select Cellular or Mobile Data: Tap on Cellular (or Mobile Data).
3. Choose Your eSIM: Find the eSIM you want to use from the list of available plans.
4. Turn On the Line: Select Turn on this line to activate the eSIM.
Switching Between a Physical SIM and eSIM on Android
The steps can vary by manufacturer, but here’s a general method:
1. Open Settings: Go into your device’s Settings.
2. Select SIM Cards & Mobile Networks: Tap on SIM cards & mobile networks.
3. Select SIM to Use: Here, you should see both your physical SIM and eSIM listed. Tap on the one you want to use.
4. Activate the SIM: Toggle the option to enable the selected SIM.
General Tips
• Manage SIM Settings: Make sure that the SIM you wish to use is enabled in the settings, and disable the other one to avoid conflicts.
• Device Compatibility: Some devices may have limitations on using both a physical SIM and an eSIM simultaneously. Check your device specifications to understand its capabilities.
• Carrier Support: Ensure that your carrier supports the eSIM feature and is configured correctly for your specific device.
By following these steps, you can easily switch between a physical SIM card and an eSIM on your device.
🌍 What Networks Can I Use with My eSIM?
Our eSIMs offer extensive multi-network coverage across different regions, ensuring you stay connected wherever you go!
📌 How to Check Available Networks
✅ During Checkout – View supported networks before purchasing.
✅ In Your Portal – Log in to see where your data bundle works.
💡 Why Multi-Network Coverage Matters
✔ Better Coverage – Switch between networks for the best signal.
✔ More Choices – Select the network that suits you best.
✔ Stay Connected Anywhere – Even in rural or remote areas.
🔹 Tip: With multi-network support, you can roam freely without worrying about losing connection!
Troubleshooting
Apple Devices
Important: your phone or device must also be Carrier-Unlocked to use eSIM.
List of Apple Devices Compatible With eSIMs.
● iPhone XR*
● iPhone XS*
● iPhone XS Max*
● iPhone 11*
● iPhone 11 Pro*
● iPhone SE 2 (2020) *
● iPhone 12*
● iPhone 12 Mini*
● iPhone 12 Pro*
● iPhone 12 Pro Max*
● iPhone 13
● iPhone 13 Mini
● iPhone 13 Pro
● iPhone 13 Pro Max
● iPhone SE 3 (2022)
● iPhone 14
● iPhone 14 Plus
● iPhone 14 Pro
● iPhone 14 Pro Max
● iPhone 15
● iPhone 15 Plus
● iPhone 15 Pro
● iPhone 15 Pro Max
● iPhone 16
● iPhone 16 Plus
● iPhone 16 Pro
● iPhone 16 Pro Max
*For iPhone 12 or earlier models. While they support multiple eSIMs, only one eSIM can be
*iPhones from mainland China and iPhone devices from Hong Kong and Macao (except for iPhone 13 mini, iPhone 12 mini, iPhone SE 2020, and iPhone XS) don’t have eSIM capability.
*iPhone 14, iPhone 14 Plus, iPhone 14 Pro, and iPhone 14 Pro Max are not compatible with physical SIM cards in the USA.
iPads with eSIM (only iPads with 4G connectivity):
● iPad Air 5th Gen (model A1822, from 2022)
● iPad 10th Gen (model A2757, from 2022)
● iPad 9th Gen (model A2604, from 2021)
● iPad Mini 6th Gen (model A2568, from 2021)
● iPad Pro 11″ (model A2068, from 2020)
● iPad Pro 12.9″ (model A2069, from 2020)
● iPad Air (model A2123, from 2019)
● iPad (model A2198, from 2019)
● iPad Mini (model A2124, from 2019)
Can I use iMessage with my eSIM?
Yes, you can use iMessage with your eSIM.
Please keep in mind that you may need to reset iMessage after installing your eSIM. You can do so by following the steps below:
1. Go to Settings on your device
2. Go to Messagesimage.png189.88 KB3. Toggle iMessage OFF image.png189.88 KB4. Toggle iMessage back to ONimage.png326.79 KB5. Tap on Send & Receiveimage.png344.67 KB6. Uncheck your number and make sure your email address is checked. This way, you’ll be able to send and receive iMessages with only a data connection.image.png115.56 KBWhen you no longer have a need for your eSIM, and wish to switch back to your Primary SIM, you can do so by following these steps: Settings > Messages > Send & Receive and check your phone number again.
If you have any questions, please feel free to contact support.
Can’t Connect My eSIM on iPhone?
If your eSIM isn’t connecting, try these troubleshooting steps:
✅ 1. Enable Data Roaming
Go to Settings > Cellular > Cellular Plans, select your eSIM, and toggle on Data Roaming.
✅ 2. Set eSIM for Mobile Data
Go to Settings > Cellular > Cellular Data and select your eSIM.
✅ 3. Reset Connection
Turn on Airplane Mode for a few seconds, then turn it off—or restart your iPhone.
✅ 4. Manually Select a Network
Go to Settings > Cellular > Network Selection, turn off Automatic, and choose a supported network manually.
💡 Still not working? Contact our support team for further assistance! 🚀
eSIM Compatibility with Smart Watches
At this time, our eSIMs do not support smartwatches. We are actively working to expand compatibility in the future, but for now, our eSIMs are designed for use with:
📱 Mobile Phones
💻 Tablets & Laptops
📡 Other Cellular-Enabled Devices
If you’re considering an eSIM, please check your device’s compatibility within these categories. Stay tuned for updates as we continue to enhance our offerings! 🚀
How to Check If Your iPhone is Unlocked for eSIM
Before using an eSIM, make sure your iPhone is carrier-unlocked. Follow these simple steps to check:
📱 Step 1: Open Settings and tap General
🔍 Step 2: Select About
🔓 Step 3: Scroll down to Network Provider Lock
• If it says “No SIM restrictions” → 🎉 Your iPhone is unlocked and ready for eSIM!
• If you see any restrictions → 🚫 Your device is locked, and you’ll need to contact your carrier for unlocking.
💡 Tip: If your iPhone was recently unlocked, eSIM functionality might take some time to activate due to carrier security policies.
Now you’re ready to enjoy seamless eSIM connectivity! 🌍
How to Install an eSIM Manually on an iPhone
📌 Before You Begin:
Make sure you have:
✅ A stable internet connection (Wi-Fi or mobile data)
✅ An eSIM-compatible and unlocked device
✅ Your SMDP+ Address & Activation Code (provided by your eSIM provider)
⚠️ Important: After installation, enable Data Roaming to ensure seamless connectivity.
Step-by-Step Installation Guide
1. Go to Settings → Tap Mobile Data (or Cellular)
2. Tap “Add eSIM”
3. Choose “Enter Details Manually”
4. Enter SMDP+ Address & Activation Code (leave the Confirmation Code blank)
5. Tap “Continue” → Stay on this screen until the installation completes
6. Wait up to 10 minutes for activation
7. Tap “Done” when the installation is complete
8. Set Up eSIM Settings:
• Default Line: Keep your Primary SIM for calls & SMS
• Mobile Data: Select your eSIM for data (e.g., “Travel”)
9. Enable Data Roaming:
• Go to Settings → Mobile Data
• Select your eSIM → Turn on Data Roaming
🎉 All Set! Your eSIM is now installed and ready to use. 🌍📶
How to Install an eSIM on Your iPad
📌 Before You Begin:
Ensure you have:
✅ A stable internet connection (Wi-Fi or 4G)
✅ An eSIM-compatible and unlocked iPad
✅ Your QR Code or manual activation details from your eSIM provider
Step-by-Step Installation Guide
1️⃣ Go to Settings → Tap Mobile Data
2️⃣ Tap “Add a New Plan”
3️⃣ Scan the QR Code (or enter the details manually if required)
4️⃣ Follow the on-screen instructions to activate your eSIM
5️⃣ Set up your data plan:
• Choose your eSIM as the default data plan
• If your iPad has a physical SIM, you can manage both under Mobile Data settings
🎉 That’s it! Your iPad is now connected with eSIM. 🌍📶
How to Enable or Disable an eSIM on iPhone
Need to temporarily turn off your eSIM? Follow these simple steps:
1️⃣ Open Settings → Tap Mobile Data (or Cellular)
2️⃣ Select Your eSIM from the list of plans
3️⃣ Toggle the Switch:
• Turn Off to disable the eSIM
• Turn On to reactivate it
✅ That’s it! You can now easily manage your eSIM connection.
Using iMessage with eSIM (Data Only)
If you’re using an eSIM for data only, you may need to adjust your iMessage settings.
Steps to Set Up iMessage with eSIM:
1️⃣ Go to Settings → Tap Messages
2️⃣ Turn Off iMessage, then turn it back On
3️⃣ Tap “Send & Receive”
4️⃣ Uncheck Your Phone Number (this ensures iMessage works via data only)
5️⃣ Make Sure Your Email is Checked
Switching Back to Primary SIM
When switching back to your primary SIM, go to Send & Receive and recheck your phone number.
✅ That’s it! Now you can send and receive iMessages using just your eSIM’s data connection.
How to Check Your Apple Device Model
If your iPhone is iPhone XR or newer, it should support eSIM. Follow these steps to check your model:
✅ If your device is iPhone XR or newer, it supports eSIM!
How to Find Your eSIM ICCID on iPhone
If you need to locate your eSIM’s ICCID (serial number), follow these steps:
📌 Steps to Find Your ICCID:
1️⃣ Open Settings → Tap General
2️⃣ Select “About”
3️⃣ Scroll Down to “ICCID”
🔹 If you have multiple SIMs, you’ll see the ICCID for each listed under its respective profile.
This number is useful for troubleshooting or managing your eSIM.
How to Manually Select a Network on iPhone (eSIM)
If you’re facing poor signal quality, you can switch to a different network manually.
📌 Steps for Manual Network Selection:
1️⃣ Open Settings → Tap Mobile Data (or Cellular)
2️⃣ Select Your eSIM → Ensure “Turn This Line On” is enabled
3️⃣ Tap “Network Selection”
4️⃣ Disable “Automatic”
5️⃣ Choose a Preferred Network
🔹 Wait a few seconds for your device to connect. If the network is unavailable, try another option.
How to Set Up an APN on iPhone (eSIM)
Most eSIMs automatically configure the Access Point Name (APN), but if needed, you can manually set it up.
📌 Steps to Set Up APN:
1️⃣ Open Settings → Tap Mobile Data (or Cellular)
2️⃣ Select Your eSIM under the SIMs section
3️⃣ Tap “Mobile Data Network” (or “Cellular Data Network”)
4️⃣ Enter the APN → Type data.esim in the APN field
🔹 Leave all other fields blank
💡 This ensures your eSIM works properly for data roaming.
Troubleshooting eSIM Data Connection Issues on iPhone/iPad
If your eSIM is installed but not connecting to data, try these steps:
🔹 1. Disconnect from Wi-Fi
• Wi-Fi may be prioritizing over your eSIM.
• Turn Wi-Fi off and check if mobile data starts working.
🔹 2. Reset Network Settings(⚠️ This removes saved Wi-Fi passwords!)
• Go to Settings → General → Transfer or Reset iPhone → Reset → Reset Network Settings
🔹 3. Update Your iOS/iPadOS
• Check for updates: Settings → General → Software Update
🔹 4. Restart Your Device
• Press & hold power + volume button → Slide to power off → Restart
If the issue persists, contact your eSIM provider for further assistance. 🚀
Turning Data Roaming On/Off on iOS Devices
Enabling Data Roaming is crucial for using your eSIM. Here’s how to manage it:
🔹 1. Open Settings
• Tap on the Settings app.
🔹 2. Select Mobile Data/Cellular Data
• Go to Mobile Data (or Cellular Data, depending on region).
🔹 3. Choose Your eSIM
• Tap on the eSIM profile you want to manage.
🔹 4. Toggle Data Roaming
• Switch Data RoamingON (toggle turns green).
• To disable, switch it OFF.
🔹 5. Wait for Connection
• Your device may take a moment to register on a network.
Now, your eSIM is ready to use with Data Roaming enabled! 🌍📶
What to Do If Your eSIM Is Stuck on Activating
1. Check Your Location
• If you are not yet in the destination country where the eSIM is supposed to work, the activation process may remain incomplete. It should activate automatically once you arrive.
2. Enable Data Roaming
• Go to Settings > Mobile Data (Cellular) > Select Your eSIM > Toggle Data Roaming ON.
• Some eSIMs require data roaming to be enabled for activation.
3. Restart Your Device
• Power off your iPhone/iPad and turn it back on. This can help refresh network connections.
4. Try Airplane Mode
• Turn Airplane Mode ON, wait 30 seconds, then turn it OFF again.
• This forces the device to reconnect to the network.
5. Manually Select a Network
• Go to Settings > Mobile Data (Cellular) > Your eSIM > Network Selection
• Turn off Automatic and manually choose an available network.
6. Reset Network Settings (If Necessary)
• Go to Settings > General > Transfer or Reset iPhone > Reset > Reset Network Settings.
• This clears saved network settings but does not delete your eSIM.
7. Contact Support
• If the issue persists even after arriving in the coverage area, contact your eSIM provider for assistance.
Once you reach your destination, the eSIM should activate automatically as long as you have followed these steps. 🚀📶
“Cellular Plans From This Carrier Cannot be Added” Error Message
If you see this error when trying to install an eSIM, your device may be carrier-locked and unable to use eSIMs from other providers.
How to Check if Your Device is Locked
For iPhone:
1. Open Settings > General > About.
2. Look for Carrier Lock.
3. If it says “No SIM restrictions”, your device is unlocked.
4. If it shows a carrier name or restriction message, your device is locked.
For Android:
1. Open Settings > Connections (or Network & Internet).
2. Tap Mobile Networks > Network Operators.
3. If you see multiple available networks, your phone is likely unlocked.
4. Alternatively, insert a SIM from another carrier—if it doesn’t work, your phone is locked.
How to Fix This Issue
1. If Your Device is Locked:
• Contact your carrier to request an unlock.
• They may require you to complete a contract or pay off the device.
2. If Your Device is Unlocked but the Error Persists:
• Restart your device and try reinstalling the eSIM.
• Ensure your software is up to date.
• Reset network settings:
• iPhone:Settings > General > Transfer or Reset iPhone > Reset > Reset Network Settings.
• Android:Settings > System > Reset Options > Reset Wi-Fi, mobile & Bluetooth.
• If the issue continues, contact your eSIM provider for assistance.
Once your device is confirmed unlocked, you should be able to install and activate your eSIM without issues! 🚀📶
How to Check if Your eSIM is Installed
The steps for verifying your eSIM installation vary depending on your device. Follow these instructions based on your operating system:
For iOS Devices (iPhone & iPad)
1. Open Settings and tap on Mobile Data (or Cellular).
2. If the eSIM is installed, it will appear under the SIMs section.
3. Select your eSIM and ensure that Turn On This Line is toggled on.
For Android Devices
1. Open Settings and go to SIM cards & mobile networks (or Connections > SIM Manager, depending on your device).
2. Scroll down and select Manage eSIM.
3. If the eSIM is installed, it will be listed here. Ensure it is enabled.
If you are still unsure whether your eSIM is installed, please contact our Support Team for assistance. They can verify the installation status for you.
How to Disable 5G on iOS & Android Devices
Disabling 5G can help conserve data usage or improve connectivity in areas with weak 5G coverage. Follow the steps below for your device:
For iOS Devices (iPhone & iPad)
1. Open Settings and tap Mobile Data (or Cellular).
2. Select Your eSIM: Choose the eSIM for which you want to disable 5G.
3. Tap Voice & Data under the selected eSIM.
4. Choose 4G: Select 4G (or LTE) to disable 5G.
5. Your device will now use 4G instead of 5G.
For Android Devices
1. Open Settings and go to SIM Cards & Mobile Networks (or Connections > Mobile Networks, depending on your device).
2. Select Your eSIM: Choose the eSIM you want to configure.
3. Tap Preferred Network Type (or Network Mode).
4. Select 4G or 3G: Choose Prefer 4G (or LTE Only) to turn off 5G.
5. Your device will now prioritize 4G or 3G instead of 5G.
If you experience network issues after disabling 5G, you can always switch back to automatic mode using the same steps.
How to Enable 5G on iOS & Android Devices
If you’re in an area with 5G coverage, you can enable it on your device to enjoy faster data speeds. Follow the steps below:
For iOS Devices (iPhone & iPad)
1. Open Settings and tap Mobile Data (or Cellular).
2. Select Your eSIM: Choose the eSIM you want to enable 5G for.
3. Tap Voice & Data under the selected eSIM.
4. Choose a 5G Option:
• 5G On – Always use 5G when available.
• 5G Auto – Uses 5G only when it won’t significantly reduce battery life.
For Android Devices
1. Open Settings and go to SIM Cards & Mobile Networks (or Connections > Mobile Networks, depending on your device).
2. Select Your eSIM: Choose the eSIM you want to configure.
3. Tap Preferred Network Type (or Network Mode).
4. Select 5G: Choose 5G as your preferred network type.
Once enabled, your device will connect to 5G whenever it’s available. If 5G coverage is weak, it may automatically switch to 4G for better stability.
How to Save and Use Less Data with Your eSIM
Want to make the most of your eSIM data? Here are some simple ways to reduce data usage and avoid overages:
1. Monitor Your Data Usage
Check your phone settings to track data consumption.
Set alerts or limits to prevent excessive use.
2. Use Wi-Fi Whenever Possible
Connect to Wi-Fi for streaming, downloads, and updates.
Enable Wi-Fi Assist (iOS) or Adaptive Wi-Fi (Android) to avoid unnecessary mobile data use.
3. Limit Background Data
Some apps use data even when you’re not actively using them.
Disable background data for non-essential apps in settings.
4. Turn Off Auto-Play for Videos
Social media apps like Facebook, Instagram, and TikTok autoplay videos by default.
Disable auto-play in the app settings to save data.
5. Enable Data Compression
Use data-saving features in browsers like Google Chrome’s Lite mode.
Some messaging apps also offer lower data usage modes.
6. Download Content for Offline Use
Apps like Netflix, YouTube, and Spotify allow you to download content.
Download over Wi-Fi before traveling to save mobile data.
By following these tips, you can maximize your eSIM plan while keeping data usage under control.
How to Set Up Your APN for eSIM
Our eSIMs usually come with automatic APN (Access Point Name) settings, but if you’re experiencing connectivity issues, you may need to set it up manually. Follow the steps below for your device:
For iOS Devices:
1. Open Settings.
2. Tap Mobile Data (or Cellular Data).
3. Under Mobile Data Plans, select your eSIM.
4. Tap Mobile Data Network (or Cellular Data Network).
5. In the Mobile Data APN field, enter: data.esim.
6. Leave all other fields blank.
For Android Devices:
1. Open Settings.
2. Tap Network & Internet.
3. Select Mobile Networks.
4. Tap Access Point Names (APN).
5. Add a new APN or edit the existing one by entering: data.esim.
6. Leave all other fields blank.
Once you’ve configured the APN, restart your device to apply the changes. If you still experience issues, please contact our support team for assistance.
Fixing “PDP Authentication Failure” on Your eSIM
The PDP Authentication Failure error may be caused by incorrect settings, data depletion, or network compatibility. Please check the following:
1. Verify Your APN Settings
• Ensure that the APN (Access Point Name) is set correctly as shown on your eSIM installation page.
• The APN should be entered in lowercase and without spaces.
2. Check Your Data Balance
• If your eSIM has run out of data, you may see this error.
• Verify your remaining data balance in your eSIM provider’s app or account.
3. Ensure You Are Connected to the Correct Network
• Your eSIM should be connected to a supported network in your current location.
• You can find network details in My eSIMs > Details > Install eSIM (scroll down for network information).
4. Reset Network Settings (if the issue persists)
If the above steps do not resolve the issue, try resetting your network settings:
1. Open Settings on your device.
2. Go to General > Reset.
3. Select Reset Network Settings.
4. Restart your device.
🚨 Note: Resetting network settings will erase saved Wi-Fi networks, passwords, cellular settings, VPN, and APN settings.
If the issue persists, please contact our support team for further assistance.
Unable to Scan Your eSIM QR Code? Try These Fixes
If you’re having trouble scanning the QR code for your eSIM, follow these steps to resolve the issue:
1. Check Phone Compatibility
🔹 Ensure your device supports eSIM technology. Not all phones are eSIM-compatible.
2. Inspect the QR Code
🔹 Make sure the QR code is not damaged, blurry, or distorted.
🔹 If it’s unreadable, try scanning it again.
3. Adjust Lighting Conditions
🔹 Poor lighting can affect the scanner’s ability to read the QR code.
🔹 Ensure the area is well-lit and avoid glare or reflections.
4. Move Closer to the QR Code
🔹 If you’re too far away, the scanner may not recognize the code.
🔹 Hold your phone at a reasonable distance and refocus the camera.
5. Restart Your Phone
🔹 If the issue persists, restart your phone to clear any temporary software glitches.
Still Having Issues?
If none of these steps work, contact your eSIM provider for further assistance. They may offer an alternative way to install your eSIM manually.
Can’t Scan Your QR Code? Install Your eSIM Manually
If you’re unable to scan the QR code, you can install the eSIM manually by following the steps below.
📱 iOS Devices
Manual Installation Steps:
1️⃣ Open the My eSIMs tab in the app or website to find your Manual Installation details.
2️⃣ Go to Settings → Cellular/Mobile.
3️⃣ Tap Add Cellular/Mobile Plan.
4️⃣ Select Enter Details Manually and enter:
• SM-DP+ Address
• Activation Code
• Confirmation Code (if available)
5️⃣ Turn on your eSIM under Cellular/Mobile Plan.
6️⃣ Select your eSIM for Cellular/Mobile Data.
7️⃣ Enable Data Roaming (Turn off your primary line to avoid roaming charges when abroad).
8️⃣ If required, set up an APN (Access Point Name)—you can find the APN details in the eSIM installation page.
Need Help?
If you encounter any issues, please contact our Support Team for further assistance.
Can’t Scan Your QR Code? Install Your eSIM Manually
If you’re unable to scan the QR code, you can install the eSIM manually by following the steps below.
🤖 Android Devices
Manual Installation Steps:
1️⃣ Open the My eSIMs tab in the app or website to find your Manual Installation details.
2️⃣ Go to Settings → Network & Internet.
3️⃣ Tap the Add icon next to Mobile Network.
4️⃣ Tap Next when asked, “Don’t have a SIM card?”.
5️⃣ Tap Enter Code Manually and enter the SM-DP+ Address from the Manual Installation tab.
6️⃣ Turn on your eSIM under Mobile Network.
7️⃣ Enable Mobile Data.
8️⃣ Enable Data Roaming (Turn off your primary line to avoid roaming charges when abroad).
9️⃣ If required, set up an APN (Access Point Name)—you can find the APN details in the eSIM installation page.
Need Help?
If you encounter any issues, please contact our Support Team for further assistance.
I'm experiencing the ‘Cellular Plans From This Carrier Cannot be Added' error message
This error may show if you are trying to install an eSIM on a network-locked device.
You can check if your device is locked by following the steps below:
1. Go to Settings > General, and tap About.
2. Under Carrier Lock, you should see a message that says No SIM restrictions. If you don't see that message, please contact your carrier to have your device unlocked.
If you have confirmed with your current provider that your device is unlocked, please contact support.
🛑 ‘Unable to Complete Cellular Plan Change’ Error
This error typically occurs due to an installation failure caused by one of the following reasons:image.png443.22 KB1️⃣ Too Many eSIMs Installed
• Some devices allow you to store multiple eSIMs but can only have one or two active at a time.
• iPhones, for example, can store 5 to 10 eSIMs, depending on the model.
✅ Solution: If you’ve reached your device’s limit, remove old eSIMs by following the instructions here: How to Remove an eSIM
2️⃣ Cellular/Mobile Data Is Disabled
• If Mobile Data is turned off, your device may not complete the eSIM installation.
✅ Solution:
• Go to Settings → Cellular/Mobile
• Make sure Mobile Data is turned ON
3️⃣ eSIM Already Installed
• Most eSIMs can only be installed once.
✅ Solution: Check if your eSIM is already installed:
1. Go to Settings → General → About
2. Scroll down to find the ICCID (20-digit number starting with 89XXXXXXXXXX).
3. If your eSIM is already installed, you may need to adjust your settings to activate it. Refer to your eSIM installation page for details.
4️⃣ Poor Internet Connection During Installation
• A weak or unstable internet connection, especially public Wi-Fi or ship Wi-Fi, can interrupt the process.
✅ Solution:
• Switch to a stronger Wi-Fi or mobile network
• Restart the installation process
📞 Need More Help?
If the issue persists, please contact Support for further assistance.
📉 How to Enable Low Data Mode on iOS & Android
Enabling Low Data Mode can help you save mobile data while traveling by restricting background apps and limiting automatic updates.
🔹 Low Data Mode on iOS
1️⃣ Go to Settings.
2️⃣ Scroll down to Battery.
3️⃣ Tap on Battery.
4️⃣ Enable Low Power Mode.
✅ This reduces background data usage while conserving battery life.
🔹 Low Data Mode on Android
📌 Steps may vary slightly depending on your device model.
1️⃣ Go to Settings.
2️⃣ Scroll down to Battery.
3️⃣ Tap on Optimize battery usage.
4️⃣ Select Apps optimized or Optimize manually.
5️⃣ Turn on Battery Saver.
✅ This helps conserve both battery and mobile data by limiting background activity.
By enabling these modes, you can minimize data usage while still staying connected during your travels. 🚀🌍
🛠 Fixing the “This Code Is No Longer Valid” Error
If you see this error during eSIM installation, it usually means:
1️⃣ eSIM Already Installed – Your eSIM may have been fully or partially installed, even if the process seemed interrupted.
2️⃣ Partial Installation Issue – A failed setup might have left an incomplete eSIM in your settings.
✅ Steps to Fix It
🔹 Check if Your eSIM is Installed
📌 Go to Settings > Mobile Data (or Cellular) and check if your eSIM is listed.
✔️ If visible, it’s installed—no need to rescan the QR code.
🔹 Delete a Partially Installed eSIM
📌 If an incomplete eSIM appears, remove it from your device settings.
📌 Then, rescan the QR code to install it again.
🔹 Verify with Our Chatbot
📌 Our chatbot can check if the eSIM is active on your device.
✔️ If confirmed, find it under Settings > Mobile Data (or Cellular).
By following these steps, you can resolve the issue and complete your eSIM setup smoothly. 🚀
🛠 Fixing “Home SIM Not Working After eSIM Installation”
If your physical SIM stops working after installing an eSIM, try these steps:
✅ Quick Fixes
1️⃣ Check SIM Card Placement
📌 Ensure your physical SIM is properly inserted in the tray.
2️⃣ Review SIM Settings
📌 Go to Settings > Cellular (or Mobile Data) and confirm:
✔️ Your physical SIM is enabled for calls, texts, or data (if needed).
3️⃣ Restart Your Device
📌 Turn off your phone, wait a few seconds, and restart it.
4️⃣ Check for Conflicts
📌 Some devices disable the primary SIM when eSIM is activated. Check:
✔️ Data Roaming ON for eSIM
✔️ Data Roaming OFF for the physical SIM
If the issue persists, contact your carrier to verify your SIM’s status. 🚀
🛠 Fixing “iMessage Not Working After eSIM Installation”
If iMessage stops working after installing an eSIM, follow these steps:
✅ Quick Fixes
1️⃣ Verify eSIM Activation
📌 Ensure your eSIM is activated and has a working mobile data connection.
2️⃣ Check SIM Settings
📌 Go to Settings > Cellular (or Mobile Data) and confirm:
✔️ Primary SIM is set as Default Voice Line
✔️ eSIM is designated for Mobile Data
3️⃣ Review iMessage Settings
📌 Go to Settings > Messages > Send & Receive
✔️ Ensure iMessage is enabled
✔️ Confirm your phone number and email are listed correctly
4️⃣ Restart Your Device
📌 Power off your phone, wait a few seconds, and turn it back on.
5️⃣ Reset Network Settings
📌 Go to Settings > General > Reset > Reset Network Settings
⚠️ This will erase saved Wi-Fi networks, passwords, and VPN settings.
6️⃣ Update Your Device
📌 Check for updates via Settings > General > Software Update
If the issue persists, contact Apple Support for further troubleshooting. 🚀
🚀 Fixing Slow Internet Connection with eSIM
If your eSIM connection is slow, try these steps to improve your speed:
✅ Quick Fixes
1️⃣ Check Network Coverage
📌 Ensure you have a strong signal.
📌 If speeds are slow, try switching to a different network (Settings > Manual Network Selection).
2️⃣ Reset Your Network
📌 Option 1: Toggle Airplane Mode ON, wait a few seconds, then turn it OFF.
⚠️ This will erase saved Wi-Fi networks, passwords, and VPN settings.
3️⃣ Limit Background Data Usage
📌 Some apps may be using too much data. Enable Low Data Mode or Data Saver in your settings.
4️⃣ Restart Your Device
📌 A quick reboot can clear caches and refresh connections.
5️⃣ Check for External Factors
📌 Slow speeds can be due to network congestion—especially during peak hours. If this is the case, speeds should improve over time.
6️⃣ Still Experiencing Issues?
📌 Contact our support team for further assistance.
📶 How to Turn Data Roaming On/Off on Oppo Devices
🔹 Turning ON Data Roaming
1️⃣ Open Settings on your Oppo device.
2️⃣ Tap Mobile Network.
3️⃣ Select Data eSIM.
4️⃣ Toggle Data Roaming ON (it should turn blue).
5️⃣ If prompted, confirm by tapping Turn On.
🔻 Turning OFF Data Roaming
1️⃣ Follow Steps 1-3 above.
2️⃣ Toggle Data Roaming OFF (it should turn white).
3️⃣ If prompted, confirm the action.
📌 Note: Enabling Data Roaming may lead to additional charges. Check with your carrier for details.
🔒 What to Do If Your Device Is Network or Carrier-Locked
If your phone was purchased from a mobile provider, it may be carrier-locked, meaning you can’t install an eSIM from another provider.
📌 How to Check & Unlock Your Device
✅ Contact Your Carrier – Ask them to unlock your device.
✅ Wait for eSIM Activation – If your phone was recently unlocked, eSIM support may be temporarily disabled for security reasons. Contact your carrier to override this.
📢 Need help? Contact support, and we’ll be happy to assist! 😊
🌍 What Networks Can I Use with My eSIM?
Our eSIMs offer extensive multi-network coverage across different regions, ensuring you stay connected wherever you go!
📌 How to Check Available Networks
✅ During Checkout – View supported networks before purchasing.
✅ In Your Portal – Log in to see where your data bundle works.
💡 Why Multi-Network Coverage Matters
✔ Better Coverage – Switch between networks for the best signal.
✔ More Choices – Select the network that suits you best.
✔ Stay Connected Anywhere – Even in rural or remote areas.
🔹 Tip: With multi-network support, you can roam freely without worrying about losing connection!
🔓 What to Do If Your Device Is Network Locked
A network-locked device can only work with a specific carrier, preventing eSIM activation. If your device is locked, here’s how to unlock it:
📌 Steps to Unlock Your Device
✅ Contact Your Carrier – Your provider can unlock your phone, though fees or conditions may apply.
✅ Explore Third-Party Services – Some companies offer unlocking services, but be cautious—ensure they are legitimate.
✅ Consider a New Device – If unlocking isn’t an option, purchasing an unlocked phone may be the best solution.
⚠️ Important Considerations
🔹 Not all devices are eligible for unlocking.
🔹 Unlocking may void your warranty—check with your provider first.
Following these steps will help you determine the best way to unlock your device and start using an eSIM! 🚀
Using & managing eSIMS
Installing eSIM(s) On An Apple Device
This help guide walks you through the steps required to install an eSIM on an Apple Device.
There are three install options offered in this help guide, either "install using a QR code", "install using Apple Quick Install URL" or "manual install"
Before starting the install, it is important you have the following three components:
A strong internet connection - Ideally using a Wifi network or a good 4G connection
An eSIM compatible device - If unsure, a list of compatible devices is provided here
The device is not locked to one particular network - If unsure, an article has been provided to talk you through how to determine the "locked / unlocked" status of a device, click here (ellenőrizni)
Don't forget to turn on "Data Roaming" after install!
Install Using A QR Code
There are two options available when scanning the QR code to install an eSIM;
Step 1.
Either
1.1) Open the camera on your device > Scan the QR code > Tap "Mobile Plan"
Or
1.2) Go to "Settings" > Tap "Mobile / Cellular Data" > Tap "Add eSIM" > Tap "Use QR Code" > Scan the QR code provided
Step 2. Tap "Continue" > Allow up to 10 minutes for the eSIM to Activate > Tap "Done"
Step 3. There are two options available at this stage, we advise proceeding with option 3.1)
Either
3.1) Tap "Continue" and then move to Step 4.
or
3.2) You have the option to modify the "eSIM Label" (the name of the eSIM) instead of using the default name.
If you would like to modify the eSIM label before moving to the next step;
Tap ">" (the right hand arrow) > Then either choose one of the preset label's or type the name you want to use in the "Custom Label" box > Tap "Done" > Tap "Continue"
In this example the name of the esim was changed to "My eSIM" using the custom label box.
Please note; Option 3.2) won't be offered to you if you have more than one eSIM already installed on your device, so a custom label can only be altered after the SIM install is complete.
Step 4. Configure the following settings as suggested:
Set Default Line to "Primary" > Tap "Continue"
Set iMessage & FaceTime to "Primary" > Tap "Continue"
Set Mobile Data to your previously chosen esim label, in this example "My eSIM"
Allow Mobile Data Switching is defaulted to off, choose you preference using the toggle > Tap "Done"
"Allow Mobile Data Switching" will allow your device to use mobile data from both lines depending on coverage and availability. You can change your selection later in settings.
Step 5. The eSIM is now installed and configured.
Important: Data Roaming MUST be ENABLED in order for the eSIM to work
Go to "Settings" > Tap "Mobile / Cellular Data" > Select desired SIM > Move the toggle switch to "On"
Don't forget to turn on "Data Roaming" after install!
Manual eSIM Install
Step 1. Go to "Settings" > Tap "Mobile / Cellular Data"
Step 2. Tap "Add eSIM" > Tap "Use QR Code" > Tap "Enter Details Manually"
Step 3. Enter the "SMDP Address" and the "Activation Code" provided > Tap "Next"
Leave "Confirmation Code" blank
Step 4. Tap "Continue" > Allow up to 10 minutes for the eSIM to Activate > Tap "Done"
Step 5. There are two options available at this stage, we advise proceeding with option 5.1)
Either
5.1) Tap "Continue" and then move to Step 6.
or
5.2) You have the option to modify the "eSIM Label" (the name of the eSIM) instead of using the default name.
If you would like to modify the eSIM label before moving to the next step;
Tap ">" (the right hand arrow) > Then either choose one of the preset label's or type the name you want to use in the "Custom Label" box > Tap "Done" > Tap "Continue"
In this example the name of the esim was changed to "My eSIM" using the custom label box.
Please note; Option 5.2) won't be offered to you if you have more than one eSIM already installed on your device, so a custom label can only be altered after the SIM install is complete.
Step 6. Configure the following settings as suggested:
Set Default Line to "Primary" > Tap "Continue"
Set iMessage & FaceTime to "Primary" > Tap "Continue"
Set Mobile Data to your previously chosen esim label, in this example "My eSIM"
Allow Mobile Data Switching is defaulted to off, choose you preference using the toggle > Tap "Done"
"Allow Mobile Data Switching" will allow your device to use mobile data from both lines depending on coverage and availability. You can change your selection later in settings.
Step 7. The eSIM is now installed and configured.
Important: Data Roaming MUST be ENABLED in order for the eSIM to work
Go to "Settings" > Tap "Mobile / Cellular Data" > Select desired SIM > Move the toggle switch to "On"
📱 Can I Use the Same eSIM on Multiple Devices?
❌ No, eSIMs are designed for single-device use. Once activated, an eSIM is permanently tied to that device and cannot be transferred or reinstalled on another device.
⚠️ Important Things to Know:
🔹 If you delete an eSIM (e.g., when upgrading devices), you can’t reinstall it—you’ll need a new eSIM.
🔹 Be sure to install your eSIM only on the device you plan to use throughout its validity period.
Need help? Contact our support team—we’re happy to assist! 😊
📞 Can I Make Calls or Send SMS with My eSIM?
❌ No, most Telemeteor eSIMs are data-only, meaning you can’t make phone calls or send SMS text messages.
💡 Alternative: Use Internet-Based Apps
🔹 You can still call and text using apps like WhatsApp, Telegram, or Skype.
🔹 Ensure these apps are set up before using your eSIM to stay connected.
Need help? Contact our support team! 😊
📞 Can I Receive Calls on My Primary Number While Using an eSIM?
✅ Yes! If your device supports Dual SIM Dual Standby (DSDS), you can receive calls on your primary numberwhile using your Telemeteor eSIM for data.
📱 iPhone Compatibility
🔹 iPhone 13 Pro Max, 13 Pro, 13, 13 mini or newer→ Supports two active eSIMs or one nano-SIM + one eSIM
🔹 iPhone 12, 11, XS, XS Max, XR → Supports one nano-SIM + one eSIM (but only one eSIM active at a time)
For other device brands, check with the manufacturer for Dual SIM compatibility.
💡 Important: If your primary SIM is roaming, you may be charged for incoming calls by your carrier.
Need help? Contact Telemeteor support! 😊
🔄 Can I Reinstall an eSIM?
❌ No, eSIMs typically cannot be reinstalled. If you remove an eSIM from your device, you may not be able to download it again. We strongly recommend keeping your eSIM installed if you still plan to use it.
🚨 Why You Shouldn’t Remove an eSIM You Still Need
• Unlike physical SIM cards, eSIMs are tied to your device’s hardware and cannot be easily reinstalled or transferred.
• If your eSIM runs out of data or its validity period ends, you can top it up instead of removing it. To top up:
My eSIMs > TOP UP > Choose a new data package
⏸️ Why You Might Want to Temporarily Disable an eSIM
Temporarily disabling your eSIM can help:
✔ Conserve data when not in use
✔ Prevent background data consumption (useful for travel or limited plans)
📱 How to Temporarily Disable an eSIM
On iOS (iPhone & iPad)
1️⃣ Go to Settings > Cellular > SIMs
2️⃣ Select your eSIM
3️⃣ Toggle “Turn This Line On” OFF
On Android
1️⃣ Go to Settings > SIM cards & mobile networks
2️⃣ Scroll to “Manage eSIM” and select your eSIM
3️⃣ Select “Disable” from the prompt
💡 Important: Disabling your eSIM does not pause its validity period—it remains active but dormant until you turn it back on.
📩 Need help? Contact Telemeteor Support! 😊
📡 Can I Use Tethering (Personal Hotspot) with My eSIM?
✅ Yes! You can use your Personal Hotspot with your Telemeteor eSIM, as long as your device and network support it.
🛠️ How to Enable Hotspot on iOS (iPhone & iPad)
1️⃣ Go to Settings
2️⃣ Tap Personal Hotspot
3️⃣ Toggle on “Allow Others to Join”
⚙️ Setting Up APN for Hotspot (if required)
Some eSIMs require manual APN configuration for tethering. If needed:
1️⃣ Go to Settings > Cellular/Mobile Data
2️⃣ Select your eSIM under “Cellular/Mobile Data Plans”
3️⃣ Tap “Cellular/Mobile Data Network”
4️⃣ Enter the APN in the “Personal Hotspot APN” field (refer to your eSIM installation details)
5️⃣ Leave Username & Password blank
🛠️ How to Enable Hotspot on Android
1️⃣ Set the APN before enabling hotspot
2️⃣ Open Settings (or pull down the notification bar & tap the ⚙️ icon)
3️⃣ Go to Network & Internet
4️⃣ Tap “Hotspot & Tethering”
5️⃣ Select “Wi-Fi Hotspot” & turn it ON
📩 Need help? Contact Telemeteor Support! 😊
🌍 Do Any Apps or Websites Restrict Access While Using an eSIM?
🚀 Telemeteor does not impose any restrictions on websites or apps when using our eSIM. However, certain platforms may have their own security or access policies that could affect your browsing experience.
🔍 Common Reasons for Restricted Access
🔹 Proxy Settings – Some websites or apps may block connections that appear to be routed through a proxy server.
🔹 Security Protocols – Certain platforms have security measures that might not be compatible with how eSIM data is routed.
🔹 Location or Service Provider Restrictions – Some services restrict access based on your detected location or network provider.
Because eSIM data often routes through a roaming platform, some websites or apps may mistakenly block access based on their security settings. This is not a Telemeteor-specific issue, but a general limitation of how some platforms manage network access.
❓ What Can You Do?
If you’re unable to access a website or app:
✅ Try a different network connection (e.g., Wi-Fi)
✅ Clear your browser cache & cookies
✅ Contact the app or website’s support team for help
📩 Still need assistance? Reach out to Telemeteor Support! We’re happy to help. 😊
📱 How Can I Receive SMS & Calls While Using a Data-Only eSIM?
If your eSIM supports data-only, you can still use another line for voice and SMS.
In order to use your primary line for voice and text while you enjoy your eSIM for data, you need to enable the primary line and set it up as your Default Voice line.
The data roaming may also need to be enabled depending on the requirement of your home provider. This may incur roaming charges, so we highly encourage you to consult your home provider to learn about the charges before proceeding.
Do the same on step 3, this time for SMS Preference.
For Mobile data, ensure that your eSIM is selected for it.
Once you have followed the above steps, you should have your Main / Primaryline set for calls or SMS, then your eSIMs for mobile data.
📅 How Do Data Amounts and Validity Periods Work for eSIM Packages?
Telemeteor offers eSIM packages for over 200 countries and regions around the world — each with an amount of data you can use for a specific amount of time.
The amount of time you can use your package is referred to as its validity period. You can learn more about data usage and validity periods from our answers to the following frequently asked questions.
🕒 When Does My Validity Period Start?
Your validity period begins when one of the following happens:
✔ You connect to a supported network in the eSIM’s coverage area.
✔ You install your eSIM (only for specific activation policies).
🔎 How to Check Your eSIM’s Activation Policy:
1️. Go toMy eSIMs > Show more details for the relevant eSIM.
2️. Find “Auto Start” for specific details.
📊 How is eSIM Data Distributed?
• Your data is valid for the entire period—it is not split per day.
• Example: A 1GB - 7-day package means 1GB total, not 1GB per day.
💡 Can I Use All My Data on the First Day?
✅ Yes! You can use all your data at any time during your validity period.
💳 Need more data? You can purchase a top-up via My eSims > Recharge eSIM.
🔔 Unlimited Data Packages: If your package includes unlimited data, your speeds may slow down after exceeding a fair usage limit (check “Additional Information” in your eSIM details).
🔹 Limit high-data apps like video streaming, large downloads, or auto-updates.
❓ What Happens If I Run Out of Data?
📌 If you run out of data before the end of the validity period, you can purchase a recharge. To do so, go to My eSIMs > RECHARGE for the relevant eSIM.
📩 Need help? Our support team is available 24/7—we’re happy to assist! 🚀
How do I change my eSIM label?
Most phones allow you to store multiple eSIM profiles and switch between them as needed.
During eSIM installation, your device will automatically assign a label to your new eSIM. If you’d like to change it, you can do so in your device settings.
We recommend choosing a name that helps you easily identify the eSIM (e.g., Italy eSIM or Telemeteor eSIM).
How to Change an eSIM Label
On iOS Devices
1. Go to Settings.
2. TapCellular or Mobile.
3. Under SIMs, tap the eSIM you want to rename.
4. TapCellular/Mobile Plan Label.
5. Tap the default eSIM label.
6. Enter your preferred name in the Custom Label field.
On Samsung Galaxy Devices
1. Go to Settings.
2. TapConnections.
3. TapSIM card manager.
4. Tap the eSIM profile you want to rename.
5. Enter the new eSIM name.
6. TapDone to save the changes.
On Google Pixel Devices
1. Go to Settings.
2. TapNetwork & Internet.
3. TapSIMs, then select the eSIM you want to rename.
4. Tap the pencil icon.
5. Enter the new eSIM name (you can also change the label color).
6. TapSave to confirm the changes.
Your eSIM is now renamed! If you change your mind, you can edit the eSIM label as many times as you like.
If you have any questions, our support team is happy to assist you.
How do I set a data limit on my Android device?
Setting a mobile data limit on your Android device helps you reduce your data usage. You can select the billing cycle, add the data limit, set a warning before hitting the limit, and more. Follow these steps to learn how to set your mobile data limit. For Samsung Galaxy devices:
OPEN the Settings app, then TAP Connections.
TAP Data Usage.
ENSURE that Mobile Data is ON, then TAP Billing cycle and data warning.
TAP Start billing cycle and SET the date based on your arrival in the destination country.
ENABLE Set data warning and specify the data warning in numbers. For example, if your eSIM package has 10 GB, you can set a data warning at 8 GB.
ENABLE Set data limit and specify the data limit in numbers. This option will turn off mobile data when you reach the specified limit.
OPEN the Settings app, then TAP Network & Internet.
TAP SIMs.
ENSURE that Mobile Data is ON, then TAP Data warning & limit.
TAP Mobile data usage cycle and SET the date based on your arrival in the destination country.
ENABLE Set data warning and specify the data warning in numbers. For example, if your eSIM package has 10 GB, you can set a data warning at 8 GB.
ENABLE Set data limit and specify the data limit in numbers. This option will turn off mobile data when you reach the specified limit. image.png460.04 KBIf you have any questions, please feel free to contact our support team, and we'll be happy to help!
How many Telemeteor eSIMs can I install?
eSIM-compatible devices allow you to install multiple eSIMs, but the number you can have active simultaneouslydepends on your device model.
How many eSIMs can my device store?
• iPhones can store 5 to 10 eSIMs.
• Samsung Galaxy, Google Pixel, Huawei, and other Android devices typically store 5 to 7 eSIMs.
However, the number of active eSIMs at the same time depends on your device’s SIM capability.
eSIM Capability by Device Type
1. Dual SIM Dual Active (DSDA) – Two Active eSIMs
These devices allow you to use two eSIMs simultaneously or one eSIM + one nano-SIM:
✅ iPhone 13 and newer
✅ Galaxy S24 and newer
✅ Google Pixel 7 and newer
2. Dual SIM Dual Standby (DSDS) – One Active eSIM at a Time
These devices allow you to install multiple eSIMs but can only have one eSIM active at a time:
✅ iPhone 12, 11, XS, XS Max, and XR models
✅ Most Android devices (except newer Google Pixel models)
3. Special Case – Google Pixel 7 & Newer
• Google Pixel 7 and later models support two active eSIMs, but this depends on carrier support.
If you need help managing your eSIMs, feel free to contact our support team!
What happens to unused data after the validity period?
Any unused data will expire once the validity period ends. This means that you cannot carry over or use the remaining data after your eSIM’s validity period.
Can I extend my eSIM’s validity?
If your eSIM is rechargeable, you can add a new data package by tapping “Recharge” on your eSIM. This allows you to continue using the same eSIM.
If you need further assistance, our support team is always happy to help!
When Can I Use the Same eSIM?
You can continue using the same eSIM if:
✅ The eSIM supports recharges, allowing you to buy additional data.
✅ The eSIM remains installed on your device.
✅ You are using it in a supported country.
When you purchase an eSIM, it will indicate whether recharges are available. If you plan to use it again, do not delete the eSIM. Instead, you can turn it off under Cellular Data Plans while not in use.
You can keep recharging your eSIM as long as data packages are available. To learn how, see: “How can I recharge my eSIM?”
💡 Important: Your eSIM and data packages are only valid in the supported country/countries.
When Can’t I Use the Same eSIM?
❌ No recharge options are available.
❌ You need to use it in a different, unsupported country.
If your eSIM does not support recharges, it is for one-time use only. You can safely remove it from your device once the data package is used or expired.
If you’re traveling to a different country, make sure your eSIM and data package support that location before relying on it.
Quick Reference:
📌 Local eSIMs → Support only one country.
📌 Regional & Global eSIMs → Cover multiple countries.
If you have any questions, our support team is happy to help!
Készülékek
Apple Devices
Important: your phone or device must also be Carrier-Unlocked to use eSIM.
List of Apple Devices Compatible With eSIMs.
● iPhone XR*
● iPhone XS*
● iPhone XS Max*
● iPhone 11*
● iPhone 11 Pro*
● iPhone SE 2 (2020) *
● iPhone 12*
● iPhone 12 Mini*
● iPhone 12 Pro*
● iPhone 12 Pro Max*
● iPhone 13
● iPhone 13 Mini
● iPhone 13 Pro
● iPhone 13 Pro Max
● iPhone SE 3 (2022)
● iPhone 14
● iPhone 14 Plus
● iPhone 14 Pro
● iPhone 14 Pro Max
● iPhone 15
● iPhone 15 Plus
● iPhone 15 Pro
● iPhone 15 Pro Max
● iPhone 16
● iPhone 16 Plus
● iPhone 16 Pro
● iPhone 16 Pro Max
*For iPhone 12 or earlier models. While they support multiple eSIMs, only one eSIM can be
*iPhones from mainland China and iPhone devices from Hong Kong and Macao (except for iPhone 13 mini, iPhone 12 mini, iPhone SE 2020, and iPhone XS) don’t have eSIM capability.
*iPhone 14, iPhone 14 Plus, iPhone 14 Pro, and iPhone 14 Pro Max are not compatible with physical SIM cards in the USA.
iPads with eSIM (only iPads with 4G connectivity):
● iPad Air 5th Gen (model A1822, from 2022)
● iPad 10th Gen (model A2757, from 2022)
● iPad 9th Gen (model A2604, from 2021)
● iPad Mini 6th Gen (model A2568, from 2021)
● iPad Pro 11″ (model A2068, from 2020)
● iPad Pro 12.9″ (model A2069, from 2020)
● iPad Air (model A2123, from 2019)
● iPad (model A2198, from 2019)
● iPad Mini (model A2124, from 2019)
Devices
Apple Devices
Important: your phone or device must also be Carrier-Unlocked to use eSIM.
List of Apple Devices Compatible With eSIMs.
● iPhone XR*
● iPhone XS*
● iPhone XS Max*
● iPhone 11*
● iPhone 11 Pro*
● iPhone SE 2 (2020) *
● iPhone 12*
● iPhone 12 Mini*
● iPhone 12 Pro*
● iPhone 12 Pro Max*
● iPhone 13
● iPhone 13 Mini
● iPhone 13 Pro
● iPhone 13 Pro Max
● iPhone SE 3 (2022)
● iPhone 14
● iPhone 14 Plus
● iPhone 14 Pro
● iPhone 14 Pro Max
● iPhone 15
● iPhone 15 Plus
● iPhone 15 Pro
● iPhone 15 Pro Max
● iPhone 16
● iPhone 16 Plus
● iPhone 16 Pro
● iPhone 16 Pro Max
*For iPhone 12 or earlier models. While they support multiple eSIMs, only one eSIM can be
*iPhones from mainland China and iPhone devices from Hong Kong and Macao (except for iPhone 13 mini, iPhone 12 mini, iPhone SE 2020, and iPhone XS) don’t have eSIM capability.
*iPhone 14, iPhone 14 Plus, iPhone 14 Pro, and iPhone 14 Pro Max are not compatible with physical SIM cards in the USA.
iPads with eSIM (only iPads with 4G connectivity):
● iPad Air 5th Gen (model A1822, from 2022)
● iPad 10th Gen (model A2757, from 2022)
● iPad 9th Gen (model A2604, from 2021)
● iPad Mini 6th Gen (model A2568, from 2021)
● iPad Pro 11″ (model A2068, from 2020)
● iPad Pro 12.9″ (model A2069, from 2020)
● iPad Air (model A2123, from 2019)
● iPad (model A2198, from 2019)
● iPad Mini (model A2124, from 2019)
Can I use iMessage with my eSIM?
Yes, you can use iMessage with your eSIM.
Please keep in mind that you may need to reset iMessage after installing your eSIM. You can do so by following the steps below:
1. Go to Settings on your device
2. Go to Messagesimage.png189.88 KB3. Toggle iMessage OFF image.png189.88 KB4. Toggle iMessage back to ONimage.png326.79 KB5. Tap on Send & Receiveimage.png344.67 KB6. Uncheck your number and make sure your email address is checked. This way, you’ll be able to send and receive iMessages with only a data connection.image.png115.56 KBWhen you no longer have a need for your eSIM, and wish to switch back to your Primary SIM, you can do so by following these steps: Settings > Messages > Send & Receive and check your phone number again.
If you have any questions, please feel free to contact support.
eSIM Compatibility with Smart Watches
At this time, our eSIMs do not support smartwatches. We are actively working to expand compatibility in the future, but for now, our eSIMs are designed for use with:
📱 Mobile Phones
💻 Tablets & Laptops
📡 Other Cellular-Enabled Devices
If you’re considering an eSIM, please check your device’s compatibility within these categories. Stay tuned for updates as we continue to enhance our offerings! 🚀
How to Check If Your iPhone is Unlocked for eSIM
Before using an eSIM, make sure your iPhone is carrier-unlocked. Follow these simple steps to check:
📱 Step 1: Open Settings and tap General
🔍 Step 2: Select About
🔓 Step 3: Scroll down to Network Provider Lock
• If it says “No SIM restrictions” → 🎉 Your iPhone is unlocked and ready for eSIM!
• If you see any restrictions → 🚫 Your device is locked, and you’ll need to contact your carrier for unlocking.
💡 Tip: If your iPhone was recently unlocked, eSIM functionality might take some time to activate due to carrier security policies.
Now you’re ready to enjoy seamless eSIM connectivity! 🌍
How to Install an eSIM Manually on an iPhone
📌 Before You Begin:
Make sure you have:
✅ A stable internet connection (Wi-Fi or mobile data)
✅ An eSIM-compatible and unlocked device
✅ Your SMDP+ Address & Activation Code (provided by your eSIM provider)
⚠️ Important: After installation, enable Data Roaming to ensure seamless connectivity.
Step-by-Step Installation Guide
1. Go to Settings → Tap Mobile Data (or Cellular)
2. Tap “Add eSIM”
3. Choose “Enter Details Manually”
4. Enter SMDP+ Address & Activation Code (leave the Confirmation Code blank)
5. Tap “Continue” → Stay on this screen until the installation completes
6. Wait up to 10 minutes for activation
7. Tap “Done” when the installation is complete
8. Set Up eSIM Settings:
• Default Line: Keep your Primary SIM for calls & SMS
• Mobile Data: Select your eSIM for data (e.g., “Travel”)
9. Enable Data Roaming:
• Go to Settings → Mobile Data
• Select your eSIM → Turn on Data Roaming
🎉 All Set! Your eSIM is now installed and ready to use. 🌍📶
How to Install an eSIM on Your iPad
📌 Before You Begin:
Ensure you have:
✅ A stable internet connection (Wi-Fi or 4G)
✅ An eSIM-compatible and unlocked iPad
✅ Your QR Code or manual activation details from your eSIM provider
Step-by-Step Installation Guide
1️⃣ Go to Settings → Tap Mobile Data
2️⃣ Tap “Add a New Plan”
3️⃣ Scan the QR Code (or enter the details manually if required)
4️⃣ Follow the on-screen instructions to activate your eSIM
5️⃣ Set up your data plan:
• Choose your eSIM as the default data plan
• If your iPad has a physical SIM, you can manage both under Mobile Data settings
🎉 That’s it! Your iPad is now connected with eSIM. 🌍📶
How to Enable or Disable an eSIM on iPhone
Need to temporarily turn off your eSIM? Follow these simple steps:
1️⃣ Open Settings → Tap Mobile Data (or Cellular)
2️⃣ Select Your eSIM from the list of plans
3️⃣ Toggle the Switch:
• Turn Off to disable the eSIM
• Turn On to reactivate it
✅ That’s it! You can now easily manage your eSIM connection.
Using iMessage with eSIM (Data Only)
If you’re using an eSIM for data only, you may need to adjust your iMessage settings.
Steps to Set Up iMessage with eSIM:
1️⃣ Go to Settings → Tap Messages
2️⃣ Turn Off iMessage, then turn it back On
3️⃣ Tap “Send & Receive”
4️⃣ Uncheck Your Phone Number (this ensures iMessage works via data only)
5️⃣ Make Sure Your Email is Checked
Switching Back to Primary SIM
When switching back to your primary SIM, go to Send & Receive and recheck your phone number.
✅ That’s it! Now you can send and receive iMessages using just your eSIM’s data connection.
How to Check Your Apple Device Model
If your iPhone is iPhone XR or newer, it should support eSIM. Follow these steps to check your model:
✅ If your device is iPhone XR or newer, it supports eSIM!
How to Find Your eSIM ICCID on iPhone
If you need to locate your eSIM’s ICCID (serial number), follow these steps:
📌 Steps to Find Your ICCID:
1️⃣ Open Settings → Tap General
2️⃣ Select “About”
3️⃣ Scroll Down to “ICCID”
🔹 If you have multiple SIMs, you’ll see the ICCID for each listed under its respective profile.
This number is useful for troubleshooting or managing your eSIM.
How to Manually Select a Network on iPhone (eSIM)
If you’re facing poor signal quality, you can switch to a different network manually.
📌 Steps for Manual Network Selection:
1️⃣ Open Settings → Tap Mobile Data (or Cellular)
2️⃣ Select Your eSIM → Ensure “Turn This Line On” is enabled
3️⃣ Tap “Network Selection”
4️⃣ Disable “Automatic”
5️⃣ Choose a Preferred Network
🔹 Wait a few seconds for your device to connect. If the network is unavailable, try another option.
How to Set Up an APN on iPhone (eSIM)
Most eSIMs automatically configure the Access Point Name (APN), but if needed, you can manually set it up.
📌 Steps to Set Up APN:
1️⃣ Open Settings → Tap Mobile Data (or Cellular)
2️⃣ Select Your eSIM under the SIMs section
3️⃣ Tap “Mobile Data Network” (or “Cellular Data Network”)
4️⃣ Enter the APN → Type data.esim in the APN field
🔹 Leave all other fields blank
💡 This ensures your eSIM works properly for data roaming.
Troubleshooting eSIM Data Connection Issues on iPhone/iPad
If your eSIM is installed but not connecting to data, try these steps:
🔹 1. Disconnect from Wi-Fi
• Wi-Fi may be prioritizing over your eSIM.
• Turn Wi-Fi off and check if mobile data starts working.
🔹 2. Reset Network Settings(⚠️ This removes saved Wi-Fi passwords!)
• Go to Settings → General → Transfer or Reset iPhone → Reset → Reset Network Settings
🔹 3. Update Your iOS/iPadOS
• Check for updates: Settings → General → Software Update
🔹 4. Restart Your Device
• Press & hold power + volume button → Slide to power off → Restart
If the issue persists, contact your eSIM provider for further assistance. 🚀
Turning Data Roaming On/Off on iOS Devices
Enabling Data Roaming is crucial for using your eSIM. Here’s how to manage it:
🔹 1. Open Settings
• Tap on the Settings app.
🔹 2. Select Mobile Data/Cellular Data
• Go to Mobile Data (or Cellular Data, depending on region).
🔹 3. Choose Your eSIM
• Tap on the eSIM profile you want to manage.
🔹 4. Toggle Data Roaming
• Switch Data RoamingON (toggle turns green).
• To disable, switch it OFF.
🔹 5. Wait for Connection
• Your device may take a moment to register on a network.
Now, your eSIM is ready to use with Data Roaming enabled! 🌍📶
What to Do If Your eSIM Is Stuck on Activating
1. Check Your Location
• If you are not yet in the destination country where the eSIM is supposed to work, the activation process may remain incomplete. It should activate automatically once you arrive.
2. Enable Data Roaming
• Go to Settings > Mobile Data (Cellular) > Select Your eSIM > Toggle Data Roaming ON.
• Some eSIMs require data roaming to be enabled for activation.
3. Restart Your Device
• Power off your iPhone/iPad and turn it back on. This can help refresh network connections.
4. Try Airplane Mode
• Turn Airplane Mode ON, wait 30 seconds, then turn it OFF again.
• This forces the device to reconnect to the network.
5. Manually Select a Network
• Go to Settings > Mobile Data (Cellular) > Your eSIM > Network Selection
• Turn off Automatic and manually choose an available network.
6. Reset Network Settings (If Necessary)
• Go to Settings > General > Transfer or Reset iPhone > Reset > Reset Network Settings.
• This clears saved network settings but does not delete your eSIM.
7. Contact Support
• If the issue persists even after arriving in the coverage area, contact your eSIM provider for assistance.
Once you reach your destination, the eSIM should activate automatically as long as you have followed these steps. 🚀📶
“Cellular Plans From This Carrier Cannot be Added” Error Message
If you see this error when trying to install an eSIM, your device may be carrier-locked and unable to use eSIMs from other providers.
How to Check if Your Device is Locked
For iPhone:
1. Open Settings > General > About.
2. Look for Carrier Lock.
3. If it says “No SIM restrictions”, your device is unlocked.
4. If it shows a carrier name or restriction message, your device is locked.
For Android:
1. Open Settings > Connections (or Network & Internet).
2. Tap Mobile Networks > Network Operators.
3. If you see multiple available networks, your phone is likely unlocked.
4. Alternatively, insert a SIM from another carrier—if it doesn’t work, your phone is locked.
How to Fix This Issue
1. If Your Device is Locked:
• Contact your carrier to request an unlock.
• They may require you to complete a contract or pay off the device.
2. If Your Device is Unlocked but the Error Persists:
• Restart your device and try reinstalling the eSIM.
• Ensure your software is up to date.
• Reset network settings:
• iPhone:Settings > General > Transfer or Reset iPhone > Reset > Reset Network Settings.
• Android:Settings > System > Reset Options > Reset Wi-Fi, mobile & Bluetooth.
• If the issue continues, contact your eSIM provider for assistance.
Once your device is confirmed unlocked, you should be able to install and activate your eSIM without issues! 🚀📶
How to Check if Your eSIM is Installed
The steps for verifying your eSIM installation vary depending on your device. Follow these instructions based on your operating system:
For iOS Devices (iPhone & iPad)
1. Open Settings and tap on Mobile Data (or Cellular).
2. If the eSIM is installed, it will appear under the SIMs section.
3. Select your eSIM and ensure that Turn On This Line is toggled on.
For Android Devices
1. Open Settings and go to SIM cards & mobile networks (or Connections > SIM Manager, depending on your device).
2. Scroll down and select Manage eSIM.
3. If the eSIM is installed, it will be listed here. Ensure it is enabled.
If you are still unsure whether your eSIM is installed, please contact our Support Team for assistance. They can verify the installation status for you.
How to Disable 5G on iOS & Android Devices
Disabling 5G can help conserve data usage or improve connectivity in areas with weak 5G coverage. Follow the steps below for your device:
For iOS Devices (iPhone & iPad)
1. Open Settings and tap Mobile Data (or Cellular).
2. Select Your eSIM: Choose the eSIM for which you want to disable 5G.
3. Tap Voice & Data under the selected eSIM.
4. Choose 4G: Select 4G (or LTE) to disable 5G.
5. Your device will now use 4G instead of 5G.
For Android Devices
1. Open Settings and go to SIM Cards & Mobile Networks (or Connections > Mobile Networks, depending on your device).
2. Select Your eSIM: Choose the eSIM you want to configure.
3. Tap Preferred Network Type (or Network Mode).
4. Select 4G or 3G: Choose Prefer 4G (or LTE Only) to turn off 5G.
5. Your device will now prioritize 4G or 3G instead of 5G.
If you experience network issues after disabling 5G, you can always switch back to automatic mode using the same steps.
How to Enable 5G on iOS & Android Devices
If you’re in an area with 5G coverage, you can enable it on your device to enjoy faster data speeds. Follow the steps below:
For iOS Devices (iPhone & iPad)
1. Open Settings and tap Mobile Data (or Cellular).
2. Select Your eSIM: Choose the eSIM you want to enable 5G for.
3. Tap Voice & Data under the selected eSIM.
4. Choose a 5G Option:
• 5G On – Always use 5G when available.
• 5G Auto – Uses 5G only when it won’t significantly reduce battery life.
For Android Devices
1. Open Settings and go to SIM Cards & Mobile Networks (or Connections > Mobile Networks, depending on your device).
2. Select Your eSIM: Choose the eSIM you want to configure.
3. Tap Preferred Network Type (or Network Mode).
4. Select 5G: Choose 5G as your preferred network type.
Once enabled, your device will connect to 5G whenever it’s available. If 5G coverage is weak, it may automatically switch to 4G for better stability.
How to Save and Use Less Data with Your eSIM
Want to make the most of your eSIM data? Here are some simple ways to reduce data usage and avoid overages:
1. Monitor Your Data Usage
Check your phone settings to track data consumption.
Set alerts or limits to prevent excessive use.
2. Use Wi-Fi Whenever Possible
Connect to Wi-Fi for streaming, downloads, and updates.
Enable Wi-Fi Assist (iOS) or Adaptive Wi-Fi (Android) to avoid unnecessary mobile data use.
3. Limit Background Data
Some apps use data even when you’re not actively using them.
Disable background data for non-essential apps in settings.
4. Turn Off Auto-Play for Videos
Social media apps like Facebook, Instagram, and TikTok autoplay videos by default.
Disable auto-play in the app settings to save data.
5. Enable Data Compression
Use data-saving features in browsers like Google Chrome’s Lite mode.
Some messaging apps also offer lower data usage modes.
6. Download Content for Offline Use
Apps like Netflix, YouTube, and Spotify allow you to download content.
Download over Wi-Fi before traveling to save mobile data.
By following these tips, you can maximize your eSIM plan while keeping data usage under control.
How to Set Up Your APN for eSIM
Our eSIMs usually come with automatic APN (Access Point Name) settings, but if you’re experiencing connectivity issues, you may need to set it up manually. Follow the steps below for your device:
For iOS Devices:
1. Open Settings.
2. Tap Mobile Data (or Cellular Data).
3. Under Mobile Data Plans, select your eSIM.
4. Tap Mobile Data Network (or Cellular Data Network).
5. In the Mobile Data APN field, enter: data.esim.
6. Leave all other fields blank.
For Android Devices:
1. Open Settings.
2. Tap Network & Internet.
3. Select Mobile Networks.
4. Tap Access Point Names (APN).
5. Add a new APN or edit the existing one by entering: data.esim.
6. Leave all other fields blank.
Once you’ve configured the APN, restart your device to apply the changes. If you still experience issues, please contact our support team for assistance.
How to Switch Between a Physical SIM and an eSIM
Switching between a physical SIM card and an eSIM can vary depending on the device you’re using. Here’s a general guide on how to switch between these SIM profiles.
Switching Between eSIM Profiles on iPhone
1. Open Settings: Go into your device’s Settings.
2. Select Cellular or Mobile Data: Tap on Cellular (or Mobile Data).
3. Choose Your eSIM: Find the eSIM you want to use from the list of available plans.
4. Turn On the Line: Select Turn on this line to activate the eSIM.
Switching Between a Physical SIM and eSIM on Android
The steps can vary by manufacturer, but here’s a general method:
1. Open Settings: Go into your device’s Settings.
2. Select SIM Cards & Mobile Networks: Tap on SIM cards & mobile networks.
3. Select SIM to Use: Here, you should see both your physical SIM and eSIM listed. Tap on the one you want to use.
4. Activate the SIM: Toggle the option to enable the selected SIM.
General Tips
• Manage SIM Settings: Make sure that the SIM you wish to use is enabled in the settings, and disable the other one to avoid conflicts.
• Device Compatibility: Some devices may have limitations on using both a physical SIM and an eSIM simultaneously. Check your device specifications to understand its capabilities.
• Carrier Support: Ensure that your carrier supports the eSIM feature and is configured correctly for your specific device.
By following these steps, you can easily switch between a physical SIM card and an eSIM on your device.
Fixing “PDP Authentication Failure” on Your eSIM
The PDP Authentication Failure error may be caused by incorrect settings, data depletion, or network compatibility. Please check the following:
1. Verify Your APN Settings
• Ensure that the APN (Access Point Name) is set correctly as shown on your eSIM installation page.
• The APN should be entered in lowercase and without spaces.
2. Check Your Data Balance
• If your eSIM has run out of data, you may see this error.
• Verify your remaining data balance in your eSIM provider’s app or account.
3. Ensure You Are Connected to the Correct Network
• Your eSIM should be connected to a supported network in your current location.
• You can find network details in My eSIMs > Details > Install eSIM (scroll down for network information).
4. Reset Network Settings (if the issue persists)
If the above steps do not resolve the issue, try resetting your network settings:
1. Open Settings on your device.
2. Go to General > Reset.
3. Select Reset Network Settings.
4. Restart your device.
🚨 Note: Resetting network settings will erase saved Wi-Fi networks, passwords, cellular settings, VPN, and APN settings.
If the issue persists, please contact our support team for further assistance.
Unable to Scan Your eSIM QR Code? Try These Fixes
If you’re having trouble scanning the QR code for your eSIM, follow these steps to resolve the issue:
1. Check Phone Compatibility
🔹 Ensure your device supports eSIM technology. Not all phones are eSIM-compatible.
2. Inspect the QR Code
🔹 Make sure the QR code is not damaged, blurry, or distorted.
🔹 If it’s unreadable, try scanning it again.
3. Adjust Lighting Conditions
🔹 Poor lighting can affect the scanner’s ability to read the QR code.
🔹 Ensure the area is well-lit and avoid glare or reflections.
4. Move Closer to the QR Code
🔹 If you’re too far away, the scanner may not recognize the code.
🔹 Hold your phone at a reasonable distance and refocus the camera.
5. Restart Your Phone
🔹 If the issue persists, restart your phone to clear any temporary software glitches.
Still Having Issues?
If none of these steps work, contact your eSIM provider for further assistance. They may offer an alternative way to install your eSIM manually.
Can’t Scan Your QR Code? Install Your eSIM Manually
If you’re unable to scan the QR code, you can install the eSIM manually by following the steps below.
📱 iOS Devices
Manual Installation Steps:
1️⃣ Open the My eSIMs tab in the app or website to find your Manual Installation details.
2️⃣ Go to Settings → Cellular/Mobile.
3️⃣ Tap Add Cellular/Mobile Plan.
4️⃣ Select Enter Details Manually and enter:
• SM-DP+ Address
• Activation Code
• Confirmation Code (if available)
5️⃣ Turn on your eSIM under Cellular/Mobile Plan.
6️⃣ Select your eSIM for Cellular/Mobile Data.
7️⃣ Enable Data Roaming (Turn off your primary line to avoid roaming charges when abroad).
8️⃣ If required, set up an APN (Access Point Name)—you can find the APN details in the eSIM installation page.
Need Help?
If you encounter any issues, please contact our Support Team for further assistance.
Can’t Scan Your QR Code? Install Your eSIM Manually
If you’re unable to scan the QR code, you can install the eSIM manually by following the steps below.
🤖 Android Devices
Manual Installation Steps:
1️⃣ Open the My eSIMs tab in the app or website to find your Manual Installation details.
2️⃣ Go to Settings → Network & Internet.
3️⃣ Tap the Add icon next to Mobile Network.
4️⃣ Tap Next when asked, “Don’t have a SIM card?”.
5️⃣ Tap Enter Code Manually and enter the SM-DP+ Address from the Manual Installation tab.
6️⃣ Turn on your eSIM under Mobile Network.
7️⃣ Enable Mobile Data.
8️⃣ Enable Data Roaming (Turn off your primary line to avoid roaming charges when abroad).
9️⃣ If required, set up an APN (Access Point Name)—you can find the APN details in the eSIM installation page.
Need Help?
If you encounter any issues, please contact our Support Team for further assistance.
I'm experiencing the ‘Cellular Plans From This Carrier Cannot be Added' error message
This error may show if you are trying to install an eSIM on a network-locked device.
You can check if your device is locked by following the steps below:
1. Go to Settings > General, and tap About.
2. Under Carrier Lock, you should see a message that says No SIM restrictions. If you don't see that message, please contact your carrier to have your device unlocked.
If you have confirmed with your current provider that your device is unlocked, please contact support.
🛑 ‘Unable to Complete Cellular Plan Change’ Error
This error typically occurs due to an installation failure caused by one of the following reasons:image.png443.22 KB1️⃣ Too Many eSIMs Installed
• Some devices allow you to store multiple eSIMs but can only have one or two active at a time.
• iPhones, for example, can store 5 to 10 eSIMs, depending on the model.
✅ Solution: If you’ve reached your device’s limit, remove old eSIMs by following the instructions here: How to Remove an eSIM
2️⃣ Cellular/Mobile Data Is Disabled
• If Mobile Data is turned off, your device may not complete the eSIM installation.
✅ Solution:
• Go to Settings → Cellular/Mobile
• Make sure Mobile Data is turned ON
3️⃣ eSIM Already Installed
• Most eSIMs can only be installed once.
✅ Solution: Check if your eSIM is already installed:
1. Go to Settings → General → About
2. Scroll down to find the ICCID (20-digit number starting with 89XXXXXXXXXX).
3. If your eSIM is already installed, you may need to adjust your settings to activate it. Refer to your eSIM installation page for details.
4️⃣ Poor Internet Connection During Installation
• A weak or unstable internet connection, especially public Wi-Fi or ship Wi-Fi, can interrupt the process.
✅ Solution:
• Switch to a stronger Wi-Fi or mobile network
• Restart the installation process
📞 Need More Help?
If the issue persists, please contact Support for further assistance.
📉 How to Enable Low Data Mode on iOS & Android
Enabling Low Data Mode can help you save mobile data while traveling by restricting background apps and limiting automatic updates.
🔹 Low Data Mode on iOS
1️⃣ Go to Settings.
2️⃣ Scroll down to Battery.
3️⃣ Tap on Battery.
4️⃣ Enable Low Power Mode.
✅ This reduces background data usage while conserving battery life.
🔹 Low Data Mode on Android
📌 Steps may vary slightly depending on your device model.
1️⃣ Go to Settings.
2️⃣ Scroll down to Battery.
3️⃣ Tap on Optimize battery usage.
4️⃣ Select Apps optimized or Optimize manually.
5️⃣ Turn on Battery Saver.
✅ This helps conserve both battery and mobile data by limiting background activity.
By enabling these modes, you can minimize data usage while still staying connected during your travels. 🚀🌍
🛠 Fixing the “This Code Is No Longer Valid” Error
If you see this error during eSIM installation, it usually means:
1️⃣ eSIM Already Installed – Your eSIM may have been fully or partially installed, even if the process seemed interrupted.
2️⃣ Partial Installation Issue – A failed setup might have left an incomplete eSIM in your settings.
✅ Steps to Fix It
🔹 Check if Your eSIM is Installed
📌 Go to Settings > Mobile Data (or Cellular) and check if your eSIM is listed.
✔️ If visible, it’s installed—no need to rescan the QR code.
🔹 Delete a Partially Installed eSIM
📌 If an incomplete eSIM appears, remove it from your device settings.
📌 Then, rescan the QR code to install it again.
🔹 Verify with Our Chatbot
📌 Our chatbot can check if the eSIM is active on your device.
✔️ If confirmed, find it under Settings > Mobile Data (or Cellular).
By following these steps, you can resolve the issue and complete your eSIM setup smoothly. 🚀
🛠 Fixing “Home SIM Not Working After eSIM Installation”
If your physical SIM stops working after installing an eSIM, try these steps:
✅ Quick Fixes
1️⃣ Check SIM Card Placement
📌 Ensure your physical SIM is properly inserted in the tray.
2️⃣ Review SIM Settings
📌 Go to Settings > Cellular (or Mobile Data) and confirm:
✔️ Your physical SIM is enabled for calls, texts, or data (if needed).
3️⃣ Restart Your Device
📌 Turn off your phone, wait a few seconds, and restart it.
4️⃣ Check for Conflicts
📌 Some devices disable the primary SIM when eSIM is activated. Check:
✔️ Data Roaming ON for eSIM
✔️ Data Roaming OFF for the physical SIM
If the issue persists, contact your carrier to verify your SIM’s status. 🚀
🛠 Fixing “iMessage Not Working After eSIM Installation”
If iMessage stops working after installing an eSIM, follow these steps:
✅ Quick Fixes
1️⃣ Verify eSIM Activation
📌 Ensure your eSIM is activated and has a working mobile data connection.
2️⃣ Check SIM Settings
📌 Go to Settings > Cellular (or Mobile Data) and confirm:
✔️ Primary SIM is set as Default Voice Line
✔️ eSIM is designated for Mobile Data
3️⃣ Review iMessage Settings
📌 Go to Settings > Messages > Send & Receive
✔️ Ensure iMessage is enabled
✔️ Confirm your phone number and email are listed correctly
4️⃣ Restart Your Device
📌 Power off your phone, wait a few seconds, and turn it back on.
5️⃣ Reset Network Settings
📌 Go to Settings > General > Reset > Reset Network Settings
⚠️ This will erase saved Wi-Fi networks, passwords, and VPN settings.
6️⃣ Update Your Device
📌 Check for updates via Settings > General > Software Update
If the issue persists, contact Apple Support for further troubleshooting. 🚀
🚀 Fixing Slow Internet Connection with eSIM
If your eSIM connection is slow, try these steps to improve your speed:
✅ Quick Fixes
1️⃣ Check Network Coverage
📌 Ensure you have a strong signal.
📌 If speeds are slow, try switching to a different network (Settings > Manual Network Selection).
2️⃣ Reset Your Network
📌 Option 1: Toggle Airplane Mode ON, wait a few seconds, then turn it OFF.
⚠️ This will erase saved Wi-Fi networks, passwords, and VPN settings.
3️⃣ Limit Background Data Usage
📌 Some apps may be using too much data. Enable Low Data Mode or Data Saver in your settings.
4️⃣ Restart Your Device
📌 A quick reboot can clear caches and refresh connections.
5️⃣ Check for External Factors
📌 Slow speeds can be due to network congestion—especially during peak hours. If this is the case, speeds should improve over time.
6️⃣ Still Experiencing Issues?
📌 Contact our support team for further assistance.
📶 How to Turn Data Roaming On/Off on Oppo Devices
🔹 Turning ON Data Roaming
1️⃣ Open Settings on your Oppo device.
2️⃣ Tap Mobile Network.
3️⃣ Select Data eSIM.
4️⃣ Toggle Data Roaming ON (it should turn blue).
5️⃣ If prompted, confirm by tapping Turn On.
🔻 Turning OFF Data Roaming
1️⃣ Follow Steps 1-3 above.
2️⃣ Toggle Data Roaming OFF (it should turn white).
3️⃣ If prompted, confirm the action.
📌 Note: Enabling Data Roaming may lead to additional charges. Check with your carrier for details.
🔒 What to Do If Your Device Is Network or Carrier-Locked
If your phone was purchased from a mobile provider, it may be carrier-locked, meaning you can’t install an eSIM from another provider.
📌 How to Check & Unlock Your Device
✅ Contact Your Carrier – Ask them to unlock your device.
✅ Wait for eSIM Activation – If your phone was recently unlocked, eSIM support may be temporarily disabled for security reasons. Contact your carrier to override this.
📢 Need help? Contact support, and we’ll be happy to assist! 😊
🌍 What Networks Can I Use with My eSIM?
Our eSIMs offer extensive multi-network coverage across different regions, ensuring you stay connected wherever you go!
📌 How to Check Available Networks
✅ During Checkout – View supported networks before purchasing.
✅ In Your Portal – Log in to see where your data bundle works.
💡 Why Multi-Network Coverage Matters
✔ Better Coverage – Switch between networks for the best signal.
✔ More Choices – Select the network that suits you best.
✔ Stay Connected Anywhere – Even in rural or remote areas.
🔹 Tip: With multi-network support, you can roam freely without worrying about losing connection!
🔓 What to Do If Your Device Is Network Locked
A network-locked device can only work with a specific carrier, preventing eSIM activation. If your device is locked, here’s how to unlock it:
📌 Steps to Unlock Your Device
✅ Contact Your Carrier – Your provider can unlock your phone, though fees or conditions may apply.
✅ Explore Third-Party Services – Some companies offer unlocking services, but be cautious—ensure they are legitimate.
✅ Consider a New Device – If unlocking isn’t an option, purchasing an unlocked phone may be the best solution.
⚠️ Important Considerations
🔹 Not all devices are eligible for unlocking.
🔹 Unlocking may void your warranty—check with your provider first.
Following these steps will help you determine the best way to unlock your device and start using an eSIM! 🚀
How to Install an eSIM Manually on a Google Device
This guide provides a step-by-step walkthrough for installing an eSIM manually on your Google device.
Installing an eSIM Manually
Before starting the installation process, ensure you have the following:
• A strong internet connection: Ideally, connect to Wi-Fi or ensure you have a good mobile data connection.
• An eSIM-compatible device: If you are unsure whether your device supports eSIMs, check the relevant list of compatible devices.
• An unlocked device: Verify that your device is not locked to a specific network by checking the locked/unlocked devices guide.
Note: Remember to enable Data Roaming once the installation is complete.
Step-by-Step Installation
1. Open Settings: Go into your Settings and tap on Network & internet.
2. Add Mobile Network: Tap the + next to Mobile network.
3. SIM Card Setup: On the new screen, tap Don’t have a SIM card?.
4. Proceed to Next Step: Tap Next.
5. Access Help: When prompted with the option to scan a QR code, tap Need help?.
6. Manual Entry: Select Enter it manually.
7. Input Your Details: To install the eSIM manually, you will need your SMDP+ Address and SMDP+ Activation Code. Enter them in the format: 1$SMDP+ Address$SMDP+ Activation Code. The final code should resemble the example provided in your reference materials.
8. Activate Installation: Tap Activate to begin the installation process. Note: Do NOT close this window during the installation, as it may cause the process to fail.
9. Wait for Activation: Allow up to 10 minutes for the eSIM to activate.
10. Return to Network Settings: Once activation is complete, go back into Network & internet.
11. Access Mobile Networks: Tap on Mobile Networks.
12. Enable Data Roaming: Ensure your Data Roaming is toggled On.
13. Verify Toggle: Confirm that the Data Roaming toggle is set as shown in the installation confirmation.
14. Completion: The eSIM is now successfully installed and set up on your device.
Following these steps will allow you to install an eSIM manually on your Google device smoothly.
How to Install an eSIM Using a QR Code on Google Devices
This guide provides a step-by-step walkthrough for installing an eSIM on your Google device using a QR code.
Installing an eSIM Using a QR Code
Before you start the installation, ensure you have the following:
• A strong internet connection: Ideally, connect to Wi-Fi or ensure you have a stable mobile data connection.
• An eSIM-compatible device: If you’re unsure whether your device supports eSIMs, refer to the relevant list of compatible devices.
• An unlocked device: Make sure your device is not locked to a specific network by checking the locked/unlocked devices guide.
Note: Don’t forget to enable Data Roaming after the installation is complete.
Step-by-Step Installation
1. Open Settings: Go into your Settings and tap on Network & internet.
2. Add Mobile Network: Tap the + next to Mobile network.
3. SIM Card Setup: On the new screen, tap Don’t have a SIM card?.
4. Proceed to Next Step: Tap Next.
5. Scan QR Code: Use your device’s camera to scan the QR code provided by your carrier.
6. Activate eSIM: On the Data eSIM screen, tap Activate and wait for the activation process to finish.
• Note: Do NOT close this window during the installation, as it may interrupt the process.
7. Select Primary SIM: Once the eSIM has been successfully installed, you will be taken to a screen where you can choose which SIM you would like to use for your number. We recommend using your primary SIM card for this section.
8. Enable Data Roaming: After completing the setup, ensure that your Data Roaming is toggled On.
9. Verify Data Roaming: The Data Roaming toggle should appear as enabled on the installed eSIM.
10. Completion: Your eSIM is now installed and ready to use.
By following these steps, you can successfully install an eSIM on your Google device using a QR code.
How to Uninstall an eSIM from a Google Device
To uninstall an eSIM from your Google device, follow these steps. Ensure you have a stable internet connection, ideally by connecting to Wi-Fi or using a good 4G connection. You also have the option to temporarily disable an eSIM if you plan to use it again. Please note that deactivating or disabling an eSIM does not extend its validity.
Uninstall an eSIM from Google Device
1. Open Settings: Go to Settings on your device.
2. Navigate to Network & Internet: Tap on Network & Internet.
3. Select Mobile Networks: Tap on Mobile Networks, then choose the eSIM you want to remove from the list.
4. Erase SIM: Scroll down until you see the option for Erase SIM.
5. Confirm Erasure: Tap Erase and wait for the eSIM to be erased.
6. Completion: Once this is done, the eSIM should be successfully removed from your device.
Following these steps will help you uninstall the eSIM from your Google device smoothly.
Identify Device Model on Google Device
If your Google device is newer than or the same as the Google Pixel 2 (only devices purchased with Google Fi service), it should be compatible with an eSIM. You can verify your device model by following these steps:
Check My Google Model
1. Open Settings: Go to Settings on your device.
2. Scroll to About Phone: Scroll down until you see the About Phone section.
3. View Device Name: At the top, you will see Device Name, which displays your phone model.
By following these steps, you can easily identify your Google device model to confirm its eSIM compatibility.
Manual Network Selection on a Google Device
If you experience poor-quality connection issues on a specific network, you can manually search for and select a different network. This will allow you to connect only to the networks that we support.
Manually Selecting a Network
1. Open Settings: Go to Settings on your device.
2. Select Network & Internet: Tap on Network & Internet.
3. Access Mobile Networks: Tap on Mobile Networks.
4. Choose Your eSIM: Select the eSIM for which you want to change the network.
5. Disable Automatic Selection: De-select the Automatically select network option.
6. View Available Networks: This will take you to a screen displaying all available networks in your current area.
7. Connect to a Network: Choose the network you wish to connect to.
By following these steps, you can manually select a network on your Google device to ensure a better connection.
Set Up an APN on a Google Device
While all our eSIMs come with an automatic Access Point Name (APN) configuration, you can check or manually configure the APN by following these steps:
Checking My APN
1. Open Settings: Go to Settings on your device.
2. Select Network & Internet: Tap on Network & Internet.
3. Access Mobile Networks: Tap on Mobile Networks.
4. Select eSIM: Choose the eSIM for which you want to check the APN.
5. Open Advanced Settings: Scroll down and tap on Advanced.
6. Access Point Names: In the drop-down menu, select Access Point Names.
7. Check APN Name: Look for the APN name, which should be listed as data.esim. If you do not see this name, proceed to the next step.
8. Edit APN: Tap on Planet3 and rename it to data.esim. Leave the other fields blank.
Following these steps will help ensure your APN is correctly set up for your eSIM on your Google device.
Turning Data Roaming On / Off on a Google Device
Enabling Data Roaming is essential for using your eSIM. Follow these steps to turn Data Roaming on or off on your Google device.
Turning Data Roaming On
1. Open Settings: Go to Settings on your device.
2. Select Network and Internet: Tap on Network and Internet.
3. Access Mobile Network: Tap on Mobile Network.
4. Choose eSIM: Select the eSIM you want to enable Data Roaming for.
5. Toggle Data Roaming: Ensure the Data Roaming slider is toggled to on.
6. Confirmation: The Data Roaming toggle should indicate that it is enabled for the installed eSIM.
Turning Data Roaming Off
1. Open Settings: Go to Settings on your device.
2. Select Network and Internet: Tap on Network and Internet.
3. Access Mobile Network: Tap on Mobile Network.
4. Choose eSIM: Select the eSIM you want to disable Data Roaming for.
5. Toggle Data Roaming: Toggle the Data Roaming slider to off.
Following these steps will allow you to easily manage Data Roaming settings on your Google device, ensuring your eSIM works properly when needed.
How to Install an eSIM Manually on a Huawei Device
This guide provides a step-by-step walkthrough for installing an eSIM manually on your Huawei device.
Before You Start
Make sure you have the following:
• Strong Internet Connection: Ideally, connect to Wi-Fi or ensure a good mobile data connection.
• eSIM Compatible Device: If you’re unsure, check the list of compatible devices.
• Unlocked Device: Confirm that your device is not locked to a specific network.
Remember to enable Data Roaming after installation.
Installing an eSIM Manually
1. Open Settings: Go to Settings on your device.
2. Access Mobile Network: Tap on Mobile Network.
3. Select SIM Management: Tap on SIM Management.
4. Add eSIM: Tap Add eSIM.
5. Enter Manually: Click on the + in the bottom left of the screen, then tap Enter Manually.
6. Input SMDP+ Information:
• You will need your SMDP+ Address and SMDP+ Activation Code.
• Enter the information in the format: 1$SMDP+ Address$SMDP+ Activation Code.
• Leave the confirmation code section blank.
7. Add eSIM: Tap Add this eSIM.
Note: Do NOT close this window, or the installation will stop.
8. Wait for Activation: Allow up to 10 minutes for the eSIM to activate.
9. Access eSIM Settings: Once the eSIM has finished installing, tap into the eSIM settings.
10. Enable eSIM: Tap to enable the eSIM.
11. Check Mobile Data Settings: Go back into Mobile Network and tap on Mobile Data.
12. Turn On Data Roaming: Ensure that your Data Roaming is toggled on.
13. Confirmation: The Data Roaming toggle should show as enabled.
14. Completion: Your eSIM is now installed and set up.
Following these steps will help you successfully install your eSIM on your Huawei device.
How to Install an eSIM Using a QR Code on Huawei Devices
This guide provides a step-by-step walkthrough for installing an eSIM on your Huawei device using a QR code.
Before You Start
Ensure you have the following:
• Strong Internet Connection: Ideally, connect to Wi-Fi or have a good mobile data connection.
• eSIM Compatible Device: If unsure, check the list of compatible devices.
• Unlocked Device: Confirm that your device is not locked to a specific network.
Don’t forget to enable Data Roaming after installation.
Installing an eSIM Using a QR Code
1. Open Settings: Go to Settings on your device.
2. Access Mobile Network: Tap on Mobile Network.
3. Select SIM Management: Tap on SIM Management.
4. Add eSIM: Tap Add eSIM.
5. Scan QR Code: Click on the + in the bottom left of the screen to scan the QR code provided.
6. Add eSIM: Tap Add this eSIM.
Note: Do NOT close this window, or the installation will stop.
7. Wait for Activation: Allow up to 10 minutes for the eSIM to activate.
8. Access eSIM Settings: Once the eSIM has finished installing, tap into the eSIM settings.
9. Enable eSIM: Tap to enable the eSIM.
10. Check Mobile Data Settings: Go back into Mobile Network and tap on Mobile Data.
11. Turn On Data Roaming: Ensure that your Data Roaming is toggled on.
12. Confirmation: The Data Roaming toggle should show as enabled.
13. Completion: Your eSIM is now installed and set up.
Following these steps will help you successfully install your eSIM on your Huawei device.
How to Uninstall an eSIM from Huawei Device
To uninstall an eSIM from your Huawei device, please follow the steps below. Before starting the uninstall process, ensure that you have a stable internet connection; ideally, connect to a local Wi-Fi or use a good 4G connection. You can also temporarily disable an eSIM if you intend to use it again, but note that deactivating or disabling an eSIM will not extend its validity.
Uninstall an eSIM from Huawei Device
1. Open Settings: Go to Settings on your device.
2. Access Mobile Networks: Tap on Mobile Networks.
3. Select SIM Management: Tap into SIM Management.
4. Choose eSIM: Select the eSIM you would like to remove from your device.
5. Disable the eSIM: Tap on the enabled eSIM. (Note: You won’t be able to remove the eSIM unless it is disabled.)
6. Tap DELETE: Click on the DELETE button and tick the box next to I understand, then tap the DELETE button again.
7. Confirmation: Once this is done, your eSIM should have been successfully removed.
Following these steps will help you uninstall the eSIM from your Huawei device smoothly.
Identify Device Model on Huawei Device
To determine if your Huawei device is compatible with an eSIM (if it is newer than or the same as the Huawei P40), follow these steps:
Check My Huawei Model
1. Open Settings: Go to Settings on your device.
2. Access About Phone: Scroll down and tap on About Phone.
3. Find Your Device Model: Your device model will be displayed within this section.
By following these steps, you can easily identify the model of your Huawei device and check its compatibility with eSIM technology.
Locate ICCID (eSIM Serial Number) on Huawei Devices
If you need to find the unique ICCID associated with your eSIM, follow these steps on your Huawei device:
Finding My ICCID
1. Open Settings: Navigate to Settings on your device.
2. Select Mobile Network: Tap on Mobile Network.
3. Access SIM Management: Tap on SIM Management.
4. Choose Your eSIM: Select the eSIM for which you want to check the ICCID.
5. View ICCID: Tap on the enabled eSIM, and your ICCID will be displayed.
By following these steps, you can easily find the ICCID for your eSIM on Huawei devices.
Manual Network Selection on a Huawei Device
If you’re experiencing a poor-quality connection on a specific network, you can manually select a different network to improve your service. Note that you will only be able to connect to networks supported by your service provider.
Manually Selecting a Network
1. Open Settings: Navigate to Settings on your Huawei device.
2. Select Mobile Network: Tap on Mobile Network.
3. Access Mobile Data: Go into Mobile Data.
4. Find Network Provider: Scroll to the bottom and select Network Provider.
5. Disable Automatic Selection: Turn off the Automatic toggle so it appears white.
6. Search for Networks: A search message will appear at the bottom of the screen while your device scans for available networks.
7. Choose Your Network: Once the search is complete, you’ll see a list of providers that are available in your area. Tap on the desired network to connect.
By following these steps, you should be able to manually select a network that provides a better connection for your needs.
Setting Up an APN on a Huawei Device
While all our eSIMs come with an automatic Access Point Name (APN) that typically doesn’t require manual setup, you can check or manually configure the APN if needed. Here’s how to do it on a Huawei device.
Checking My APN
1. Open Settings: Go to Settings on your Huawei device.
2. Tap Mobile Network: Select Mobile Network.
3. Access Mobile Data: Tap on Mobile Data.
4. Locate APNs: Scroll down and select Access Point Names (APNs).
5. Check APN Name: Here, you should see an entry named data.esim. If it’s not listed, proceed to the next step.
6. Edit Existing APN: Tap on the APN that appears in your list.
7. Rename APN: Manually rename the APN to data.esim. Leave all other fields blank.
After making these changes, your APN should be correctly configured for optimal performance with your eSIM. If you encounter any issues, consider reaching out to your carrier for further assistance.
Turning Data Roaming On/Off on Huawei Devices
To ensure your eSIM functions correctly, it’s essential to have Data Roaming enabled on your Huawei device. Here’s how to manage your Data Roaming settings.
Turning On Data Roaming
1. Open Settings: Go to Settings on your Huawei device.
2. Select Mobile Network: Tap on Mobile Network.
3. Access Mobile Data: Tap on Mobile Data.
4. Find Data Roaming Toggle: Scroll down to locate the toggle for Data Roaming.
5. Enable Data Roaming: If the toggle is white, tap it to turn it blue, which indicates that Data Roaming is now enabled.
Once the toggle is blue, your Data Roaming is active, and your eSIM should function properly.
Turning Off Data Roaming
1. Follow Steps 1-3 Above: Navigate to Settings > Mobile Network > Mobile Data.
2. Locate Data Roaming Toggle: Scroll to find the Data Roaming toggle.
3. Disable Data Roaming: If the toggle is blue, tap it to turn it white, which indicates that Data Roaming is now disabled.
Disabling Data Roaming can help manage costs while traveling or using mobile data. If you have any issues or questions regarding your eSIM, please reach out to your carrier for assistance.
How to Install an eSIM Manually on a Motorola Razr
This guide provides a step-by-step walkthrough for installing an eSIM manually on your Motorola Razr device.
Prerequisites
Before you start the installation process, ensure you have the following:
• A strong internet connection: Ideally, connect to Wi-Fi or have a reliable mobile data connection.
• An eSIM compatible device: Check if your device supports eSIMs. Refer to the list of compatible devices if you’re unsure.
• An unlocked device: Verify whether your device is locked to a specific network. For details, consult the locked/unlocked devices article.
Remember to enable Data Roaming after the installation is complete.
Steps to Install an eSIM Manually
1. Open Settings: Go to Settings on your Motorola Razr.
2. Select Network & Internet: Tap on Network & Internet.
3. Access Mobile Network: Tap on Mobile Network.
4. Open Advanced Menu: Tap the drop-down menu labeled Advanced.
5. Select Carrier: Tap on Carrier.
6. Add Carrier: Tap Add carrier.
7. Proceed to Next Step: Tap Next.
8. Enter Code Manually: Tap Enter code manually.
9. Input SMDP+ Information: You will need your SMDP+ Address and SMDP+ Activation Code. Enter them in the format:
1$SMDP+ Address$SMDP+ Activation Code
The code should look similar to the format shown in your documentation.
10. Start the Installation: Tap Start to initiate the installation process. Note: Do NOT close this window during the installation, as it may cause the process to fail.
11. Wait for Activation: Allow up to 10 minutes for the eSIM to activate.
12. Complete the Installation: Once activation is finished, tap Done.
13. Return to Previous Screen: Tap the back arrow to return to the previous menu.
14. Enable Data Roaming: Ensure that your Data Roaming is toggled On.
15. Accept the Prompt: Follow any prompts that appear to confirm the change.
16. Verify Data Roaming: Ensure the Data Roaming toggle indicates that it is enabled for the installed eSIM.
17. Completion: Your eSIM is now installed and set up!
Final Note
If you encounter any difficulties during the installation, please contact your carrier for assistance.
How to Install an eSIM Using a QR Code on Motorola Razr Devices
Follow this step-by-step guide to install an eSIM on your Motorola Razr using a QR code.
Prerequisites
Before you begin, ensure you have the following:
• A strong internet connection: It’s best to be connected to Wi-Fi or have a reliable mobile data connection.
• An eSIM compatible device: Check if your device supports eSIMs. For details, refer to the list of compatible devices.
• An unlocked device: Verify whether your device is locked to a specific carrier. For more information, check the locked/unlocked devices article.
Remember to enable Data Roaming after installation.
Steps to Install an eSIM
1. Open Settings: Go into Settings on your Motorola Razr.
2. Select Network & Internet: Tap on Network & Internet.
3. Access Mobile Network: Tap on Mobile Network.
4. Open Advanced Menu: Tap the drop-down menu labeled Advanced.
5. Select Carrier: Tap on Carrier.
6. Add Carrier: Tap Add carrier.
7. Proceed to Next Step: Tap Next.
8. Scan QR Code: Use your device’s camera to scan the QR code provided by your carrier.
9. Start the Installation: Tap Start. Note: Do NOT close this window during the installation process, as it may stop the installation.
10. Wait for Activation: Allow up to 10 minutes for the eSIM to activate, then press Done.
11. Return to Previous Screen: Once the activation is complete, tap the back arrow to return.
12. Enable Data Roaming: Make sure your Data Roaming is toggled On.
13. Accept the Prompt: Follow any prompts to confirm the change.
14. Verify Data Roaming: Ensure the Data Roaming toggle shows as enabled for the installed eSIM.
15. Completion: Your eSIM is now installed and ready to use!
Final Note
If you encounter any issues during the installation, don’t hesitate to reach out to your carrier for support.
How to Uninstall an eSIM from Motorola Razr Device
To remove an eSIM from your Motorola Razr device, follow these steps. Make sure you have a stable internet connection, preferably connected to Wi-Fi or a strong 4G network. You can also temporarily disable the eSIM if you plan to use it again later, but keep in mind that deactivating it won’t extend its validity.
Steps to Uninstall an eSIM
1. Open Settings: Go into Settings on your Motorola Razr.
2. Select Network & Internet: Tap on Network & Internet.
3. Access Mobile Network: Tap on Mobile Network.
4. Go to Advanced Options: Tap on the Advanced option.
5. Select Carrier: Tap on Carrier.
6. Choose the eSIM to Remove: Select the eSIM you want to uninstall.
7. Tap Delete: Press the Delete button.
8. Confirm Deletion: Read the prompt and accept it by pressing Delete again, then wait for the eSIM to be erased.
9. Completion: Once the process is complete, the eSIM should be successfully removed from your device.
Important Note
If you encounter any issues during the uninstall process or need further assistance, consider reaching out to your carrier’s customer support for help.
Identify Device Model on Motorola Razr Device
To determine whether your Motorola device is compatible with an eSIM, you can check your device model. If your device is newer than or the same as the Motorola Razr (2020), it should support eSIM functionality. Follow these steps to check your model:
Steps to Check Your Motorola Model
1. Open Settings: Go to Settings on your Motorola Razr.
2. Navigate to System: Scroll down until you see the option for System.
3. View Device Model: At the top of the list, you will see your device model or name displayed.
Important Note
If you find that your device is compatible with eSIM, you can proceed with eSIM activation or management as needed. If not, consider contacting your service provider for alternatives or device upgrade options.
Manual Network Selection on Motorola Razr Devices
If you’re experiencing a poor-quality connection on your current network, you can manually search for and select a different network. Keep in mind that you will only have access to networks that we offer service on. Follow these steps to manually select a network:
Steps for Manual Network Selection
1. Open Settings: Go to Settings on your Motorola Razr.
2. Tap on Network & Internet: Select Network & Internet from the menu.
3. Access Mobile Network: Tap on Mobile Network.
4. Open Advanced Options: Click on the Advanced drop-down menu.
6. Scan for Available Networks: Wait for your device to scan and display all eligible networks.
7. Select a Network: Choose the network you would like to connect to from the list.
8. Connect: Once you select a network, your device will connect to it.
Important Note
After switching networks, allow a moment for your device to establish a connection. If you have any trouble connecting or if the signal remains poor, consider switching back to the original network or contacting your service provider for assistance.
Setting Up an APN on Motorola Razr Devices
All eSIMs automatically configure an Access Point Name (APN), so manual setup is usually not necessary. However, if you need to check or configure the APN manually, follow these steps:
Checking or Setting Up the APN
1. Open Settings: Go to Settings on your Motorola Razr.
2. Select Network & Internet: Tap on Network & Internet.
3. Click Mobile Network: Tap on Mobile Network.
4. Access Advanced Options: Click on the Advanced drop-down menu.
5. Tap on Access Point Names: Select Access Point Names.
6. Check for data.esim: Look for an APN named data.esim.
• If it is listed, you are all set.
• If it is not listed, proceed to the next step.
7. Modify Existing APN: Click on the APN named Planet3 (or any other name it might have).
8. Rename APN: Manually rename it to data.esim in the name section.
9. Save Changes: Ensure to save any changes you make.
Important Note
Once you’ve set up the APN, restart your device to ensure that all settings are correctly applied and the connection is established. If you encounter any issues, you may want to check with your carrier for the correct APN settings specific to your plan.
Turning Data Roaming On/Off on Motorola Razr
To use your eSIM on a Motorola Razr, it’s essential to enable Data Roaming. Here’s how to turn Data Roaming on and off in your device settings.
Turning Data Roaming On
1. Open Settings: Go to Settings on your Motorola Razr.
2. Select Network & Internet: Tap on Network & Internet.
3. Choose Mobile Network: Tap on Mobile Network.
4. Enable Data Roaming:
• Ensure that the Data Roaming option is enabled. If the toggle is white, tap it to turn it blue.
5. Confirmation: A confirmation screen will appear.
6. Check Status: If the toggle is blue, Data Roaming is now enabled.
Turning Data Roaming Off
To disable Data Roaming, simply follow the same steps above and toggle the Data Roaming option back to white. This will turn off Data Roaming on your device.
Important Note
Remember that enabling Data Roaming may incur additional charges depending on your carrier and location. Always check with your carrier for specific information regarding roaming charges and coverage.
How to Install an eSIM Manually on an Oppo Device
This guide provides a step-by-step walkthrough for manually installing an eSIM on your Oppo device.
Prerequisites
Before starting the installation, ensure you have the following:
• Strong Internet Connection: Ideally, connect to Wi-Fi or have a reliable mobile data connection.
• eSIM-Compatible Device: Check if your device supports eSIMs. Refer to the article on the List of Compatible Devices for verification.
• Unlocked Device: Ensure that your device is not locked to a specific mobile network. For details, consult the article on Locked/Unlocked Devices.
Remember to turn on Data Roaming once the installation is complete.
Installation Steps
1. Open Settings: Go to Settings on your Oppo device.
2. Select Mobile Network: Tap on Mobile Network.
3. Add eSIM: Tap on eSIM.
4. Tap Next: Select Add eSIM and then tap Next.
5. Need Help?: When the QR code screen appears, tap on Need help?.
6. Manual Entry: Tap on Enter it manually.
7. Input SMDP+ Details: To manually install the eSIM, enter your SMDP+ Address and SMDP+ Activation Code in the format:
“1$SMDP+ Address$SMDP+ Activation Code”.
Your code should look similar to the one shown in the reference screenshot.
8. Download eSIM: Tap Download to initiate the installation process. Note: Do NOT close this window while the installation is in progress, as it may cause the installation to fail.
9. Activation Time: Allow up to 10 minutes for the eSIM to activate.
10. Go to Settings: After activation, tap Settings again.
11. Check Data Roaming: Ensure your Data Roaming is turned on by going into Data eSIM.
12. Enable Data Roaming: If the Data Roaming toggle appears white, tap it to enable it.
13. Confirmation: The Data Roaming toggle should now be displayed in blue, indicating it is on.
14. Completion: Your eSIM is now installed and set up successfully.
Troubleshooting
If you face any issues during the installation, double-check your internet connection and ensure that your device is unlocked and compatible with eSIM technology. If the installation fails, retry the process from the beginning.
How to Install an eSIM Using a QR Code on Oppo Device
This guide provides a step-by-step walkthrough for installing an eSIM on your Oppo device using a QR code.
Installing an eSIM Using a QR Code
Before you begin the installation process, ensure you have the following:
• Strong Internet Connection: Ideally, connect to Wi-Fi or have a reliable mobile data connection.
• eSIM-Compatible Device: Check if your device supports eSIMs. Refer to the article on the List of Compatible Devices for confirmation.
• Unlocked Device: Make sure your device is not locked to a specific network. For details, check the article on Locked/Unlocked Devices.
Don’t forget to turn on Data Roaming once the installation is complete.
Steps to Install
1. Open Settings: Go to Settings on your Oppo device.
2. Tap Mobile Network: Select Mobile Network.
3. Turn on eSIM: Tap on eSIM and ensure it is turned on.
4. Loading Screen: A loading screen will appear for a moment.
5. Add eSIM: Tap on Add eSIM.
6. Next: Tap Next to proceed.
7. Scan QR Code: Use your device camera to scan the QR code provided by your carrier.
8. Download eSIM: Accept the prompt and tap Download. Note: Do NOT close this window while the installation is in progress.
9. Activation Time: Allow up to 10 minutes for the eSIM to activate.
10. Go to Settings: Once activated, tap Settings.
11. Access eSIM: Tap on eSIM again.
12. Enable eSIM: Tap the three dots on the right-hand side and enable the eSIM.
13. Accept Prompt: Confirm by accepting the prompt to enable.
14. Tap Yes: Confirm your choice by tapping Yes.
15. Check Data Roaming: Ensure your Data Roaming is turned on by going into Data eSIM.
16. Toggle Data Roaming: If the Data Roaming toggle appears greyed out, tap it to enable.
17. Confirmation: The Data Roaming toggle should now show as blue on the installed eSIM.
18. Completion: Your eSIM is now installed and set up successfully.
How to Uninstall an eSIM from Oppo Device
To uninstall an eSIM from your Oppo device, follow the steps below. Ensure you have a stable internet connection before starting the process. You can also temporarily disable an eSIM if you plan to use it again later. Please note that deactivating or disabling an eSIM will not extend its validity.
Uninstall an eSIM from Oppo Device
1. Open Settings: Go to the Settings app on your Oppo device.
2. Access Mobile Network: Tap on Mobile Network.
3. Select eSIM: Tap into eSIM.
4. Choose the eSIM to Remove: Tap on the eSIM you want to remove.
5. Delete the eSIM: Tap on the three dots shown on the right-hand side and select Delete.
6. Confirm Deletion: Accept the prompt that appears by pressing Delete, then wait for the eSIM to be removed.
7. Completion: Once the process is finished, your eSIM should be successfully uninstalled.
Identify Device Model on Oppo Devices
To check if your Oppo device is compatible with eSIM, follow these steps to identify your device model:
Check My Oppo Model
1. Open Settings: Go to the Settings app on your Oppo device.
2. Navigate to About Device: Scroll down and tap on About Device.
3. View Device Information: In this section, you will see the device name and model.
If your device is newer or the same as the Oppo Find X3 Pro, it should support eSIM functionality.
Manual Network Selection on Oppo Devices
If you’re experiencing a poor-quality connection on a specific network, manually selecting a different network can help. Here’s how to do it:
Manually Selecting a Network
1. Open Settings: Go to the Settings app on your Oppo device.
2. Access Mobile Network: Tap on Mobile Network.
3. Select Data eSIM: Click on Data eSIM.
4. Operator Settings: Tap on Operator.
5. Disable Auto-Select: Turn off the Auto-select option.
6. Search for Networks: Wait for your device to search for all available networks.
7. Choose Your Network: Once the search is complete, select the desired network from the list.
Final Steps
After selecting a network, please allow a moment for your device to establish a connection. Once connected, you should be able to use data services as normal.
Setting Up an APN on Oppo Devices
Although all eSIMs come with an automatic Access Point Name (APN) configuration, you may want to check or manually adjust the APN settings. Here’s how to do it:
Checking My APN
1. Open Settings: Go to the Settings app on your Oppo device.
2. Access Mobile Network: Tap on Mobile Network.
3. Select Data eSIM: Click on Data eSIM.
4. Access Point Names: Tap on Access Point Names.
5. View Current APN:
• Here, you should see the APN name listed as data.esim.
• If the name does not appear as expected, proceed to step 6.
6. Rename APN:
• Tap on the APN entry.
• Manually rename it to data.esim in the Name section.
• Leave the other fields blank.
Note
After making changes, ensure you save your settings if prompted, and restart your device if necessary to apply the new APN configuration.
Can’t Connect My eSIM on Android
If you’re experiencing difficulties connecting your eSIM on an Android device, you can try the following troubleshooting steps:
1. Enable Data Roaming: Ensure that data roaming is turned on for your eSIM. Go to Settings > Network & internet > Mobile Network and check the data roaming option.
2. Configure Mobile Data Settings: Make sure your device is set to use the eSIM for mobile data. You can check this in Settings > Network & internet > Mobile Network and confirm that the eSIM is selected as the preferred mobile data source.
3. Restart Connection: Turn on Airplane Mode for a few seconds and then turn it off again, or simply restart your device. This can help refresh your network connection.
4. Manually Connect to a Supported Network: Go to Settings > Network & internet > Mobile Network > Advanced and select Network operators. From there, manually search for and connect to a supported network.
If you’ve gone through these steps and still cannot connect, please contact our support team for further assistance.
How to Change the Name/Label of Your eSIM Profile on Android
Customizing the label of your eSIM profiles can help you easily identify them on your device. Here’s a step-by-step guide on how to change the name of your eSIM profile on Android:
Changing Your eSIM Label
1. Open Settings: Go to the Settings app on your Android device.
2. Tap on SIM Cards & Mobile Networks: Select SIM cards & mobile networks from the menu.
3. Manage eSIM: Scroll down and tap on Manage eSIM.
4. Select Your eSIM: Choose the eSIM profile you want to rename.
5. Change Nickname: Here, you can enter a new nickname for your eSIM.
• (For example, you might want to label it as eSIM.)
6. Confirm Changes: Tap OK to save the new label.
Your eSIM profile is now updated with the new name, making it easier to identify among other profiles!
How to Check If My Samsung Device Is Unlocked
To use an eSIM on your Samsung device, you need to ensure that your device is unlocked. Follow the steps below to check if your device is unlocked.
Steps to Check If Your Device Is Unlocked
1. Open Settings: Go into the Settings app on your device.
2. Access Connections: Tap on Connections.
3. Select Mobile Networks: Tap on Mobile Networks.
4. Network Operators: Tap on Network Operators.
5. Disable Automatic Selection: Turn off the Select Automatically option.
6. Check Available Networks:
• If your device is unlocked, a list of available networks will display.
• If no list appears or you see only one network, your device may be locked to a specific carrier.
Next Steps
If your device is locked, contact your carrier to get it unlocked. Keep in mind that if your device was recently unlocked, you may need to wait for eSIM support to be activated, as some carriers may temporarily disable it for security reasons.
How to Install an eSIM Manually on a Samsung Device
This guide provides a step-by-step walkthrough for manually installing an eSIM on your Samsung device.
Prerequisites
Before you start, make sure you have the following:
• A strong internet connection: Ideally, connect to Wi-Fi or ensure a good mobile signal.
• An eSIM compatible device: If you’re unsure about compatibility, check the List of Compatible Devices.
• An unlocked device: Confirm that your device is not locked to a specific network by reviewing our article on Locked/Unlocked Devices.
• SMDP+ Address and SMDP+ Activation Code: You’ll need this information to manually install the eSIM.
Installing an eSIM Manually
1. Open Settings and tap on Connections.
2. Tap on SIM Manager.
3. Tap Add eSIM.
4. Select the option Scan QR Code from Service Provider or tap Enter Activation Code.
5. To manually install the eSIM, enter your SMDP+ Address and SMDP+ Activation Code in the format: 1$SMDP+ Address$SMDP+ Activation Code. Ensure the format is correct, as shown in the example below.
6. Tap Add to initiate the installation process.
• Note: Do NOT close this window while the installation is in progress, as it may cause the installation to fail.
7. Wait up to 10 minutes for the eSIM to activate.
8. Once the activation is complete, tap on Connections.
9. Tap on Mobile Networks.
10. Ensure that Data Roaming is turned on.
• If the toggle for Data Roaming is blue, it means it is enabled.
11. Your eSIM is now installed and set up!
If you have any questions or need further assistance, feel free to ask!
How to Install an eSIM Using a QR Code on Samsung Devices
Follow this step-by-step guide to install an eSIM on your Samsung device using a QR code.
Before You Start
Ensure you have the following:
• A strong internet connection: Ideally, connect to Wi-Fi or have a reliable mobile data connection.
• An eSIM compatible device: Check if your device is compatible by referring to the list of compatible devices.
• An unlocked device: Make sure your device isn’t locked to a specific network. If you’re unsure, refer to the article on locked/unlocked devices.
Steps to Install the eSIM
1. Open Settings: Go to Settings and tap on Connections.
2. Access SIM Manager: Tap on SIM Manager.
3. Add eSIM: Tap on Add eSIM.
4. Scan QR Code: Select Scan QR Code from service provider.
5. Scan the QR Code: Use your device’s camera to scan the QR code provided by your carrier.
6. Add eSIM: Tap on Add. Note: Do NOT close this window, as it may interrupt the installation.
7. Activation: Allow up to 10 minutes for the eSIM to activate.
8. Complete Installation: Tap Done to finish the installation.
9. Set Default SIM: Leave the Calls and Messages settings on your original primary SIM.
10. Return to SIM Manager: Go back into SIM Manager.
11. Select eSIM for Data: Tap on the eSIM you want to use for mobile data.
12. Access Mobile Networks: Go back to Connections and tap on Mobile networks.
13. Enable Data: Toggle the switch to On.
14. Check Data Roaming: Ensure the Data Roaming toggle is enabled for the installed eSIM.
15. Complete Setup: Your eSIM is now installed and set up.
If you encounter any issues during the process, feel free to ask for help!
How to Switch Your eSIM to a New Android Device
If you’ve recently upgraded your phone and need to transfer your eSIM, follow the steps below:
1. Check Compatibility: Ensure your new Android device is eSIM-compatible and supports the eSIM feature. You can find this information in the device specifications or manual.
2. Contact Your Carrier: Reach out to your current carrier to obtain a QR code or activation code for your eSIM. This code is necessary for activating the eSIM on your new device.
3. Open Settings: On your new Android device, go to Settings and look for the option to add a new cellular plan or activate the eSIM. The location of this option may vary by device and Android version.
4. Scan QR Code: Use your device’s camera to scan the QR code or enter the activation code provided by your carrier.
5. Follow On-Screen Instructions: Complete the activation process by following the on-screen instructions.
6. Final Steps: Once the activation process is complete, your new device will be ready to use with your eSIM. You may need to restart your device or wait a few minutes for the new eSIM to activate fully.
If you have any questions or need assistance during the process, feel free to ask!
How to Turn Your eSIM On and Off on Android Devices
Sometimes your eSIM may become disabled, or you might want to disable it for various reasons, such as switching to a different eSIM, saving data, or using another SIM while traveling. This guide will help you enable or disable your eSIM on your Android device.
Enabling eSIMs
1. Go to Settings: Open the Settings app on your device.
2. Select SIM Cards & Mobile Networks: Tap on SIM cards & mobile networks.
3. Manage eSIM: Scroll down and select Manage eSIM.
4. Select Your eSIM: Tap on the eSIM you wish to enable.
5. Enable the eSIM: Follow the prompts to enable the eSIM.
6. Wait for Activation: Allow a moment for the eSIM to enable.
7. Confirmation: Your eSIM is now enabled and ready to use.
Disabling eSIMs
1. Go to Settings: Open the Settings app on your device.
2. Select SIM Cards & Mobile Networks: Tap on SIM cards & mobile networks.
3. Manage eSIM: Scroll down and select Manage eSIM.
4. Select Your eSIM: Tap on the eSIM you want to disable.
5. Disable the eSIM: Follow the prompts to disable it.
6. Confirm Action: Accept the prompt to confirm.
7. Confirmation: Your eSIM is now disabled.
By following these steps, you can easily manage your eSIM on Android devices, enabling or disabling it as needed based on your requirements.
How to Uninstall an eSIM from Your Samsung Device
To uninstall an eSIM from your Samsung device, follow the steps below. Make sure you have a stable internet connection, ideally connected to local Wi-Fi or a strong 4G signal.
Uninstall an eSIM from Samsung Device
1. Open Settings on your device and tap on Connections.
2. Tap on SIM Manager.
3. Select the eSIM you want to remove from the list.
4. Tap Remove. If prompted, provide your device’s Passcode or use Face ID.
5. After confirming your Passcode or Face ID, tap the Remove button again to complete the process.
If you plan to use the eSIM again in the future, consider temporarily disabling it instead of uninstalling it. Please note that deactivating or disabling an eSIM will not extend its validity. If you have any questions, feel free to ask!
Identify Device Model on Samsung Device
To check if your Samsung device is compatible with an eSIM, follow these steps:
Check My Samsung Model
1. Open Settings on your device and scroll down to the bottom to find About phone.
2. Tap on the About phone section.
3. Here, you will see your Device Model listed.
If your device is newer or the same as the Samsung Galaxy S20, it should be compatible with an eSIM. If you have any further questions, feel free to ask!
Locate ICCID (eSIM Serial Number) on Samsung Devices
If you need to identify the unique ICCID associated with your eSIM, follow the steps below on your Samsung device.
Finding My ICCID
1. Open Settings and tap on Connections.
2. Tap on SIM Manager.
3. Select the eSIM for which you want to know the ICCID.
4. Click on More Information.
5. You will see the ICCID for the selected eSIM displayed on the screen.
If you have any further questions or need assistance, feel free to ask!
Manual Network Selection on Samsung Devices
If you’re experiencing a poor-quality connection on a particular network, you can manually search for and select a different network. Please note that you will only be able to connect to networks we offer service on.
Manual Network Select Guide
1. Open Settings and tap on Connections.
2. Select Mobile Networks.
3. Tap on Network Operators.
4. Disable Select Automatically.
5. Choose the network you wish to connect to from the list.
6. You are now connected to the selected network.
If you have any questions or need further assistance, feel free to ask!
Setting Up an APN on Samsung Devices
All our eSIMs come with an automatic Access Point Name (APN) configured, so manual programming is usually not necessary. However, if you want to check or manually configure the APN, follow the steps below:
Checking My APN Settings
1. Open Settings and tap on Connections.
2. Tap on Mobile Networks.
3. Tap on Access Point Names.
4. In the APN settings, look for a configuration labeled data.esim.
• If you do not see this name, select the current APN and modify it:
• Rename the APN to data.esim.
If you need any further assistance or have questions, feel free to ask!
Turning Data Roaming On/Off on a Samsung Device
Enabling Data Roaming is essential for using your eSIM. You can easily toggle Data Roaming on or off in your device settings by following these steps:
Toggling Data Roaming
1. Open Settings and tap on Connections.
2. Tap on Mobile Network.
3. Toggle Data Roaming to enable it.
• When enabled, the toggle will appear blue, indicating that Data Roaming is active.
Note: If you have another SIM card in your device, you may need to disable data services on that SIM to ensure the eSIM is used. Please be patient as the device may take a moment to reconfigure after changing the settings.
If you have any further questions or need assistance, feel free to ask!
What to do if I can't delete an Telemeteor eSIM on my Samsung Galaxy S22?
Some Samsung Galaxy S22 users have reported a known issue where they cannot delete an Telemeteor eSIM profile from their device or the SIM manager fails to load due to a software bug. This issue can be frustrating, but not to worry — workarounds are available to help you manage your eSIMs until a software update from Samsung is released to fix the problem. Check for Software Updates. If an update is available, please download and install it.
1. GO to Settings.
2. SCROLL DOWN and TAP Software update.
3. TAP Download and install.
Remove/Add a Physical SIM. This will force the SIM manager to reload.
1. INSERT the SIM removal pin into the hole to release the tray.
2. PULL the tray out gently from the tray slot.
3. ENSURE that a physical SIM is in the tray.
4. INSERT the tray back into the tray slot.
Restart your device. A simple reboot can resolve any technical issues.
1. PRESS and HOLD the side key and the volume down button simultaneously.
2. TAP Restart.
3. TAP the Restart option again.
Reset the Network settings. This will reset all network settings, including Wi-Fi, Mobile data, and Bluetooth.
1. GO to Settings.
2. SCROLL DOWN and TAP General management.
3. TAP Reset.
4. TAP Reset network settings.
5. TAP Reset settings to confirm.
Should the Telemeteor eSIM deletion issue persist after doing the workarounds above, please contact Samsung or your carrier, as the issue might be related to the device's software.
If you have any questions, please feel free to contact our support team, and we'll be happy to help!
How to Install an eSIM Manually on a Sony Device
This guide provides a step-by-step walkthrough for manually installing an eSIM on your Sony device.
Installing an eSIM Manually
Before you begin, ensure you have the following:
• A strong internet connection: Ideally, connect to Wi-Fi or have a good mobile data signal.
• An eSIM compatible device: If you’re unsure, refer to our List of compatible devices.
• Your device is network unlocked: If you need to check, see our article on Locked/Unlocked devices.
Note: Don’t forget to turn on Data Roaming once the installation is complete.
Steps to Install
1. Open Settings and tap on Network and Internet.
2. Tap on Download a SIM instead?.
3. When prompted with Scan QR Code, tap on Need help?.
4. Select Enter it manually.
5. To manually install the eSIM, you will need your SMDP+ Address and SMDP+ Activation Code. Enter them in the format: 1$SMDP+ Address$SMDP+ Activation Code. The code should look similar to the example below.
6. Tap Download.
Note: Do NOT close this window during the installation process.
7. Allow up to 10 minutes for the eSIM to activate.
8. Once activated, go back to Settings.
9. In Settings, select Use SIM and ensure the toggle is turned On.
10. Confirm that you want to turn on the eSIM.
11. Ensure that Data Roaming is toggled On.
12. The Data Roaming toggle should appear as below on the installed eSIM.
13. Your eSIM is now successfully installed and set up!
If you have any questions or need further assistance, feel free to ask!
How to Install an eSIM Using a QR Code on Sony Devices
This guide provides a step-by-step walkthrough for installing an eSIM on your Sony device using a QR code.
Installing an eSIM Using a QR Code
Before you begin, ensure you have the following:
• A strong internet connection: Ideally, connect to Wi-Fi or have a good mobile data signal.
• An eSIM compatible device: If you’re unsure, refer to our List of compatible devices.
• Your device is network unlocked: If you need to check, see our article on Locked/Unlocked devices.
Note: Don’t forget to turn on Data Roaming once the installation is complete.
Steps to Install
1. Open Settings and tap on Network and Internet.
2. Go to SIMs.
3. Tap on Download a SIM instead?.
4. Click Next.
5. Scan the QR code provided by your mobile network operator.
6. Tap Download.
Note: Do NOT close this window during the installation process.
7. Allow up to 10 minutes for the eSIM to activate.
8. Once activated, go back to Settings.
9. In Settings, select Use SIM and ensure the toggle is turned On.
10. Confirm that you want to turn on the eSIM.
11. Ensure that Data Roaming is toggled On.
12. The Data Roaming toggle should look like the one below on the installed eSIM.
13. Your eSIM is now successfully installed and set up!
If you have any questions or need further assistance, feel free to ask!
Identify Device Model on a Sony Device
If your Sony device is newer than or the same as the Sony Xperia 10, it should be compatible with eSIM functionality. Here’s how to check your device model:
Check My Sony Model
1. Open the Settings app on your Sony device.
2. Scroll down and select About Phone.
3. In this section, you will see your device’s model number displayed.
If you need further assistance or have questions about compatibility, feel free to ask!
Manual Network Selection on a Sony Device
If you’re experiencing a poor-quality connection on a specific network, you can manually search for and select a different network. Keep in mind that you will only be able to connect to networks that we support.
Manually Selecting a Network
1. Open the Settings app on your Sony device.
2. Tap on Network and Internet.
3. Go to SIMs.
4. Select the eSIM for which you want to change the network.
5. Scroll down to find the option for Automatically select network.
6. Deselect the Automatically select network option. Read the prompt that appears and select OK to confirm.
7. After confirming, your phone will take a few minutes to search for available networks.
8. Once the search is complete, you’ll see a list of networks available in your area. Select your desired network from the list, and you will be connected.
This process should help improve your connection quality. If you have any questions or need further assistance, feel free to ask!
Setting Up an APN on Sony Devices
All our eSIMs come with an automatic Access Point Name (APN) configured, so manual programming is typically not required. However, if you need to check or manually set it up, here are the steps to follow:
Checking Your APN
1. Open the Settings app on your Sony device.
2. Tap on Network and Internet.
3. Click on SIMs.
4. Select the eSIM you want to configure (for example, 3 AT 2).
5. Scroll down to find the option for Access Point Names.
6. Here, you should see the APN name listed, which should read data.esim. If it doesn’t display this name, proceed to the next step.
7. You can manually set the APN by entering data.esim in the Name section. Leave all other fields blank.
This ensures that your device is configured to access the correct network settings. If you have any further questions or need assistance, feel free to ask!
Turning Data Roaming On/Off on a Sony Device
Enabling Data Roaming is essential for using any eSIM on your Sony device. Here’s how to manage your Data Roaming settings:
Turning Data Roaming On
1. Open the Settings app on your device.
2. Tap on Network and Internet.
3. Select SIMs.
4. Choose the eSIM you would like to check Data Roaming for.
5. Ensure that Data Roaming is enabled. If the toggle is grey, tap it to turn it blue.
6. Once the toggle is blue, Data Roaming is activated.
After enabling Data Roaming, please give your device a moment to connect to a network.
Turning Data Roaming Off
To disable Data Roaming, follow the same steps:
1. Open the Settings app.
2. Tap on Network and Internet.
3. Select SIMs.
4. Choose the eSIM you want to modify.
5. Tap the toggle to turn it grey, which will disable Data Roaming.
This allows you to manage your Data Roaming preferences easily. If you have any questions or need further assistance, feel free to ask!
How to Install an eSIM Manually on a Windows Device
This guide provides a step-by-step walkthrough for manually installing an eSIM on your Windows device.
Prerequisites
Before you begin, make sure you have the following:
• A strong internet connection: Ideally, connect to Wi-Fi or ensure a good mobile signal.
• An eSIM compatible device: If you’re unsure about compatibility, check the List of Compatible Devices.
• An unlocked device: Confirm that your device is not locked to a specific network by reviewing our article on Locked/Unlocked Devices.
• SMDP+ Address and SMDP+ Activation Code: You will need this information to manually install the eSIM.
Installing an eSIM Manually
1. Open the Windows Settings app by clicking the Start menu and selecting the gear icon.
2. Select Network & Internet from the settings menu.
3. Click on Cellular and then select Add a cellular plan.
4. To manually install the eSIM, you will need to enter your SMDP+ Address and SMDP+ Activation Code in the format: 1$SMDP+ Address$SMDP+ Activation Code.
5. Click Download to start the installation process.
6. Follow the prompts to complete the eSIM activation process.
Once you’ve completed these steps, your eSIM should be successfully installed and ready to use. If you have any questions or require further assistance, feel free to ask!
How to Install an eSIM on Windows 11
This guide provides a step-by-step walkthrough for installing an eSIM on your Windows 11 device.
Prerequisites
Before you begin, ensure you have the following:
• A strong internet connection: Ideally, connect to Wi-Fi or have a good 4G signal.
• An eSIM compatible device: If you’re unsure about compatibility, check the List of Compatible Devices.
• An unlocked device: Make sure your device is not locked to a specific mobile network. For more information, refer to our article on how to check if your device is locked or unlocked.
Installing an eSIM Using a QR Code
1. Open the Windows 11 Settings app by clicking the Start button and selecting the gear icon on the left side of the Start menu.
2. Click on Network & Internet in the Settings app.
3. Select Cellular from the left-hand menu.
4. Click the Add a plan button under the Mobile data section on the right side of the page.
5. Choose eSIM as the connection type.
6. Enter the necessary information for your eSIM, such as the activation code, IMEI number, and any other details required by your carrier.
7. Follow the prompts to complete the setup process and activate your eSIM plan.
Once the eSIM is installed and activated, you should be able to use it for internet connectivity and, depending on your device and carrier, make calls as well. If you have any questions or need assistance, feel free to ask!
How to Install eSIM Using a QR Code on Windows Devices
This guide provides a step-by-step walkthrough for installing an eSIM on your Windows device using a QR code.
Prerequisites
Before you begin, ensure you have the following:
• A strong internet connection: Ideally, connect to Wi-Fi or ensure you have a reliable internet connection.
• An eSIM compatible device: If you’re unsure whether your device supports eSIM, check the article on List of Compatible Devices.
• A network-unlocked device: If you’re not certain whether your device is locked to a specific network, refer to the article on Locked/Unlocked Devices.
Installing an eSIM Using a QR Code
1. Open the Settings app on your Windows device.
2. Click on Network & Internet.
3. Select Cellular from the left-hand menu.
4. Click on Add a new eSIM profile.
5. Choose Install an eSIM from a QR code.
6. Scan the QR code provided by your mobile network operator using your device’s camera.
7. Once the QR code is scanned, the eSIM profile will automatically download and install on your device.
8. If prompted, enter any additional details required by your mobile network operator, such as your account information or verification code.
9. After the installation is complete, your Windows device will be connected to the mobile network using the eSIM.
If you encounter any issues during the installation process, feel free to ask for help!
Identify Device Model on Windows Device
To ensure your Windows device is compatible with an eSIM, you can check your device model. Follow these steps:
Check My Device Model
1. Open the Settings app.
2. Scroll down and select About.
3. On this page, you should see the Device specifications, which will include the model name and number.
If your device is newer than or the same as the Microsoft Surface Pro LTE, it should be compatible with an eSIM. If you need further assistance, feel free to ask!
Laptops which are compatible with eSIM
Microsoft Surface Pro X
Microsoft Surface Go 2
Microsoft Surface Pro LTE Advanced
Acer Swift 3
Asus Mini Transformer
Asus NovaGo
Asus VivoBook Flip 14
Samsung Galaxy Book 2
Lenovo Yoga 520
Lenovo Miix 630
Lenovo Yoga C630
HP Specter Folio 13
HP Probook G5
HP Elitebook G5
Notebooks which are compatible with eSIM
Acer Swift 7
HP Zbook G5
Locate ICCID (eSIM Serial Number) on Windows Devices
It may be necessary to identify the unique ICCID associated with your eSIM. Here are the steps to find it on a Windows device:
Finding My ICCID
1. Open the Settings app by clicking on the Start menu and selecting Settings.
2. Tap on Network & Internet.
3. Select Cellular from the left-hand menu.
4. Under Mobile Plans, you will see the ICCID listed for each active cellular plan.
If you need any more assistance, feel free to ask!
Manual Network Selection on Windows Devices
If you’re experiencing a poor-quality connection on a specific network, you can manually search for and select a different network. Please note that you can only connect to networks that we support.
Manually Selecting a Network
1. Open Settings.
2. Click on Network & Internet.
3. Select Cellular from the left-hand menu.
4. Under Mobile Plans, click on the eSIM you want to modify.
5. Scroll down to the Network selection section.
6. Click on Search for networks.
7. Your device will begin scanning for available networks. Once the scan is complete, a list of available networks will appear.
8. Click on the network you want to connect to.
9. You are now connected to your desired network.
If you need further assistance, feel free to ask!
Setting Up an APN on Windows Devices
While all our eSIMs come with an automatic Access Point Name (APN) configured, you can check or manually set it up if needed. Here’s how to do it:
Checking Your APN
1. Open the Settings app.
2. Click on Network & Internet.
3. Select Cellular from the left-hand menu.
4. Under Mobile Plans, click on the cellular plan you wish to modify.
5. Scroll down to the APN settings section.
6. Here, you should see the APN name, which should read data.esim. If it doesn’t display this name, proceed to the next step.
7. You can manually set the APN name by entering data.esim in the Name section. Leave all other fields blank.
If you have any further questions or need assistance, feel free to ask!
Turning Data Roaming On/Off on a Windows Device
To ensure your eSIM works properly, it’s essential to enable data roaming on your device. You can easily manage your data roaming settings in your device’s settings.
Turning Data Roaming On
1. Open the Settings app on your device.
2. Click on Network & Internet.
3. Select Cellular from the left-hand menu.
4. Scroll down to the Data roaming options section.
5. To enable data roaming, toggle the Data roaming switch to the On position. Your device may prompt you to confirm that you want to enable data roaming.
Turning Data Roaming Off
If you wish to disable data roaming:
1. Follow steps 1-4 above.
2. Toggle the Data roaming switch to the Off position.
If you need more help, feel free to reach out!
Manual Network Selection on Xiaomi Devices
If you’re experiencing a poor-quality connection on your current network, manually selecting a different network can often help. Keep in mind that you will only have an internet connection on networks supported by our services.
Manually Selecting a Network
1. Open Settings and tap on SIM cards & mobile networks.
2. Select the eSIM you want to change the network for (e.g., 3 AT).
3. Tap on Preferred network type.
4. Deselect Automatically select network.
5. Accept the prompt that appears to confirm the change.
6. Wait for the device to search for available networks in your area.
7. Choose the network you wish to connect to from the list presented.
8. You are now connected to your desired network.
If you need further assistance, feel free to ask!
Set Up an APN on Xiaomi Devices
All our eSIMs come with an automatic Access Point Name (APN), so manual configuration is usually unnecessary. However, if you wish to check or manually set up the APN, follow the steps below.
Checking My APN
1. Open Settings and tap on SIM cards & mobile networks.
2. Select the eSIM you want to check the APN for (e.g., 3 AT).
3. Tap on Access point names.
4. Here, you should see the name of the APN listed, which should be under data.esim. If it is not displayed, proceed to step 6.
5. Tap on the APN. You can manually rename it to data.esim in the Name section, leaving the other fields blank.
If you have any questions or need additional help, let me know!
Turning Data Roaming On/Off on Xiaomi Devices
To use your eSIM, it is essential to enable Data Roaming on your Xiaomi device. Here’s how you can turn it on or off in your settings:
Turning Data Roaming On
1. Open Settings and select SIM cards & mobile networks.
2. Scroll down and tap on Advanced settings.
3. Select Data roaming.
4. If the toggle is greyed out, Data Roaming is currently disabled. Tap the toggle to enable it.
5. Accept the prompt that appears to confirm the change.
6. Once the slider is blue, Data Roaming is activated.
After enabling, please give your device a moment to find a network, and data services will start working.
Feel free to reach out if you need assistance with anything else!
Apple
Can I use iMessage with my eSIM?
Yes, you can use iMessage with your eSIM.
Please keep in mind that you may need to reset iMessage after installing your eSIM. You can do so by following the steps below:
1. Go to Settings on your device
2. Go to Messagesimage.png189.88 KB3. Toggle iMessage OFF image.png189.88 KB4. Toggle iMessage back to ONimage.png326.79 KB5. Tap on Send & Receiveimage.png344.67 KB6. Uncheck your number and make sure your email address is checked. This way, you’ll be able to send and receive iMessages with only a data connection.image.png115.56 KBWhen you no longer have a need for your eSIM, and wish to switch back to your Primary SIM, you can do so by following these steps: Settings > Messages > Send & Receive and check your phone number again.
If you have any questions, please feel free to contact support.
Can’t Connect My eSIM on iPhone?
If your eSIM isn’t connecting, try these troubleshooting steps:
✅ 1. Enable Data Roaming
Go to Settings > Cellular > Cellular Plans, select your eSIM, and toggle on Data Roaming.
✅ 2. Set eSIM for Mobile Data
Go to Settings > Cellular > Cellular Data and select your eSIM.
✅ 3. Reset Connection
Turn on Airplane Mode for a few seconds, then turn it off—or restart your iPhone.
✅ 4. Manually Select a Network
Go to Settings > Cellular > Network Selection, turn off Automatic, and choose a supported network manually.
💡 Still not working? Contact our support team for further assistance! 🚀
How to Check If Your iPhone is Unlocked for eSIM
Before using an eSIM, make sure your iPhone is carrier-unlocked. Follow these simple steps to check:
📱 Step 1: Open Settings and tap General
🔍 Step 2: Select About
🔓 Step 3: Scroll down to Network Provider Lock
• If it says “No SIM restrictions” → 🎉 Your iPhone is unlocked and ready for eSIM!
• If you see any restrictions → 🚫 Your device is locked, and you’ll need to contact your carrier for unlocking.
💡 Tip: If your iPhone was recently unlocked, eSIM functionality might take some time to activate due to carrier security policies.
Now you’re ready to enjoy seamless eSIM connectivity! 🌍
How to Install an eSIM Manually on an iPhone
📌 Before You Begin:
Make sure you have:
✅ A stable internet connection (Wi-Fi or mobile data)
✅ An eSIM-compatible and unlocked device
✅ Your SMDP+ Address & Activation Code (provided by your eSIM provider)
⚠️ Important: After installation, enable Data Roaming to ensure seamless connectivity.
Step-by-Step Installation Guide
1. Go to Settings → Tap Mobile Data (or Cellular)
2. Tap “Add eSIM”
3. Choose “Enter Details Manually”
4. Enter SMDP+ Address & Activation Code (leave the Confirmation Code blank)
5. Tap “Continue” → Stay on this screen until the installation completes
6. Wait up to 10 minutes for activation
7. Tap “Done” when the installation is complete
8. Set Up eSIM Settings:
• Default Line: Keep your Primary SIM for calls & SMS
• Mobile Data: Select your eSIM for data (e.g., “Travel”)
9. Enable Data Roaming:
• Go to Settings → Mobile Data
• Select your eSIM → Turn on Data Roaming
🎉 All Set! Your eSIM is now installed and ready to use. 🌍📶
How to Install an eSIM on Your iPad
📌 Before You Begin:
Ensure you have:
✅ A stable internet connection (Wi-Fi or 4G)
✅ An eSIM-compatible and unlocked iPad
✅ Your QR Code or manual activation details from your eSIM provider
Step-by-Step Installation Guide
1️⃣ Go to Settings → Tap Mobile Data
2️⃣ Tap “Add a New Plan”
3️⃣ Scan the QR Code (or enter the details manually if required)
4️⃣ Follow the on-screen instructions to activate your eSIM
5️⃣ Set up your data plan:
• Choose your eSIM as the default data plan
• If your iPad has a physical SIM, you can manage both under Mobile Data settings
🎉 That’s it! Your iPad is now connected with eSIM. 🌍📶
How to Enable or Disable an eSIM on iPhone
Need to temporarily turn off your eSIM? Follow these simple steps:
1️⃣ Open Settings → Tap Mobile Data (or Cellular)
2️⃣ Select Your eSIM from the list of plans
3️⃣ Toggle the Switch:
• Turn Off to disable the eSIM
• Turn On to reactivate it
✅ That’s it! You can now easily manage your eSIM connection.
Using iMessage with eSIM (Data Only)
If you’re using an eSIM for data only, you may need to adjust your iMessage settings.
Steps to Set Up iMessage with eSIM:
1️⃣ Go to Settings → Tap Messages
2️⃣ Turn Off iMessage, then turn it back On
3️⃣ Tap “Send & Receive”
4️⃣ Uncheck Your Phone Number (this ensures iMessage works via data only)
5️⃣ Make Sure Your Email is Checked
Switching Back to Primary SIM
When switching back to your primary SIM, go to Send & Receive and recheck your phone number.
✅ That’s it! Now you can send and receive iMessages using just your eSIM’s data connection.
How to Check Your Apple Device Model
If your iPhone is iPhone XR or newer, it should support eSIM. Follow these steps to check your model:
✅ If your device is iPhone XR or newer, it supports eSIM!
How to Find Your eSIM ICCID on iPhone
If you need to locate your eSIM’s ICCID (serial number), follow these steps:
📌 Steps to Find Your ICCID:
1️⃣ Open Settings → Tap General
2️⃣ Select “About”
3️⃣ Scroll Down to “ICCID”
🔹 If you have multiple SIMs, you’ll see the ICCID for each listed under its respective profile.
This number is useful for troubleshooting or managing your eSIM.
How to Manually Select a Network on iPhone (eSIM)
If you’re facing poor signal quality, you can switch to a different network manually.
📌 Steps for Manual Network Selection:
1️⃣ Open Settings → Tap Mobile Data (or Cellular)
2️⃣ Select Your eSIM → Ensure “Turn This Line On” is enabled
3️⃣ Tap “Network Selection”
4️⃣ Disable “Automatic”
5️⃣ Choose a Preferred Network
🔹 Wait a few seconds for your device to connect. If the network is unavailable, try another option.
How to Set Up an APN on iPhone (eSIM)
Most eSIMs automatically configure the Access Point Name (APN), but if needed, you can manually set it up.
📌 Steps to Set Up APN:
1️⃣ Open Settings → Tap Mobile Data (or Cellular)
2️⃣ Select Your eSIM under the SIMs section
3️⃣ Tap “Mobile Data Network” (or “Cellular Data Network”)
4️⃣ Enter the APN → Type data.esim in the APN field
🔹 Leave all other fields blank
💡 This ensures your eSIM works properly for data roaming.
Troubleshooting eSIM Data Connection Issues on iPhone/iPad
If your eSIM is installed but not connecting to data, try these steps:
🔹 1. Disconnect from Wi-Fi
• Wi-Fi may be prioritizing over your eSIM.
• Turn Wi-Fi off and check if mobile data starts working.
🔹 2. Reset Network Settings(⚠️ This removes saved Wi-Fi passwords!)
• Go to Settings → General → Transfer or Reset iPhone → Reset → Reset Network Settings
🔹 3. Update Your iOS/iPadOS
• Check for updates: Settings → General → Software Update
🔹 4. Restart Your Device
• Press & hold power + volume button → Slide to power off → Restart
If the issue persists, contact your eSIM provider for further assistance. 🚀
Turning Data Roaming On/Off on iOS Devices
Enabling Data Roaming is crucial for using your eSIM. Here’s how to manage it:
🔹 1. Open Settings
• Tap on the Settings app.
🔹 2. Select Mobile Data/Cellular Data
• Go to Mobile Data (or Cellular Data, depending on region).
🔹 3. Choose Your eSIM
• Tap on the eSIM profile you want to manage.
🔹 4. Toggle Data Roaming
• Switch Data RoamingON (toggle turns green).
• To disable, switch it OFF.
🔹 5. Wait for Connection
• Your device may take a moment to register on a network.
Now, your eSIM is ready to use with Data Roaming enabled! 🌍📶
What to Do If Your eSIM Is Stuck on Activating
1. Check Your Location
• If you are not yet in the destination country where the eSIM is supposed to work, the activation process may remain incomplete. It should activate automatically once you arrive.
2. Enable Data Roaming
• Go to Settings > Mobile Data (Cellular) > Select Your eSIM > Toggle Data Roaming ON.
• Some eSIMs require data roaming to be enabled for activation.
3. Restart Your Device
• Power off your iPhone/iPad and turn it back on. This can help refresh network connections.
4. Try Airplane Mode
• Turn Airplane Mode ON, wait 30 seconds, then turn it OFF again.
• This forces the device to reconnect to the network.
5. Manually Select a Network
• Go to Settings > Mobile Data (Cellular) > Your eSIM > Network Selection
• Turn off Automatic and manually choose an available network.
6. Reset Network Settings (If Necessary)
• Go to Settings > General > Transfer or Reset iPhone > Reset > Reset Network Settings.
• This clears saved network settings but does not delete your eSIM.
7. Contact Support
• If the issue persists even after arriving in the coverage area, contact your eSIM provider for assistance.
Once you reach your destination, the eSIM should activate automatically as long as you have followed these steps. 🚀📶
How to Disable 5G on iOS & Android Devices
Disabling 5G can help conserve data usage or improve connectivity in areas with weak 5G coverage. Follow the steps below for your device:
For iOS Devices (iPhone & iPad)
1. Open Settings and tap Mobile Data (or Cellular).
2. Select Your eSIM: Choose the eSIM for which you want to disable 5G.
3. Tap Voice & Data under the selected eSIM.
4. Choose 4G: Select 4G (or LTE) to disable 5G.
5. Your device will now use 4G instead of 5G.
For Android Devices
1. Open Settings and go to SIM Cards & Mobile Networks (or Connections > Mobile Networks, depending on your device).
2. Select Your eSIM: Choose the eSIM you want to configure.
3. Tap Preferred Network Type (or Network Mode).
4. Select 4G or 3G: Choose Prefer 4G (or LTE Only) to turn off 5G.
5. Your device will now prioritize 4G or 3G instead of 5G.
If you experience network issues after disabling 5G, you can always switch back to automatic mode using the same steps.
How to Enable 5G on iOS & Android Devices
If you’re in an area with 5G coverage, you can enable it on your device to enjoy faster data speeds. Follow the steps below:
For iOS Devices (iPhone & iPad)
1. Open Settings and tap Mobile Data (or Cellular).
2. Select Your eSIM: Choose the eSIM you want to enable 5G for.
3. Tap Voice & Data under the selected eSIM.
4. Choose a 5G Option:
• 5G On – Always use 5G when available.
• 5G Auto – Uses 5G only when it won’t significantly reduce battery life.
For Android Devices
1. Open Settings and go to SIM Cards & Mobile Networks (or Connections > Mobile Networks, depending on your device).
2. Select Your eSIM: Choose the eSIM you want to configure.
3. Tap Preferred Network Type (or Network Mode).
4. Select 5G: Choose 5G as your preferred network type.
Once enabled, your device will connect to 5G whenever it’s available. If 5G coverage is weak, it may automatically switch to 4G for better stability.
How to Save and Use Less Data with Your eSIM
Want to make the most of your eSIM data? Here are some simple ways to reduce data usage and avoid overages:
1. Monitor Your Data Usage
Check your phone settings to track data consumption.
Set alerts or limits to prevent excessive use.
2. Use Wi-Fi Whenever Possible
Connect to Wi-Fi for streaming, downloads, and updates.
Enable Wi-Fi Assist (iOS) or Adaptive Wi-Fi (Android) to avoid unnecessary mobile data use.
3. Limit Background Data
Some apps use data even when you’re not actively using them.
Disable background data for non-essential apps in settings.
4. Turn Off Auto-Play for Videos
Social media apps like Facebook, Instagram, and TikTok autoplay videos by default.
Disable auto-play in the app settings to save data.
5. Enable Data Compression
Use data-saving features in browsers like Google Chrome’s Lite mode.
Some messaging apps also offer lower data usage modes.
6. Download Content for Offline Use
Apps like Netflix, YouTube, and Spotify allow you to download content.
Download over Wi-Fi before traveling to save mobile data.
By following these tips, you can maximize your eSIM plan while keeping data usage under control.
How to Set Up Your APN for eSIM
Our eSIMs usually come with automatic APN (Access Point Name) settings, but if you’re experiencing connectivity issues, you may need to set it up manually. Follow the steps below for your device:
For iOS Devices:
1. Open Settings.
2. Tap Mobile Data (or Cellular Data).
3. Under Mobile Data Plans, select your eSIM.
4. Tap Mobile Data Network (or Cellular Data Network).
5. In the Mobile Data APN field, enter: data.esim.
6. Leave all other fields blank.
For Android Devices:
1. Open Settings.
2. Tap Network & Internet.
3. Select Mobile Networks.
4. Tap Access Point Names (APN).
5. Add a new APN or edit the existing one by entering: data.esim.
6. Leave all other fields blank.
Once you’ve configured the APN, restart your device to apply the changes. If you still experience issues, please contact our support team for assistance.
How to Switch Between a Physical SIM and an eSIM
Switching between a physical SIM card and an eSIM can vary depending on the device you’re using. Here’s a general guide on how to switch between these SIM profiles.
Switching Between eSIM Profiles on iPhone
1. Open Settings: Go into your device’s Settings.
2. Select Cellular or Mobile Data: Tap on Cellular (or Mobile Data).
3. Choose Your eSIM: Find the eSIM you want to use from the list of available plans.
4. Turn On the Line: Select Turn on this line to activate the eSIM.
Switching Between a Physical SIM and eSIM on Android
The steps can vary by manufacturer, but here’s a general method:
1. Open Settings: Go into your device’s Settings.
2. Select SIM Cards & Mobile Networks: Tap on SIM cards & mobile networks.
3. Select SIM to Use: Here, you should see both your physical SIM and eSIM listed. Tap on the one you want to use.
4. Activate the SIM: Toggle the option to enable the selected SIM.
General Tips
• Manage SIM Settings: Make sure that the SIM you wish to use is enabled in the settings, and disable the other one to avoid conflicts.
• Device Compatibility: Some devices may have limitations on using both a physical SIM and an eSIM simultaneously. Check your device specifications to understand its capabilities.
• Carrier Support: Ensure that your carrier supports the eSIM feature and is configured correctly for your specific device.
By following these steps, you can easily switch between a physical SIM card and an eSIM on your device.
Fixing “PDP Authentication Failure” on Your eSIM
The PDP Authentication Failure error may be caused by incorrect settings, data depletion, or network compatibility. Please check the following:
1. Verify Your APN Settings
• Ensure that the APN (Access Point Name) is set correctly as shown on your eSIM installation page.
• The APN should be entered in lowercase and without spaces.
2. Check Your Data Balance
• If your eSIM has run out of data, you may see this error.
• Verify your remaining data balance in your eSIM provider’s app or account.
3. Ensure You Are Connected to the Correct Network
• Your eSIM should be connected to a supported network in your current location.
• You can find network details in My eSIMs > Details > Install eSIM (scroll down for network information).
4. Reset Network Settings (if the issue persists)
If the above steps do not resolve the issue, try resetting your network settings:
1. Open Settings on your device.
2. Go to General > Reset.
3. Select Reset Network Settings.
4. Restart your device.
🚨 Note: Resetting network settings will erase saved Wi-Fi networks, passwords, cellular settings, VPN, and APN settings.
If the issue persists, please contact our support team for further assistance.
Can’t Scan Your QR Code? Install Your eSIM Manually
If you’re unable to scan the QR code, you can install the eSIM manually by following the steps below.
📱 iOS Devices
Manual Installation Steps:
1️⃣ Open the My eSIMs tab in the app or website to find your Manual Installation details.
2️⃣ Go to Settings → Cellular/Mobile.
3️⃣ Tap Add Cellular/Mobile Plan.
4️⃣ Select Enter Details Manually and enter:
• SM-DP+ Address
• Activation Code
• Confirmation Code (if available)
5️⃣ Turn on your eSIM under Cellular/Mobile Plan.
6️⃣ Select your eSIM for Cellular/Mobile Data.
7️⃣ Enable Data Roaming (Turn off your primary line to avoid roaming charges when abroad).
8️⃣ If required, set up an APN (Access Point Name)—you can find the APN details in the eSIM installation page.
Need Help?
If you encounter any issues, please contact our Support Team for further assistance.
I'm experiencing the ‘Cellular Plans From This Carrier Cannot be Added' error message
This error may show if you are trying to install an eSIM on a network-locked device.
You can check if your device is locked by following the steps below:
1. Go to Settings > General, and tap About.
2. Under Carrier Lock, you should see a message that says No SIM restrictions. If you don't see that message, please contact your carrier to have your device unlocked.
If you have confirmed with your current provider that your device is unlocked, please contact support.
🛑 ‘Unable to Complete Cellular Plan Change’ Error
This error typically occurs due to an installation failure caused by one of the following reasons:image.png443.22 KB1️⃣ Too Many eSIMs Installed
• Some devices allow you to store multiple eSIMs but can only have one or two active at a time.
• iPhones, for example, can store 5 to 10 eSIMs, depending on the model.
✅ Solution: If you’ve reached your device’s limit, remove old eSIMs by following the instructions here: How to Remove an eSIM
2️⃣ Cellular/Mobile Data Is Disabled
• If Mobile Data is turned off, your device may not complete the eSIM installation.
✅ Solution:
• Go to Settings → Cellular/Mobile
• Make sure Mobile Data is turned ON
3️⃣ eSIM Already Installed
• Most eSIMs can only be installed once.
✅ Solution: Check if your eSIM is already installed:
1. Go to Settings → General → About
2. Scroll down to find the ICCID (20-digit number starting with 89XXXXXXXXXX).
3. If your eSIM is already installed, you may need to adjust your settings to activate it. Refer to your eSIM installation page for details.
4️⃣ Poor Internet Connection During Installation
• A weak or unstable internet connection, especially public Wi-Fi or ship Wi-Fi, can interrupt the process.
✅ Solution:
• Switch to a stronger Wi-Fi or mobile network
• Restart the installation process
📞 Need More Help?
If the issue persists, please contact Support for further assistance.
📉 How to Enable Low Data Mode on iOS & Android
Enabling Low Data Mode can help you save mobile data while traveling by restricting background apps and limiting automatic updates.
🔹 Low Data Mode on iOS
1️⃣ Go to Settings.
2️⃣ Scroll down to Battery.
3️⃣ Tap on Battery.
4️⃣ Enable Low Power Mode.
✅ This reduces background data usage while conserving battery life.
🔹 Low Data Mode on Android
📌 Steps may vary slightly depending on your device model.
1️⃣ Go to Settings.
2️⃣ Scroll down to Battery.
3️⃣ Tap on Optimize battery usage.
4️⃣ Select Apps optimized or Optimize manually.
5️⃣ Turn on Battery Saver.
✅ This helps conserve both battery and mobile data by limiting background activity.
By enabling these modes, you can minimize data usage while still staying connected during your travels. 🚀🌍
🛠 Fixing the “This Code Is No Longer Valid” Error
If you see this error during eSIM installation, it usually means:
1️⃣ eSIM Already Installed – Your eSIM may have been fully or partially installed, even if the process seemed interrupted.
2️⃣ Partial Installation Issue – A failed setup might have left an incomplete eSIM in your settings.
✅ Steps to Fix It
🔹 Check if Your eSIM is Installed
📌 Go to Settings > Mobile Data (or Cellular) and check if your eSIM is listed.
✔️ If visible, it’s installed—no need to rescan the QR code.
🔹 Delete a Partially Installed eSIM
📌 If an incomplete eSIM appears, remove it from your device settings.
📌 Then, rescan the QR code to install it again.
🔹 Verify with Our Chatbot
📌 Our chatbot can check if the eSIM is active on your device.
✔️ If confirmed, find it under Settings > Mobile Data (or Cellular).
By following these steps, you can resolve the issue and complete your eSIM setup smoothly. 🚀
🛠 Fixing “Home SIM Not Working After eSIM Installation”
If your physical SIM stops working after installing an eSIM, try these steps:
✅ Quick Fixes
1️⃣ Check SIM Card Placement
📌 Ensure your physical SIM is properly inserted in the tray.
2️⃣ Review SIM Settings
📌 Go to Settings > Cellular (or Mobile Data) and confirm:
✔️ Your physical SIM is enabled for calls, texts, or data (if needed).
3️⃣ Restart Your Device
📌 Turn off your phone, wait a few seconds, and restart it.
4️⃣ Check for Conflicts
📌 Some devices disable the primary SIM when eSIM is activated. Check:
✔️ Data Roaming ON for eSIM
✔️ Data Roaming OFF for the physical SIM
If the issue persists, contact your carrier to verify your SIM’s status. 🚀
🛠 Fixing “iMessage Not Working After eSIM Installation”
If iMessage stops working after installing an eSIM, follow these steps:
✅ Quick Fixes
1️⃣ Verify eSIM Activation
📌 Ensure your eSIM is activated and has a working mobile data connection.
2️⃣ Check SIM Settings
📌 Go to Settings > Cellular (or Mobile Data) and confirm:
✔️ Primary SIM is set as Default Voice Line
✔️ eSIM is designated for Mobile Data
3️⃣ Review iMessage Settings
📌 Go to Settings > Messages > Send & Receive
✔️ Ensure iMessage is enabled
✔️ Confirm your phone number and email are listed correctly
4️⃣ Restart Your Device
📌 Power off your phone, wait a few seconds, and turn it back on.
5️⃣ Reset Network Settings
📌 Go to Settings > General > Reset > Reset Network Settings
⚠️ This will erase saved Wi-Fi networks, passwords, and VPN settings.
6️⃣ Update Your Device
📌 Check for updates via Settings > General > Software Update
If the issue persists, contact Apple Support for further troubleshooting. 🚀
🚀 Fixing Slow Internet Connection with eSIM
If your eSIM connection is slow, try these steps to improve your speed:
✅ Quick Fixes
1️⃣ Check Network Coverage
📌 Ensure you have a strong signal.
📌 If speeds are slow, try switching to a different network (Settings > Manual Network Selection).
2️⃣ Reset Your Network
📌 Option 1: Toggle Airplane Mode ON, wait a few seconds, then turn it OFF.
⚠️ This will erase saved Wi-Fi networks, passwords, and VPN settings.
3️⃣ Limit Background Data Usage
📌 Some apps may be using too much data. Enable Low Data Mode or Data Saver in your settings.
4️⃣ Restart Your Device
📌 A quick reboot can clear caches and refresh connections.
5️⃣ Check for External Factors
📌 Slow speeds can be due to network congestion—especially during peak hours. If this is the case, speeds should improve over time.
6️⃣ Still Experiencing Issues?
📌 Contact our support team for further assistance.
Android
How to Disable 5G on iOS & Android Devices
Disabling 5G can help conserve data usage or improve connectivity in areas with weak 5G coverage. Follow the steps below for your device:
For iOS Devices (iPhone & iPad)
1. Open Settings and tap Mobile Data (or Cellular).
2. Select Your eSIM: Choose the eSIM for which you want to disable 5G.
3. Tap Voice & Data under the selected eSIM.
4. Choose 4G: Select 4G (or LTE) to disable 5G.
5. Your device will now use 4G instead of 5G.
For Android Devices
1. Open Settings and go to SIM Cards & Mobile Networks (or Connections > Mobile Networks, depending on your device).
2. Select Your eSIM: Choose the eSIM you want to configure.
3. Tap Preferred Network Type (or Network Mode).
4. Select 4G or 3G: Choose Prefer 4G (or LTE Only) to turn off 5G.
5. Your device will now prioritize 4G or 3G instead of 5G.
If you experience network issues after disabling 5G, you can always switch back to automatic mode using the same steps.
How to Enable 5G on iOS & Android Devices
If you’re in an area with 5G coverage, you can enable it on your device to enjoy faster data speeds. Follow the steps below:
For iOS Devices (iPhone & iPad)
1. Open Settings and tap Mobile Data (or Cellular).
2. Select Your eSIM: Choose the eSIM you want to enable 5G for.
3. Tap Voice & Data under the selected eSIM.
4. Choose a 5G Option:
• 5G On – Always use 5G when available.
• 5G Auto – Uses 5G only when it won’t significantly reduce battery life.
For Android Devices
1. Open Settings and go to SIM Cards & Mobile Networks (or Connections > Mobile Networks, depending on your device).
2. Select Your eSIM: Choose the eSIM you want to configure.
3. Tap Preferred Network Type (or Network Mode).
4. Select 5G: Choose 5G as your preferred network type.
Once enabled, your device will connect to 5G whenever it’s available. If 5G coverage is weak, it may automatically switch to 4G for better stability.
How to Save and Use Less Data with Your eSIM
Want to make the most of your eSIM data? Here are some simple ways to reduce data usage and avoid overages:
1. Monitor Your Data Usage
Check your phone settings to track data consumption.
Set alerts or limits to prevent excessive use.
2. Use Wi-Fi Whenever Possible
Connect to Wi-Fi for streaming, downloads, and updates.
Enable Wi-Fi Assist (iOS) or Adaptive Wi-Fi (Android) to avoid unnecessary mobile data use.
3. Limit Background Data
Some apps use data even when you’re not actively using them.
Disable background data for non-essential apps in settings.
4. Turn Off Auto-Play for Videos
Social media apps like Facebook, Instagram, and TikTok autoplay videos by default.
Disable auto-play in the app settings to save data.
5. Enable Data Compression
Use data-saving features in browsers like Google Chrome’s Lite mode.
Some messaging apps also offer lower data usage modes.
6. Download Content for Offline Use
Apps like Netflix, YouTube, and Spotify allow you to download content.
Download over Wi-Fi before traveling to save mobile data.
By following these tips, you can maximize your eSIM plan while keeping data usage under control.
How to Set Up Your APN for eSIM
Our eSIMs usually come with automatic APN (Access Point Name) settings, but if you’re experiencing connectivity issues, you may need to set it up manually. Follow the steps below for your device:
For iOS Devices:
1. Open Settings.
2. Tap Mobile Data (or Cellular Data).
3. Under Mobile Data Plans, select your eSIM.
4. Tap Mobile Data Network (or Cellular Data Network).
5. In the Mobile Data APN field, enter: data.esim.
6. Leave all other fields blank.
For Android Devices:
1. Open Settings.
2. Tap Network & Internet.
3. Select Mobile Networks.
4. Tap Access Point Names (APN).
5. Add a new APN or edit the existing one by entering: data.esim.
6. Leave all other fields blank.
Once you’ve configured the APN, restart your device to apply the changes. If you still experience issues, please contact our support team for assistance.
How to Switch Between a Physical SIM and an eSIM
Switching between a physical SIM card and an eSIM can vary depending on the device you’re using. Here’s a general guide on how to switch between these SIM profiles.
Switching Between eSIM Profiles on iPhone
1. Open Settings: Go into your device’s Settings.
2. Select Cellular or Mobile Data: Tap on Cellular (or Mobile Data).
3. Choose Your eSIM: Find the eSIM you want to use from the list of available plans.
4. Turn On the Line: Select Turn on this line to activate the eSIM.
Switching Between a Physical SIM and eSIM on Android
The steps can vary by manufacturer, but here’s a general method:
1. Open Settings: Go into your device’s Settings.
2. Select SIM Cards & Mobile Networks: Tap on SIM cards & mobile networks.
3. Select SIM to Use: Here, you should see both your physical SIM and eSIM listed. Tap on the one you want to use.
4. Activate the SIM: Toggle the option to enable the selected SIM.
General Tips
• Manage SIM Settings: Make sure that the SIM you wish to use is enabled in the settings, and disable the other one to avoid conflicts.
• Device Compatibility: Some devices may have limitations on using both a physical SIM and an eSIM simultaneously. Check your device specifications to understand its capabilities.
• Carrier Support: Ensure that your carrier supports the eSIM feature and is configured correctly for your specific device.
By following these steps, you can easily switch between a physical SIM card and an eSIM on your device.
Fixing “PDP Authentication Failure” on Your eSIM
The PDP Authentication Failure error may be caused by incorrect settings, data depletion, or network compatibility. Please check the following:
1. Verify Your APN Settings
• Ensure that the APN (Access Point Name) is set correctly as shown on your eSIM installation page.
• The APN should be entered in lowercase and without spaces.
2. Check Your Data Balance
• If your eSIM has run out of data, you may see this error.
• Verify your remaining data balance in your eSIM provider’s app or account.
3. Ensure You Are Connected to the Correct Network
• Your eSIM should be connected to a supported network in your current location.
• You can find network details in My eSIMs > Details > Install eSIM (scroll down for network information).
4. Reset Network Settings (if the issue persists)
If the above steps do not resolve the issue, try resetting your network settings:
1. Open Settings on your device.
2. Go to General > Reset.
3. Select Reset Network Settings.
4. Restart your device.
🚨 Note: Resetting network settings will erase saved Wi-Fi networks, passwords, cellular settings, VPN, and APN settings.
If the issue persists, please contact our support team for further assistance.
Can’t Scan Your QR Code? Install Your eSIM Manually
If you’re unable to scan the QR code, you can install the eSIM manually by following the steps below.
🤖 Android Devices
Manual Installation Steps:
1️⃣ Open the My eSIMs tab in the app or website to find your Manual Installation details.
2️⃣ Go to Settings → Network & Internet.
3️⃣ Tap the Add icon next to Mobile Network.
4️⃣ Tap Next when asked, “Don’t have a SIM card?”.
5️⃣ Tap Enter Code Manually and enter the SM-DP+ Address from the Manual Installation tab.
6️⃣ Turn on your eSIM under Mobile Network.
7️⃣ Enable Mobile Data.
8️⃣ Enable Data Roaming (Turn off your primary line to avoid roaming charges when abroad).
9️⃣ If required, set up an APN (Access Point Name)—you can find the APN details in the eSIM installation page.
Need Help?
If you encounter any issues, please contact our Support Team for further assistance.
I'm experiencing the ‘Cellular Plans From This Carrier Cannot be Added' error message
This error may show if you are trying to install an eSIM on a network-locked device.
You can check if your device is locked by following the steps below:
1. Go to Settings > General, and tap About.
2. Under Carrier Lock, you should see a message that says No SIM restrictions. If you don't see that message, please contact your carrier to have your device unlocked.
If you have confirmed with your current provider that your device is unlocked, please contact support.
🛑 ‘Unable to Complete Cellular Plan Change’ Error
This error typically occurs due to an installation failure caused by one of the following reasons:image.png443.22 KB1️⃣ Too Many eSIMs Installed
• Some devices allow you to store multiple eSIMs but can only have one or two active at a time.
• iPhones, for example, can store 5 to 10 eSIMs, depending on the model.
✅ Solution: If you’ve reached your device’s limit, remove old eSIMs by following the instructions here: How to Remove an eSIM
2️⃣ Cellular/Mobile Data Is Disabled
• If Mobile Data is turned off, your device may not complete the eSIM installation.
✅ Solution:
• Go to Settings → Cellular/Mobile
• Make sure Mobile Data is turned ON
3️⃣ eSIM Already Installed
• Most eSIMs can only be installed once.
✅ Solution: Check if your eSIM is already installed:
1. Go to Settings → General → About
2. Scroll down to find the ICCID (20-digit number starting with 89XXXXXXXXXX).
3. If your eSIM is already installed, you may need to adjust your settings to activate it. Refer to your eSIM installation page for details.
4️⃣ Poor Internet Connection During Installation
• A weak or unstable internet connection, especially public Wi-Fi or ship Wi-Fi, can interrupt the process.
✅ Solution:
• Switch to a stronger Wi-Fi or mobile network
• Restart the installation process
📞 Need More Help?
If the issue persists, please contact Support for further assistance.
📉 How to Enable Low Data Mode on iOS & Android
Enabling Low Data Mode can help you save mobile data while traveling by restricting background apps and limiting automatic updates.
🔹 Low Data Mode on iOS
1️⃣ Go to Settings.
2️⃣ Scroll down to Battery.
3️⃣ Tap on Battery.
4️⃣ Enable Low Power Mode.
✅ This reduces background data usage while conserving battery life.
🔹 Low Data Mode on Android
📌 Steps may vary slightly depending on your device model.
1️⃣ Go to Settings.
2️⃣ Scroll down to Battery.
3️⃣ Tap on Optimize battery usage.
4️⃣ Select Apps optimized or Optimize manually.
5️⃣ Turn on Battery Saver.
✅ This helps conserve both battery and mobile data by limiting background activity.
By enabling these modes, you can minimize data usage while still staying connected during your travels. 🚀🌍
🛠 Fixing the “This Code Is No Longer Valid” Error
If you see this error during eSIM installation, it usually means:
1️⃣ eSIM Already Installed – Your eSIM may have been fully or partially installed, even if the process seemed interrupted.
2️⃣ Partial Installation Issue – A failed setup might have left an incomplete eSIM in your settings.
✅ Steps to Fix It
🔹 Check if Your eSIM is Installed
📌 Go to Settings > Mobile Data (or Cellular) and check if your eSIM is listed.
✔️ If visible, it’s installed—no need to rescan the QR code.
🔹 Delete a Partially Installed eSIM
📌 If an incomplete eSIM appears, remove it from your device settings.
📌 Then, rescan the QR code to install it again.
🔹 Verify with Our Chatbot
📌 Our chatbot can check if the eSIM is active on your device.
✔️ If confirmed, find it under Settings > Mobile Data (or Cellular).
By following these steps, you can resolve the issue and complete your eSIM setup smoothly. 🚀
🛠 Fixing “Home SIM Not Working After eSIM Installation”
If your physical SIM stops working after installing an eSIM, try these steps:
✅ Quick Fixes
1️⃣ Check SIM Card Placement
📌 Ensure your physical SIM is properly inserted in the tray.
2️⃣ Review SIM Settings
📌 Go to Settings > Cellular (or Mobile Data) and confirm:
✔️ Your physical SIM is enabled for calls, texts, or data (if needed).
3️⃣ Restart Your Device
📌 Turn off your phone, wait a few seconds, and restart it.
4️⃣ Check for Conflicts
📌 Some devices disable the primary SIM when eSIM is activated. Check:
✔️ Data Roaming ON for eSIM
✔️ Data Roaming OFF for the physical SIM
If the issue persists, contact your carrier to verify your SIM’s status. 🚀
🚀 Fixing Slow Internet Connection with eSIM
If your eSIM connection is slow, try these steps to improve your speed:
✅ Quick Fixes
1️⃣ Check Network Coverage
📌 Ensure you have a strong signal.
📌 If speeds are slow, try switching to a different network (Settings > Manual Network Selection).
2️⃣ Reset Your Network
📌 Option 1: Toggle Airplane Mode ON, wait a few seconds, then turn it OFF.
⚠️ This will erase saved Wi-Fi networks, passwords, and VPN settings.
3️⃣ Limit Background Data Usage
📌 Some apps may be using too much data. Enable Low Data Mode or Data Saver in your settings.
4️⃣ Restart Your Device
📌 A quick reboot can clear caches and refresh connections.
5️⃣ Check for External Factors
📌 Slow speeds can be due to network congestion—especially during peak hours. If this is the case, speeds should improve over time.
6️⃣ Still Experiencing Issues?
📌 Contact our support team for further assistance.
How to Change the Name/Label of Your eSIM Profile on Android
Customizing the label of your eSIM profiles can help you easily identify them on your device. Here’s a step-by-step guide on how to change the name of your eSIM profile on Android:
Changing Your eSIM Label
1. Open Settings: Go to the Settings app on your Android device.
2. Tap on SIM Cards & Mobile Networks: Select SIM cards & mobile networks from the menu.
3. Manage eSIM: Scroll down and tap on Manage eSIM.
4. Select Your eSIM: Choose the eSIM profile you want to rename.
5. Change Nickname: Here, you can enter a new nickname for your eSIM.
• (For example, you might want to label it as eSIM.)
6. Confirm Changes: Tap OK to save the new label.
Your eSIM profile is now updated with the new name, making it easier to identify among other profiles!
How to Switch Your eSIM to a New Android Device
If you’ve recently upgraded your phone and need to transfer your eSIM, follow the steps below:
1. Check Compatibility: Ensure your new Android device is eSIM-compatible and supports the eSIM feature. You can find this information in the device specifications or manual.
2. Contact Your Carrier: Reach out to your current carrier to obtain a QR code or activation code for your eSIM. This code is necessary for activating the eSIM on your new device.
3. Open Settings: On your new Android device, go to Settings and look for the option to add a new cellular plan or activate the eSIM. The location of this option may vary by device and Android version.
4. Scan QR Code: Use your device’s camera to scan the QR code or enter the activation code provided by your carrier.
5. Follow On-Screen Instructions: Complete the activation process by following the on-screen instructions.
6. Final Steps: Once the activation process is complete, your new device will be ready to use with your eSIM. You may need to restart your device or wait a few minutes for the new eSIM to activate fully.
If you have any questions or need assistance during the process, feel free to ask!
How to Turn Your eSIM On and Off on Android Devices
Sometimes your eSIM may become disabled, or you might want to disable it for various reasons, such as switching to a different eSIM, saving data, or using another SIM while traveling. This guide will help you enable or disable your eSIM on your Android device.
Enabling eSIMs
1. Go to Settings: Open the Settings app on your device.
2. Select SIM Cards & Mobile Networks: Tap on SIM cards & mobile networks.
3. Manage eSIM: Scroll down and select Manage eSIM.
4. Select Your eSIM: Tap on the eSIM you wish to enable.
5. Enable the eSIM: Follow the prompts to enable the eSIM.
6. Wait for Activation: Allow a moment for the eSIM to enable.
7. Confirmation: Your eSIM is now enabled and ready to use.
Disabling eSIMs
1. Go to Settings: Open the Settings app on your device.
2. Select SIM Cards & Mobile Networks: Tap on SIM cards & mobile networks.
3. Manage eSIM: Scroll down and select Manage eSIM.
4. Select Your eSIM: Tap on the eSIM you want to disable.
5. Disable the eSIM: Follow the prompts to disable it.
6. Confirm Action: Accept the prompt to confirm.
7. Confirmation: Your eSIM is now disabled.
By following these steps, you can easily manage your eSIM on Android devices, enabling or disabling it as needed based on your requirements.
Testing rename
📶 How to Turn Data Roaming On/Off on Oppo Devices
🔹 Turning ON Data Roaming
1️⃣ Open Settings on your Oppo device.
2️⃣ Tap Mobile Network.
3️⃣ Select Data eSIM.
4️⃣ Toggle Data Roaming ON (it should turn blue).
5️⃣ If prompted, confirm by tapping Turn On.
🔻 Turning OFF Data Roaming
1️⃣ Follow Steps 1-3 above.
2️⃣ Toggle Data Roaming OFF (it should turn white).
3️⃣ If prompted, confirm the action.
📌 Note: Enabling Data Roaming may lead to additional charges. Check with your carrier for details.
Google
How to Install an eSIM Manually on a Google Device
This guide provides a step-by-step walkthrough for installing an eSIM manually on your Google device.
Installing an eSIM Manually
Before starting the installation process, ensure you have the following:
• A strong internet connection: Ideally, connect to Wi-Fi or ensure you have a good mobile data connection.
• An eSIM-compatible device: If you are unsure whether your device supports eSIMs, check the relevant list of compatible devices.
• An unlocked device: Verify that your device is not locked to a specific network by checking the locked/unlocked devices guide.
Note: Remember to enable Data Roaming once the installation is complete.
Step-by-Step Installation
1. Open Settings: Go into your Settings and tap on Network & internet.
2. Add Mobile Network: Tap the + next to Mobile network.
3. SIM Card Setup: On the new screen, tap Don’t have a SIM card?.
4. Proceed to Next Step: Tap Next.
5. Access Help: When prompted with the option to scan a QR code, tap Need help?.
6. Manual Entry: Select Enter it manually.
7. Input Your Details: To install the eSIM manually, you will need your SMDP+ Address and SMDP+ Activation Code. Enter them in the format: 1$SMDP+ Address$SMDP+ Activation Code. The final code should resemble the example provided in your reference materials.
8. Activate Installation: Tap Activate to begin the installation process. Note: Do NOT close this window during the installation, as it may cause the process to fail.
9. Wait for Activation: Allow up to 10 minutes for the eSIM to activate.
10. Return to Network Settings: Once activation is complete, go back into Network & internet.
11. Access Mobile Networks: Tap on Mobile Networks.
12. Enable Data Roaming: Ensure your Data Roaming is toggled On.
13. Verify Toggle: Confirm that the Data Roaming toggle is set as shown in the installation confirmation.
14. Completion: The eSIM is now successfully installed and set up on your device.
Following these steps will allow you to install an eSIM manually on your Google device smoothly.
How to Install an eSIM Using a QR Code on Google Devices
This guide provides a step-by-step walkthrough for installing an eSIM on your Google device using a QR code.
Installing an eSIM Using a QR Code
Before you start the installation, ensure you have the following:
• A strong internet connection: Ideally, connect to Wi-Fi or ensure you have a stable mobile data connection.
• An eSIM-compatible device: If you’re unsure whether your device supports eSIMs, refer to the relevant list of compatible devices.
• An unlocked device: Make sure your device is not locked to a specific network by checking the locked/unlocked devices guide.
Note: Don’t forget to enable Data Roaming after the installation is complete.
Step-by-Step Installation
1. Open Settings: Go into your Settings and tap on Network & internet.
2. Add Mobile Network: Tap the + next to Mobile network.
3. SIM Card Setup: On the new screen, tap Don’t have a SIM card?.
4. Proceed to Next Step: Tap Next.
5. Scan QR Code: Use your device’s camera to scan the QR code provided by your carrier.
6. Activate eSIM: On the Data eSIM screen, tap Activate and wait for the activation process to finish.
• Note: Do NOT close this window during the installation, as it may interrupt the process.
7. Select Primary SIM: Once the eSIM has been successfully installed, you will be taken to a screen where you can choose which SIM you would like to use for your number. We recommend using your primary SIM card for this section.
8. Enable Data Roaming: After completing the setup, ensure that your Data Roaming is toggled On.
9. Verify Data Roaming: The Data Roaming toggle should appear as enabled on the installed eSIM.
10. Completion: Your eSIM is now installed and ready to use.
By following these steps, you can successfully install an eSIM on your Google device using a QR code.
How to Uninstall an eSIM from a Google Device
To uninstall an eSIM from your Google device, follow these steps. Ensure you have a stable internet connection, ideally by connecting to Wi-Fi or using a good 4G connection. You also have the option to temporarily disable an eSIM if you plan to use it again. Please note that deactivating or disabling an eSIM does not extend its validity.
Uninstall an eSIM from Google Device
1. Open Settings: Go to Settings on your device.
2. Navigate to Network & Internet: Tap on Network & Internet.
3. Select Mobile Networks: Tap on Mobile Networks, then choose the eSIM you want to remove from the list.
4. Erase SIM: Scroll down until you see the option for Erase SIM.
5. Confirm Erasure: Tap Erase and wait for the eSIM to be erased.
6. Completion: Once this is done, the eSIM should be successfully removed from your device.
Following these steps will help you uninstall the eSIM from your Google device smoothly.
Identify Device Model on Google Device
If your Google device is newer than or the same as the Google Pixel 2 (only devices purchased with Google Fi service), it should be compatible with an eSIM. You can verify your device model by following these steps:
Check My Google Model
1. Open Settings: Go to Settings on your device.
2. Scroll to About Phone: Scroll down until you see the About Phone section.
3. View Device Name: At the top, you will see Device Name, which displays your phone model.
By following these steps, you can easily identify your Google device model to confirm its eSIM compatibility.
Manual Network Selection on a Google Device
If you experience poor-quality connection issues on a specific network, you can manually search for and select a different network. This will allow you to connect only to the networks that we support.
Manually Selecting a Network
1. Open Settings: Go to Settings on your device.
2. Select Network & Internet: Tap on Network & Internet.
3. Access Mobile Networks: Tap on Mobile Networks.
4. Choose Your eSIM: Select the eSIM for which you want to change the network.
5. Disable Automatic Selection: De-select the Automatically select network option.
6. View Available Networks: This will take you to a screen displaying all available networks in your current area.
7. Connect to a Network: Choose the network you wish to connect to.
By following these steps, you can manually select a network on your Google device to ensure a better connection.
Set Up an APN on a Google Device
While all our eSIMs come with an automatic Access Point Name (APN) configuration, you can check or manually configure the APN by following these steps:
Checking My APN
1. Open Settings: Go to Settings on your device.
2. Select Network & Internet: Tap on Network & Internet.
3. Access Mobile Networks: Tap on Mobile Networks.
4. Select eSIM: Choose the eSIM for which you want to check the APN.
5. Open Advanced Settings: Scroll down and tap on Advanced.
6. Access Point Names: In the drop-down menu, select Access Point Names.
7. Check APN Name: Look for the APN name, which should be listed as data.esim. If you do not see this name, proceed to the next step.
8. Edit APN: Tap on Planet3 and rename it to data.esim. Leave the other fields blank.
Following these steps will help ensure your APN is correctly set up for your eSIM on your Google device.
Turning Data Roaming On / Off on a Google Device
Enabling Data Roaming is essential for using your eSIM. Follow these steps to turn Data Roaming on or off on your Google device.
Turning Data Roaming On
1. Open Settings: Go to Settings on your device.
2. Select Network and Internet: Tap on Network and Internet.
3. Access Mobile Network: Tap on Mobile Network.
4. Choose eSIM: Select the eSIM you want to enable Data Roaming for.
5. Toggle Data Roaming: Ensure the Data Roaming slider is toggled to on.
6. Confirmation: The Data Roaming toggle should indicate that it is enabled for the installed eSIM.
Turning Data Roaming Off
1. Open Settings: Go to Settings on your device.
2. Select Network and Internet: Tap on Network and Internet.
3. Access Mobile Network: Tap on Mobile Network.
4. Choose eSIM: Select the eSIM you want to disable Data Roaming for.
5. Toggle Data Roaming: Toggle the Data Roaming slider to off.
Following these steps will allow you to easily manage Data Roaming settings on your Google device, ensuring your eSIM works properly when needed.
Huawei
How to Install an eSIM Manually on a Huawei Device
This guide provides a step-by-step walkthrough for installing an eSIM manually on your Huawei device.
Before You Start
Make sure you have the following:
• Strong Internet Connection: Ideally, connect to Wi-Fi or ensure a good mobile data connection.
• eSIM Compatible Device: If you’re unsure, check the list of compatible devices.
• Unlocked Device: Confirm that your device is not locked to a specific network.
Remember to enable Data Roaming after installation.
Installing an eSIM Manually
1. Open Settings: Go to Settings on your device.
2. Access Mobile Network: Tap on Mobile Network.
3. Select SIM Management: Tap on SIM Management.
4. Add eSIM: Tap Add eSIM.
5. Enter Manually: Click on the + in the bottom left of the screen, then tap Enter Manually.
6. Input SMDP+ Information:
• You will need your SMDP+ Address and SMDP+ Activation Code.
• Enter the information in the format: 1$SMDP+ Address$SMDP+ Activation Code.
• Leave the confirmation code section blank.
7. Add eSIM: Tap Add this eSIM.
Note: Do NOT close this window, or the installation will stop.
8. Wait for Activation: Allow up to 10 minutes for the eSIM to activate.
9. Access eSIM Settings: Once the eSIM has finished installing, tap into the eSIM settings.
10. Enable eSIM: Tap to enable the eSIM.
11. Check Mobile Data Settings: Go back into Mobile Network and tap on Mobile Data.
12. Turn On Data Roaming: Ensure that your Data Roaming is toggled on.
13. Confirmation: The Data Roaming toggle should show as enabled.
14. Completion: Your eSIM is now installed and set up.
Following these steps will help you successfully install your eSIM on your Huawei device.
How to Install an eSIM Using a QR Code on Huawei Devices
This guide provides a step-by-step walkthrough for installing an eSIM on your Huawei device using a QR code.
Before You Start
Ensure you have the following:
• Strong Internet Connection: Ideally, connect to Wi-Fi or have a good mobile data connection.
• eSIM Compatible Device: If unsure, check the list of compatible devices.
• Unlocked Device: Confirm that your device is not locked to a specific network.
Don’t forget to enable Data Roaming after installation.
Installing an eSIM Using a QR Code
1. Open Settings: Go to Settings on your device.
2. Access Mobile Network: Tap on Mobile Network.
3. Select SIM Management: Tap on SIM Management.
4. Add eSIM: Tap Add eSIM.
5. Scan QR Code: Click on the + in the bottom left of the screen to scan the QR code provided.
6. Add eSIM: Tap Add this eSIM.
Note: Do NOT close this window, or the installation will stop.
7. Wait for Activation: Allow up to 10 minutes for the eSIM to activate.
8. Access eSIM Settings: Once the eSIM has finished installing, tap into the eSIM settings.
9. Enable eSIM: Tap to enable the eSIM.
10. Check Mobile Data Settings: Go back into Mobile Network and tap on Mobile Data.
11. Turn On Data Roaming: Ensure that your Data Roaming is toggled on.
12. Confirmation: The Data Roaming toggle should show as enabled.
13. Completion: Your eSIM is now installed and set up.
Following these steps will help you successfully install your eSIM on your Huawei device.
How to Uninstall an eSIM from Huawei Device
To uninstall an eSIM from your Huawei device, please follow the steps below. Before starting the uninstall process, ensure that you have a stable internet connection; ideally, connect to a local Wi-Fi or use a good 4G connection. You can also temporarily disable an eSIM if you intend to use it again, but note that deactivating or disabling an eSIM will not extend its validity.
Uninstall an eSIM from Huawei Device
1. Open Settings: Go to Settings on your device.
2. Access Mobile Networks: Tap on Mobile Networks.
3. Select SIM Management: Tap into SIM Management.
4. Choose eSIM: Select the eSIM you would like to remove from your device.
5. Disable the eSIM: Tap on the enabled eSIM. (Note: You won’t be able to remove the eSIM unless it is disabled.)
6. Tap DELETE: Click on the DELETE button and tick the box next to I understand, then tap the DELETE button again.
7. Confirmation: Once this is done, your eSIM should have been successfully removed.
Following these steps will help you uninstall the eSIM from your Huawei device smoothly.
Identify Device Model on Huawei Device
To determine if your Huawei device is compatible with an eSIM (if it is newer than or the same as the Huawei P40), follow these steps:
Check My Huawei Model
1. Open Settings: Go to Settings on your device.
2. Access About Phone: Scroll down and tap on About Phone.
3. Find Your Device Model: Your device model will be displayed within this section.
By following these steps, you can easily identify the model of your Huawei device and check its compatibility with eSIM technology.
Locate ICCID (eSIM Serial Number) on Huawei Devices
If you need to find the unique ICCID associated with your eSIM, follow these steps on your Huawei device:
Finding My ICCID
1. Open Settings: Navigate to Settings on your device.
2. Select Mobile Network: Tap on Mobile Network.
3. Access SIM Management: Tap on SIM Management.
4. Choose Your eSIM: Select the eSIM for which you want to check the ICCID.
5. View ICCID: Tap on the enabled eSIM, and your ICCID will be displayed.
By following these steps, you can easily find the ICCID for your eSIM on Huawei devices.
Manual Network Selection on a Huawei Device
If you’re experiencing a poor-quality connection on a specific network, you can manually select a different network to improve your service. Note that you will only be able to connect to networks supported by your service provider.
Manually Selecting a Network
1. Open Settings: Navigate to Settings on your Huawei device.
2. Select Mobile Network: Tap on Mobile Network.
3. Access Mobile Data: Go into Mobile Data.
4. Find Network Provider: Scroll to the bottom and select Network Provider.
5. Disable Automatic Selection: Turn off the Automatic toggle so it appears white.
6. Search for Networks: A search message will appear at the bottom of the screen while your device scans for available networks.
7. Choose Your Network: Once the search is complete, you’ll see a list of providers that are available in your area. Tap on the desired network to connect.
By following these steps, you should be able to manually select a network that provides a better connection for your needs.
Setting Up an APN on a Huawei Device
While all our eSIMs come with an automatic Access Point Name (APN) that typically doesn’t require manual setup, you can check or manually configure the APN if needed. Here’s how to do it on a Huawei device.
Checking My APN
1. Open Settings: Go to Settings on your Huawei device.
2. Tap Mobile Network: Select Mobile Network.
3. Access Mobile Data: Tap on Mobile Data.
4. Locate APNs: Scroll down and select Access Point Names (APNs).
5. Check APN Name: Here, you should see an entry named data.esim. If it’s not listed, proceed to the next step.
6. Edit Existing APN: Tap on the APN that appears in your list.
7. Rename APN: Manually rename the APN to data.esim. Leave all other fields blank.
After making these changes, your APN should be correctly configured for optimal performance with your eSIM. If you encounter any issues, consider reaching out to your carrier for further assistance.
Turning Data Roaming On/Off on Huawei Devices
To ensure your eSIM functions correctly, it’s essential to have Data Roaming enabled on your Huawei device. Here’s how to manage your Data Roaming settings.
Turning On Data Roaming
1. Open Settings: Go to Settings on your Huawei device.
2. Select Mobile Network: Tap on Mobile Network.
3. Access Mobile Data: Tap on Mobile Data.
4. Find Data Roaming Toggle: Scroll down to locate the toggle for Data Roaming.
5. Enable Data Roaming: If the toggle is white, tap it to turn it blue, which indicates that Data Roaming is now enabled.
Once the toggle is blue, your Data Roaming is active, and your eSIM should function properly.
Turning Off Data Roaming
1. Follow Steps 1-3 Above: Navigate to Settings > Mobile Network > Mobile Data.
2. Locate Data Roaming Toggle: Scroll to find the Data Roaming toggle.
3. Disable Data Roaming: If the toggle is blue, tap it to turn it white, which indicates that Data Roaming is now disabled.
Disabling Data Roaming can help manage costs while traveling or using mobile data. If you have any issues or questions regarding your eSIM, please reach out to your carrier for assistance.
Motorola
How to Install an eSIM Manually on a Motorola Razr
This guide provides a step-by-step walkthrough for installing an eSIM manually on your Motorola Razr device.
Prerequisites
Before you start the installation process, ensure you have the following:
• A strong internet connection: Ideally, connect to Wi-Fi or have a reliable mobile data connection.
• An eSIM compatible device: Check if your device supports eSIMs. Refer to the list of compatible devices if you’re unsure.
• An unlocked device: Verify whether your device is locked to a specific network. For details, consult the locked/unlocked devices article.
Remember to enable Data Roaming after the installation is complete.
Steps to Install an eSIM Manually
1. Open Settings: Go to Settings on your Motorola Razr.
2. Select Network & Internet: Tap on Network & Internet.
3. Access Mobile Network: Tap on Mobile Network.
4. Open Advanced Menu: Tap the drop-down menu labeled Advanced.
5. Select Carrier: Tap on Carrier.
6. Add Carrier: Tap Add carrier.
7. Proceed to Next Step: Tap Next.
8. Enter Code Manually: Tap Enter code manually.
9. Input SMDP+ Information: You will need your SMDP+ Address and SMDP+ Activation Code. Enter them in the format:
1$SMDP+ Address$SMDP+ Activation Code
The code should look similar to the format shown in your documentation.
10. Start the Installation: Tap Start to initiate the installation process. Note: Do NOT close this window during the installation, as it may cause the process to fail.
11. Wait for Activation: Allow up to 10 minutes for the eSIM to activate.
12. Complete the Installation: Once activation is finished, tap Done.
13. Return to Previous Screen: Tap the back arrow to return to the previous menu.
14. Enable Data Roaming: Ensure that your Data Roaming is toggled On.
15. Accept the Prompt: Follow any prompts that appear to confirm the change.
16. Verify Data Roaming: Ensure the Data Roaming toggle indicates that it is enabled for the installed eSIM.
17. Completion: Your eSIM is now installed and set up!
Final Note
If you encounter any difficulties during the installation, please contact your carrier for assistance.
How to Install an eSIM Using a QR Code on Motorola Razr Devices
Follow this step-by-step guide to install an eSIM on your Motorola Razr using a QR code.
Prerequisites
Before you begin, ensure you have the following:
• A strong internet connection: It’s best to be connected to Wi-Fi or have a reliable mobile data connection.
• An eSIM compatible device: Check if your device supports eSIMs. For details, refer to the list of compatible devices.
• An unlocked device: Verify whether your device is locked to a specific carrier. For more information, check the locked/unlocked devices article.
Remember to enable Data Roaming after installation.
Steps to Install an eSIM
1. Open Settings: Go into Settings on your Motorola Razr.
2. Select Network & Internet: Tap on Network & Internet.
3. Access Mobile Network: Tap on Mobile Network.
4. Open Advanced Menu: Tap the drop-down menu labeled Advanced.
5. Select Carrier: Tap on Carrier.
6. Add Carrier: Tap Add carrier.
7. Proceed to Next Step: Tap Next.
8. Scan QR Code: Use your device’s camera to scan the QR code provided by your carrier.
9. Start the Installation: Tap Start. Note: Do NOT close this window during the installation process, as it may stop the installation.
10. Wait for Activation: Allow up to 10 minutes for the eSIM to activate, then press Done.
11. Return to Previous Screen: Once the activation is complete, tap the back arrow to return.
12. Enable Data Roaming: Make sure your Data Roaming is toggled On.
13. Accept the Prompt: Follow any prompts to confirm the change.
14. Verify Data Roaming: Ensure the Data Roaming toggle shows as enabled for the installed eSIM.
15. Completion: Your eSIM is now installed and ready to use!
Final Note
If you encounter any issues during the installation, don’t hesitate to reach out to your carrier for support.
How to Uninstall an eSIM from Motorola Razr Device
To remove an eSIM from your Motorola Razr device, follow these steps. Make sure you have a stable internet connection, preferably connected to Wi-Fi or a strong 4G network. You can also temporarily disable the eSIM if you plan to use it again later, but keep in mind that deactivating it won’t extend its validity.
Steps to Uninstall an eSIM
1. Open Settings: Go into Settings on your Motorola Razr.
2. Select Network & Internet: Tap on Network & Internet.
3. Access Mobile Network: Tap on Mobile Network.
4. Go to Advanced Options: Tap on the Advanced option.
5. Select Carrier: Tap on Carrier.
6. Choose the eSIM to Remove: Select the eSIM you want to uninstall.
7. Tap Delete: Press the Delete button.
8. Confirm Deletion: Read the prompt and accept it by pressing Delete again, then wait for the eSIM to be erased.
9. Completion: Once the process is complete, the eSIM should be successfully removed from your device.
Important Note
If you encounter any issues during the uninstall process or need further assistance, consider reaching out to your carrier’s customer support for help.
Identify Device Model on Motorola Razr Device
To determine whether your Motorola device is compatible with an eSIM, you can check your device model. If your device is newer than or the same as the Motorola Razr (2020), it should support eSIM functionality. Follow these steps to check your model:
Steps to Check Your Motorola Model
1. Open Settings: Go to Settings on your Motorola Razr.
2. Navigate to System: Scroll down until you see the option for System.
3. View Device Model: At the top of the list, you will see your device model or name displayed.
Important Note
If you find that your device is compatible with eSIM, you can proceed with eSIM activation or management as needed. If not, consider contacting your service provider for alternatives or device upgrade options.
Manual Network Selection on Motorola Razr Devices
If you’re experiencing a poor-quality connection on your current network, you can manually search for and select a different network. Keep in mind that you will only have access to networks that we offer service on. Follow these steps to manually select a network:
Steps for Manual Network Selection
1. Open Settings: Go to Settings on your Motorola Razr.
2. Tap on Network & Internet: Select Network & Internet from the menu.
3. Access Mobile Network: Tap on Mobile Network.
4. Open Advanced Options: Click on the Advanced drop-down menu.
6. Scan for Available Networks: Wait for your device to scan and display all eligible networks.
7. Select a Network: Choose the network you would like to connect to from the list.
8. Connect: Once you select a network, your device will connect to it.
Important Note
After switching networks, allow a moment for your device to establish a connection. If you have any trouble connecting or if the signal remains poor, consider switching back to the original network or contacting your service provider for assistance.
Setting Up an APN on Motorola Razr Devices
All eSIMs automatically configure an Access Point Name (APN), so manual setup is usually not necessary. However, if you need to check or configure the APN manually, follow these steps:
Checking or Setting Up the APN
1. Open Settings: Go to Settings on your Motorola Razr.
2. Select Network & Internet: Tap on Network & Internet.
3. Click Mobile Network: Tap on Mobile Network.
4. Access Advanced Options: Click on the Advanced drop-down menu.
5. Tap on Access Point Names: Select Access Point Names.
6. Check for data.esim: Look for an APN named data.esim.
• If it is listed, you are all set.
• If it is not listed, proceed to the next step.
7. Modify Existing APN: Click on the APN named Planet3 (or any other name it might have).
8. Rename APN: Manually rename it to data.esim in the name section.
9. Save Changes: Ensure to save any changes you make.
Important Note
Once you’ve set up the APN, restart your device to ensure that all settings are correctly applied and the connection is established. If you encounter any issues, you may want to check with your carrier for the correct APN settings specific to your plan.
Turning Data Roaming On/Off on Motorola Razr
To use your eSIM on a Motorola Razr, it’s essential to enable Data Roaming. Here’s how to turn Data Roaming on and off in your device settings.
Turning Data Roaming On
1. Open Settings: Go to Settings on your Motorola Razr.
2. Select Network & Internet: Tap on Network & Internet.
3. Choose Mobile Network: Tap on Mobile Network.
4. Enable Data Roaming:
• Ensure that the Data Roaming option is enabled. If the toggle is white, tap it to turn it blue.
5. Confirmation: A confirmation screen will appear.
6. Check Status: If the toggle is blue, Data Roaming is now enabled.
Turning Data Roaming Off
To disable Data Roaming, simply follow the same steps above and toggle the Data Roaming option back to white. This will turn off Data Roaming on your device.
Important Note
Remember that enabling Data Roaming may incur additional charges depending on your carrier and location. Always check with your carrier for specific information regarding roaming charges and coverage.
Oppo
How to Install an eSIM Manually on an Oppo Device
This guide provides a step-by-step walkthrough for manually installing an eSIM on your Oppo device.
Prerequisites
Before starting the installation, ensure you have the following:
• Strong Internet Connection: Ideally, connect to Wi-Fi or have a reliable mobile data connection.
• eSIM-Compatible Device: Check if your device supports eSIMs. Refer to the article on the List of Compatible Devices for verification.
• Unlocked Device: Ensure that your device is not locked to a specific mobile network. For details, consult the article on Locked/Unlocked Devices.
Remember to turn on Data Roaming once the installation is complete.
Installation Steps
1. Open Settings: Go to Settings on your Oppo device.
2. Select Mobile Network: Tap on Mobile Network.
3. Add eSIM: Tap on eSIM.
4. Tap Next: Select Add eSIM and then tap Next.
5. Need Help?: When the QR code screen appears, tap on Need help?.
6. Manual Entry: Tap on Enter it manually.
7. Input SMDP+ Details: To manually install the eSIM, enter your SMDP+ Address and SMDP+ Activation Code in the format:
“1$SMDP+ Address$SMDP+ Activation Code”.
Your code should look similar to the one shown in the reference screenshot.
8. Download eSIM: Tap Download to initiate the installation process. Note: Do NOT close this window while the installation is in progress, as it may cause the installation to fail.
9. Activation Time: Allow up to 10 minutes for the eSIM to activate.
10. Go to Settings: After activation, tap Settings again.
11. Check Data Roaming: Ensure your Data Roaming is turned on by going into Data eSIM.
12. Enable Data Roaming: If the Data Roaming toggle appears white, tap it to enable it.
13. Confirmation: The Data Roaming toggle should now be displayed in blue, indicating it is on.
14. Completion: Your eSIM is now installed and set up successfully.
Troubleshooting
If you face any issues during the installation, double-check your internet connection and ensure that your device is unlocked and compatible with eSIM technology. If the installation fails, retry the process from the beginning.
How to Install an eSIM Using a QR Code on Oppo Device
This guide provides a step-by-step walkthrough for installing an eSIM on your Oppo device using a QR code.
Installing an eSIM Using a QR Code
Before you begin the installation process, ensure you have the following:
• Strong Internet Connection: Ideally, connect to Wi-Fi or have a reliable mobile data connection.
• eSIM-Compatible Device: Check if your device supports eSIMs. Refer to the article on the List of Compatible Devices for confirmation.
• Unlocked Device: Make sure your device is not locked to a specific network. For details, check the article on Locked/Unlocked Devices.
Don’t forget to turn on Data Roaming once the installation is complete.
Steps to Install
1. Open Settings: Go to Settings on your Oppo device.
2. Tap Mobile Network: Select Mobile Network.
3. Turn on eSIM: Tap on eSIM and ensure it is turned on.
4. Loading Screen: A loading screen will appear for a moment.
5. Add eSIM: Tap on Add eSIM.
6. Next: Tap Next to proceed.
7. Scan QR Code: Use your device camera to scan the QR code provided by your carrier.
8. Download eSIM: Accept the prompt and tap Download. Note: Do NOT close this window while the installation is in progress.
9. Activation Time: Allow up to 10 minutes for the eSIM to activate.
10. Go to Settings: Once activated, tap Settings.
11. Access eSIM: Tap on eSIM again.
12. Enable eSIM: Tap the three dots on the right-hand side and enable the eSIM.
13. Accept Prompt: Confirm by accepting the prompt to enable.
14. Tap Yes: Confirm your choice by tapping Yes.
15. Check Data Roaming: Ensure your Data Roaming is turned on by going into Data eSIM.
16. Toggle Data Roaming: If the Data Roaming toggle appears greyed out, tap it to enable.
17. Confirmation: The Data Roaming toggle should now show as blue on the installed eSIM.
18. Completion: Your eSIM is now installed and set up successfully.
How to Uninstall an eSIM from Oppo Device
To uninstall an eSIM from your Oppo device, follow the steps below. Ensure you have a stable internet connection before starting the process. You can also temporarily disable an eSIM if you plan to use it again later. Please note that deactivating or disabling an eSIM will not extend its validity.
Uninstall an eSIM from Oppo Device
1. Open Settings: Go to the Settings app on your Oppo device.
2. Access Mobile Network: Tap on Mobile Network.
3. Select eSIM: Tap into eSIM.
4. Choose the eSIM to Remove: Tap on the eSIM you want to remove.
5. Delete the eSIM: Tap on the three dots shown on the right-hand side and select Delete.
6. Confirm Deletion: Accept the prompt that appears by pressing Delete, then wait for the eSIM to be removed.
7. Completion: Once the process is finished, your eSIM should be successfully uninstalled.
Identify Device Model on Oppo Devices
To check if your Oppo device is compatible with eSIM, follow these steps to identify your device model:
Check My Oppo Model
1. Open Settings: Go to the Settings app on your Oppo device.
2. Navigate to About Device: Scroll down and tap on About Device.
3. View Device Information: In this section, you will see the device name and model.
If your device is newer or the same as the Oppo Find X3 Pro, it should support eSIM functionality.
Manual Network Selection on Oppo Devices
If you’re experiencing a poor-quality connection on a specific network, manually selecting a different network can help. Here’s how to do it:
Manually Selecting a Network
1. Open Settings: Go to the Settings app on your Oppo device.
2. Access Mobile Network: Tap on Mobile Network.
3. Select Data eSIM: Click on Data eSIM.
4. Operator Settings: Tap on Operator.
5. Disable Auto-Select: Turn off the Auto-select option.
6. Search for Networks: Wait for your device to search for all available networks.
7. Choose Your Network: Once the search is complete, select the desired network from the list.
Final Steps
After selecting a network, please allow a moment for your device to establish a connection. Once connected, you should be able to use data services as normal.
Setting Up an APN on Oppo Devices
Although all eSIMs come with an automatic Access Point Name (APN) configuration, you may want to check or manually adjust the APN settings. Here’s how to do it:
Checking My APN
1. Open Settings: Go to the Settings app on your Oppo device.
2. Access Mobile Network: Tap on Mobile Network.
3. Select Data eSIM: Click on Data eSIM.
4. Access Point Names: Tap on Access Point Names.
5. View Current APN:
• Here, you should see the APN name listed as data.esim.
• If the name does not appear as expected, proceed to step 6.
6. Rename APN:
• Tap on the APN entry.
• Manually rename it to data.esim in the Name section.
• Leave the other fields blank.
Note
After making changes, ensure you save your settings if prompted, and restart your device if necessary to apply the new APN configuration.
Samsung
Can’t Connect My eSIM on Android
If you’re experiencing difficulties connecting your eSIM on an Android device, you can try the following troubleshooting steps:
1. Enable Data Roaming: Ensure that data roaming is turned on for your eSIM. Go to Settings > Network & internet > Mobile Network and check the data roaming option.
2. Configure Mobile Data Settings: Make sure your device is set to use the eSIM for mobile data. You can check this in Settings > Network & internet > Mobile Network and confirm that the eSIM is selected as the preferred mobile data source.
3. Restart Connection: Turn on Airplane Mode for a few seconds and then turn it off again, or simply restart your device. This can help refresh your network connection.
4. Manually Connect to a Supported Network: Go to Settings > Network & internet > Mobile Network > Advanced and select Network operators. From there, manually search for and connect to a supported network.
If you’ve gone through these steps and still cannot connect, please contact our support team for further assistance.
How to Change the Name/Label of Your eSIM Profile on Android
Customizing the label of your eSIM profiles can help you easily identify them on your device. Here’s a step-by-step guide on how to change the name of your eSIM profile on Android:
Changing Your eSIM Label
1. Open Settings: Go to the Settings app on your Android device.
2. Tap on SIM Cards & Mobile Networks: Select SIM cards & mobile networks from the menu.
3. Manage eSIM: Scroll down and tap on Manage eSIM.
4. Select Your eSIM: Choose the eSIM profile you want to rename.
5. Change Nickname: Here, you can enter a new nickname for your eSIM.
• (For example, you might want to label it as eSIM.)
6. Confirm Changes: Tap OK to save the new label.
Your eSIM profile is now updated with the new name, making it easier to identify among other profiles!
How to Check If My Samsung Device Is Unlocked
To use an eSIM on your Samsung device, you need to ensure that your device is unlocked. Follow the steps below to check if your device is unlocked.
Steps to Check If Your Device Is Unlocked
1. Open Settings: Go into the Settings app on your device.
2. Access Connections: Tap on Connections.
3. Select Mobile Networks: Tap on Mobile Networks.
4. Network Operators: Tap on Network Operators.
5. Disable Automatic Selection: Turn off the Select Automatically option.
6. Check Available Networks:
• If your device is unlocked, a list of available networks will display.
• If no list appears or you see only one network, your device may be locked to a specific carrier.
Next Steps
If your device is locked, contact your carrier to get it unlocked. Keep in mind that if your device was recently unlocked, you may need to wait for eSIM support to be activated, as some carriers may temporarily disable it for security reasons.
How to Install an eSIM Manually on a Samsung Device
This guide provides a step-by-step walkthrough for manually installing an eSIM on your Samsung device.
Prerequisites
Before you start, make sure you have the following:
• A strong internet connection: Ideally, connect to Wi-Fi or ensure a good mobile signal.
• An eSIM compatible device: If you’re unsure about compatibility, check the List of Compatible Devices.
• An unlocked device: Confirm that your device is not locked to a specific network by reviewing our article on Locked/Unlocked Devices.
• SMDP+ Address and SMDP+ Activation Code: You’ll need this information to manually install the eSIM.
Installing an eSIM Manually
1. Open Settings and tap on Connections.
2. Tap on SIM Manager.
3. Tap Add eSIM.
4. Select the option Scan QR Code from Service Provider or tap Enter Activation Code.
5. To manually install the eSIM, enter your SMDP+ Address and SMDP+ Activation Code in the format: 1$SMDP+ Address$SMDP+ Activation Code. Ensure the format is correct, as shown in the example below.
6. Tap Add to initiate the installation process.
• Note: Do NOT close this window while the installation is in progress, as it may cause the installation to fail.
7. Wait up to 10 minutes for the eSIM to activate.
8. Once the activation is complete, tap on Connections.
9. Tap on Mobile Networks.
10. Ensure that Data Roaming is turned on.
• If the toggle for Data Roaming is blue, it means it is enabled.
11. Your eSIM is now installed and set up!
If you have any questions or need further assistance, feel free to ask!
How to Install an eSIM Using a QR Code on Samsung Devices
Follow this step-by-step guide to install an eSIM on your Samsung device using a QR code.
Before You Start
Ensure you have the following:
• A strong internet connection: Ideally, connect to Wi-Fi or have a reliable mobile data connection.
• An eSIM compatible device: Check if your device is compatible by referring to the list of compatible devices.
• An unlocked device: Make sure your device isn’t locked to a specific network. If you’re unsure, refer to the article on locked/unlocked devices.
Steps to Install the eSIM
1. Open Settings: Go to Settings and tap on Connections.
2. Access SIM Manager: Tap on SIM Manager.
3. Add eSIM: Tap on Add eSIM.
4. Scan QR Code: Select Scan QR Code from service provider.
5. Scan the QR Code: Use your device’s camera to scan the QR code provided by your carrier.
6. Add eSIM: Tap on Add. Note: Do NOT close this window, as it may interrupt the installation.
7. Activation: Allow up to 10 minutes for the eSIM to activate.
8. Complete Installation: Tap Done to finish the installation.
9. Set Default SIM: Leave the Calls and Messages settings on your original primary SIM.
10. Return to SIM Manager: Go back into SIM Manager.
11. Select eSIM for Data: Tap on the eSIM you want to use for mobile data.
12. Access Mobile Networks: Go back to Connections and tap on Mobile networks.
13. Enable Data: Toggle the switch to On.
14. Check Data Roaming: Ensure the Data Roaming toggle is enabled for the installed eSIM.
15. Complete Setup: Your eSIM is now installed and set up.
If you encounter any issues during the process, feel free to ask for help!
How to Switch Your eSIM to a New Android Device
If you’ve recently upgraded your phone and need to transfer your eSIM, follow the steps below:
1. Check Compatibility: Ensure your new Android device is eSIM-compatible and supports the eSIM feature. You can find this information in the device specifications or manual.
2. Contact Your Carrier: Reach out to your current carrier to obtain a QR code or activation code for your eSIM. This code is necessary for activating the eSIM on your new device.
3. Open Settings: On your new Android device, go to Settings and look for the option to add a new cellular plan or activate the eSIM. The location of this option may vary by device and Android version.
4. Scan QR Code: Use your device’s camera to scan the QR code or enter the activation code provided by your carrier.
5. Follow On-Screen Instructions: Complete the activation process by following the on-screen instructions.
6. Final Steps: Once the activation process is complete, your new device will be ready to use with your eSIM. You may need to restart your device or wait a few minutes for the new eSIM to activate fully.
If you have any questions or need assistance during the process, feel free to ask!
How to Turn Your eSIM On and Off on Android Devices
Sometimes your eSIM may become disabled, or you might want to disable it for various reasons, such as switching to a different eSIM, saving data, or using another SIM while traveling. This guide will help you enable or disable your eSIM on your Android device.
Enabling eSIMs
1. Go to Settings: Open the Settings app on your device.
2. Select SIM Cards & Mobile Networks: Tap on SIM cards & mobile networks.
3. Manage eSIM: Scroll down and select Manage eSIM.
4. Select Your eSIM: Tap on the eSIM you wish to enable.
5. Enable the eSIM: Follow the prompts to enable the eSIM.
6. Wait for Activation: Allow a moment for the eSIM to enable.
7. Confirmation: Your eSIM is now enabled and ready to use.
Disabling eSIMs
1. Go to Settings: Open the Settings app on your device.
2. Select SIM Cards & Mobile Networks: Tap on SIM cards & mobile networks.
3. Manage eSIM: Scroll down and select Manage eSIM.
4. Select Your eSIM: Tap on the eSIM you want to disable.
5. Disable the eSIM: Follow the prompts to disable it.
6. Confirm Action: Accept the prompt to confirm.
7. Confirmation: Your eSIM is now disabled.
By following these steps, you can easily manage your eSIM on Android devices, enabling or disabling it as needed based on your requirements.
How to Uninstall an eSIM from Your Samsung Device
To uninstall an eSIM from your Samsung device, follow the steps below. Make sure you have a stable internet connection, ideally connected to local Wi-Fi or a strong 4G signal.
Uninstall an eSIM from Samsung Device
1. Open Settings on your device and tap on Connections.
2. Tap on SIM Manager.
3. Select the eSIM you want to remove from the list.
4. Tap Remove. If prompted, provide your device’s Passcode or use Face ID.
5. After confirming your Passcode or Face ID, tap the Remove button again to complete the process.
If you plan to use the eSIM again in the future, consider temporarily disabling it instead of uninstalling it. Please note that deactivating or disabling an eSIM will not extend its validity. If you have any questions, feel free to ask!
Identify Device Model on Samsung Device
To check if your Samsung device is compatible with an eSIM, follow these steps:
Check My Samsung Model
1. Open Settings on your device and scroll down to the bottom to find About phone.
2. Tap on the About phone section.
3. Here, you will see your Device Model listed.
If your device is newer or the same as the Samsung Galaxy S20, it should be compatible with an eSIM. If you have any further questions, feel free to ask!
Locate ICCID (eSIM Serial Number) on Samsung Devices
If you need to identify the unique ICCID associated with your eSIM, follow the steps below on your Samsung device.
Finding My ICCID
1. Open Settings and tap on Connections.
2. Tap on SIM Manager.
3. Select the eSIM for which you want to know the ICCID.
4. Click on More Information.
5. You will see the ICCID for the selected eSIM displayed on the screen.
If you have any further questions or need assistance, feel free to ask!
Manual Network Selection on Samsung Devices
If you’re experiencing a poor-quality connection on a particular network, you can manually search for and select a different network. Please note that you will only be able to connect to networks we offer service on.
Manual Network Select Guide
1. Open Settings and tap on Connections.
2. Select Mobile Networks.
3. Tap on Network Operators.
4. Disable Select Automatically.
5. Choose the network you wish to connect to from the list.
6. You are now connected to the selected network.
If you have any questions or need further assistance, feel free to ask!
Setting Up an APN on Samsung Devices
All our eSIMs come with an automatic Access Point Name (APN) configured, so manual programming is usually not necessary. However, if you want to check or manually configure the APN, follow the steps below:
Checking My APN Settings
1. Open Settings and tap on Connections.
2. Tap on Mobile Networks.
3. Tap on Access Point Names.
4. In the APN settings, look for a configuration labeled data.esim.
• If you do not see this name, select the current APN and modify it:
• Rename the APN to data.esim.
If you need any further assistance or have questions, feel free to ask!
Turning Data Roaming On/Off on a Samsung Device
Enabling Data Roaming is essential for using your eSIM. You can easily toggle Data Roaming on or off in your device settings by following these steps:
Toggling Data Roaming
1. Open Settings and tap on Connections.
2. Tap on Mobile Network.
3. Toggle Data Roaming to enable it.
• When enabled, the toggle will appear blue, indicating that Data Roaming is active.
Note: If you have another SIM card in your device, you may need to disable data services on that SIM to ensure the eSIM is used. Please be patient as the device may take a moment to reconfigure after changing the settings.
If you have any further questions or need assistance, feel free to ask!
What to do if I can't delete an Telemeteor eSIM on my Samsung Galaxy S22?
Some Samsung Galaxy S22 users have reported a known issue where they cannot delete an Telemeteor eSIM profile from their device or the SIM manager fails to load due to a software bug. This issue can be frustrating, but not to worry — workarounds are available to help you manage your eSIMs until a software update from Samsung is released to fix the problem. Check for Software Updates. If an update is available, please download and install it.
1. GO to Settings.
2. SCROLL DOWN and TAP Software update.
3. TAP Download and install.
Remove/Add a Physical SIM. This will force the SIM manager to reload.
1. INSERT the SIM removal pin into the hole to release the tray.
2. PULL the tray out gently from the tray slot.
3. ENSURE that a physical SIM is in the tray.
4. INSERT the tray back into the tray slot.
Restart your device. A simple reboot can resolve any technical issues.
1. PRESS and HOLD the side key and the volume down button simultaneously.
2. TAP Restart.
3. TAP the Restart option again.
Reset the Network settings. This will reset all network settings, including Wi-Fi, Mobile data, and Bluetooth.
1. GO to Settings.
2. SCROLL DOWN and TAP General management.
3. TAP Reset.
4. TAP Reset network settings.
5. TAP Reset settings to confirm.
Should the Telemeteor eSIM deletion issue persist after doing the workarounds above, please contact Samsung or your carrier, as the issue might be related to the device's software.
If you have any questions, please feel free to contact our support team, and we'll be happy to help!
Sony
How to Install an eSIM Manually on a Sony Device
This guide provides a step-by-step walkthrough for manually installing an eSIM on your Sony device.
Installing an eSIM Manually
Before you begin, ensure you have the following:
• A strong internet connection: Ideally, connect to Wi-Fi or have a good mobile data signal.
• An eSIM compatible device: If you’re unsure, refer to our List of compatible devices.
• Your device is network unlocked: If you need to check, see our article on Locked/Unlocked devices.
Note: Don’t forget to turn on Data Roaming once the installation is complete.
Steps to Install
1. Open Settings and tap on Network and Internet.
2. Tap on Download a SIM instead?.
3. When prompted with Scan QR Code, tap on Need help?.
4. Select Enter it manually.
5. To manually install the eSIM, you will need your SMDP+ Address and SMDP+ Activation Code. Enter them in the format: 1$SMDP+ Address$SMDP+ Activation Code. The code should look similar to the example below.
6. Tap Download.
Note: Do NOT close this window during the installation process.
7. Allow up to 10 minutes for the eSIM to activate.
8. Once activated, go back to Settings.
9. In Settings, select Use SIM and ensure the toggle is turned On.
10. Confirm that you want to turn on the eSIM.
11. Ensure that Data Roaming is toggled On.
12. The Data Roaming toggle should appear as below on the installed eSIM.
13. Your eSIM is now successfully installed and set up!
If you have any questions or need further assistance, feel free to ask!
How to Install an eSIM Using a QR Code on Sony Devices
This guide provides a step-by-step walkthrough for installing an eSIM on your Sony device using a QR code.
Installing an eSIM Using a QR Code
Before you begin, ensure you have the following:
• A strong internet connection: Ideally, connect to Wi-Fi or have a good mobile data signal.
• An eSIM compatible device: If you’re unsure, refer to our List of compatible devices.
• Your device is network unlocked: If you need to check, see our article on Locked/Unlocked devices.
Note: Don’t forget to turn on Data Roaming once the installation is complete.
Steps to Install
1. Open Settings and tap on Network and Internet.
2. Go to SIMs.
3. Tap on Download a SIM instead?.
4. Click Next.
5. Scan the QR code provided by your mobile network operator.
6. Tap Download.
Note: Do NOT close this window during the installation process.
7. Allow up to 10 minutes for the eSIM to activate.
8. Once activated, go back to Settings.
9. In Settings, select Use SIM and ensure the toggle is turned On.
10. Confirm that you want to turn on the eSIM.
11. Ensure that Data Roaming is toggled On.
12. The Data Roaming toggle should look like the one below on the installed eSIM.
13. Your eSIM is now successfully installed and set up!
If you have any questions or need further assistance, feel free to ask!
Identify Device Model on a Sony Device
If your Sony device is newer than or the same as the Sony Xperia 10, it should be compatible with eSIM functionality. Here’s how to check your device model:
Check My Sony Model
1. Open the Settings app on your Sony device.
2. Scroll down and select About Phone.
3. In this section, you will see your device’s model number displayed.
If you need further assistance or have questions about compatibility, feel free to ask!
Manual Network Selection on a Sony Device
If you’re experiencing a poor-quality connection on a specific network, you can manually search for and select a different network. Keep in mind that you will only be able to connect to networks that we support.
Manually Selecting a Network
1. Open the Settings app on your Sony device.
2. Tap on Network and Internet.
3. Go to SIMs.
4. Select the eSIM for which you want to change the network.
5. Scroll down to find the option for Automatically select network.
6. Deselect the Automatically select network option. Read the prompt that appears and select OK to confirm.
7. After confirming, your phone will take a few minutes to search for available networks.
8. Once the search is complete, you’ll see a list of networks available in your area. Select your desired network from the list, and you will be connected.
This process should help improve your connection quality. If you have any questions or need further assistance, feel free to ask!
Setting Up an APN on Sony Devices
All our eSIMs come with an automatic Access Point Name (APN) configured, so manual programming is typically not required. However, if you need to check or manually set it up, here are the steps to follow:
Checking Your APN
1. Open the Settings app on your Sony device.
2. Tap on Network and Internet.
3. Click on SIMs.
4. Select the eSIM you want to configure (for example, 3 AT 2).
5. Scroll down to find the option for Access Point Names.
6. Here, you should see the APN name listed, which should read data.esim. If it doesn’t display this name, proceed to the next step.
7. You can manually set the APN by entering data.esim in the Name section. Leave all other fields blank.
This ensures that your device is configured to access the correct network settings. If you have any further questions or need assistance, feel free to ask!
Turning Data Roaming On/Off on a Sony Device
Enabling Data Roaming is essential for using any eSIM on your Sony device. Here’s how to manage your Data Roaming settings:
Turning Data Roaming On
1. Open the Settings app on your device.
2. Tap on Network and Internet.
3. Select SIMs.
4. Choose the eSIM you would like to check Data Roaming for.
5. Ensure that Data Roaming is enabled. If the toggle is grey, tap it to turn it blue.
6. Once the toggle is blue, Data Roaming is activated.
After enabling Data Roaming, please give your device a moment to connect to a network.
Turning Data Roaming Off
To disable Data Roaming, follow the same steps:
1. Open the Settings app.
2. Tap on Network and Internet.
3. Select SIMs.
4. Choose the eSIM you want to modify.
5. Tap the toggle to turn it grey, which will disable Data Roaming.
This allows you to manage your Data Roaming preferences easily. If you have any questions or need further assistance, feel free to ask!
Xiaomi
Manual Network Selection on Xiaomi Devices
If you’re experiencing a poor-quality connection on your current network, manually selecting a different network can often help. Keep in mind that you will only have an internet connection on networks supported by our services.
Manually Selecting a Network
1. Open Settings and tap on SIM cards & mobile networks.
2. Select the eSIM you want to change the network for (e.g., 3 AT).
3. Tap on Preferred network type.
4. Deselect Automatically select network.
5. Accept the prompt that appears to confirm the change.
6. Wait for the device to search for available networks in your area.
7. Choose the network you wish to connect to from the list presented.
8. You are now connected to your desired network.
If you need further assistance, feel free to ask!
Set Up an APN on Xiaomi Devices
All our eSIMs come with an automatic Access Point Name (APN), so manual configuration is usually unnecessary. However, if you wish to check or manually set up the APN, follow the steps below.
Checking My APN
1. Open Settings and tap on SIM cards & mobile networks.
2. Select the eSIM you want to check the APN for (e.g., 3 AT).
3. Tap on Access point names.
4. Here, you should see the name of the APN listed, which should be under data.esim. If it is not displayed, proceed to step 6.
5. Tap on the APN. You can manually rename it to data.esim in the Name section, leaving the other fields blank.
If you have any questions or need additional help, let me know!
Turning Data Roaming On/Off on Xiaomi Devices
To use your eSIM, it is essential to enable Data Roaming on your Xiaomi device. Here’s how you can turn it on or off in your settings:
Turning Data Roaming On
1. Open Settings and select SIM cards & mobile networks.
2. Scroll down and tap on Advanced settings.
3. Select Data roaming.
4. If the toggle is greyed out, Data Roaming is currently disabled. Tap the toggle to enable it.
5. Accept the prompt that appears to confirm the change.
6. Once the slider is blue, Data Roaming is activated.
After enabling, please give your device a moment to find a network, and data services will start working.
Feel free to reach out if you need assistance with anything else!
Windows
How to Install an eSIM Manually on a Windows Device
This guide provides a step-by-step walkthrough for manually installing an eSIM on your Windows device.
Prerequisites
Before you begin, make sure you have the following:
• A strong internet connection: Ideally, connect to Wi-Fi or ensure a good mobile signal.
• An eSIM compatible device: If you’re unsure about compatibility, check the List of Compatible Devices.
• An unlocked device: Confirm that your device is not locked to a specific network by reviewing our article on Locked/Unlocked Devices.
• SMDP+ Address and SMDP+ Activation Code: You will need this information to manually install the eSIM.
Installing an eSIM Manually
1. Open the Windows Settings app by clicking the Start menu and selecting the gear icon.
2. Select Network & Internet from the settings menu.
3. Click on Cellular and then select Add a cellular plan.
4. To manually install the eSIM, you will need to enter your SMDP+ Address and SMDP+ Activation Code in the format: 1$SMDP+ Address$SMDP+ Activation Code.
5. Click Download to start the installation process.
6. Follow the prompts to complete the eSIM activation process.
Once you’ve completed these steps, your eSIM should be successfully installed and ready to use. If you have any questions or require further assistance, feel free to ask!
How to Install an eSIM on Windows 11
This guide provides a step-by-step walkthrough for installing an eSIM on your Windows 11 device.
Prerequisites
Before you begin, ensure you have the following:
• A strong internet connection: Ideally, connect to Wi-Fi or have a good 4G signal.
• An eSIM compatible device: If you’re unsure about compatibility, check the List of Compatible Devices.
• An unlocked device: Make sure your device is not locked to a specific mobile network. For more information, refer to our article on how to check if your device is locked or unlocked.
Installing an eSIM Using a QR Code
1. Open the Windows 11 Settings app by clicking the Start button and selecting the gear icon on the left side of the Start menu.
2. Click on Network & Internet in the Settings app.
3. Select Cellular from the left-hand menu.
4. Click the Add a plan button under the Mobile data section on the right side of the page.
5. Choose eSIM as the connection type.
6. Enter the necessary information for your eSIM, such as the activation code, IMEI number, and any other details required by your carrier.
7. Follow the prompts to complete the setup process and activate your eSIM plan.
Once the eSIM is installed and activated, you should be able to use it for internet connectivity and, depending on your device and carrier, make calls as well. If you have any questions or need assistance, feel free to ask!
How to Install eSIM Using a QR Code on Windows Devices
This guide provides a step-by-step walkthrough for installing an eSIM on your Windows device using a QR code.
Prerequisites
Before you begin, ensure you have the following:
• A strong internet connection: Ideally, connect to Wi-Fi or ensure you have a reliable internet connection.
• An eSIM compatible device: If you’re unsure whether your device supports eSIM, check the article on List of Compatible Devices.
• A network-unlocked device: If you’re not certain whether your device is locked to a specific network, refer to the article on Locked/Unlocked Devices.
Installing an eSIM Using a QR Code
1. Open the Settings app on your Windows device.
2. Click on Network & Internet.
3. Select Cellular from the left-hand menu.
4. Click on Add a new eSIM profile.
5. Choose Install an eSIM from a QR code.
6. Scan the QR code provided by your mobile network operator using your device’s camera.
7. Once the QR code is scanned, the eSIM profile will automatically download and install on your device.
8. If prompted, enter any additional details required by your mobile network operator, such as your account information or verification code.
9. After the installation is complete, your Windows device will be connected to the mobile network using the eSIM.
If you encounter any issues during the installation process, feel free to ask for help!
Identify Device Model on Windows Device
To ensure your Windows device is compatible with an eSIM, you can check your device model. Follow these steps:
Check My Device Model
1. Open the Settings app.
2. Scroll down and select About.
3. On this page, you should see the Device specifications, which will include the model name and number.
If your device is newer than or the same as the Microsoft Surface Pro LTE, it should be compatible with an eSIM. If you need further assistance, feel free to ask!
Laptops which are compatible with eSIM
Microsoft Surface Pro X
Microsoft Surface Go 2
Microsoft Surface Pro LTE Advanced
Acer Swift 3
Asus Mini Transformer
Asus NovaGo
Asus VivoBook Flip 14
Samsung Galaxy Book 2
Lenovo Yoga 520
Lenovo Miix 630
Lenovo Yoga C630
HP Specter Folio 13
HP Probook G5
HP Elitebook G5
Notebooks which are compatible with eSIM
Acer Swift 7
HP Zbook G5
Locate ICCID (eSIM Serial Number) on Windows Devices
It may be necessary to identify the unique ICCID associated with your eSIM. Here are the steps to find it on a Windows device:
Finding My ICCID
1. Open the Settings app by clicking on the Start menu and selecting Settings.
2. Tap on Network & Internet.
3. Select Cellular from the left-hand menu.
4. Under Mobile Plans, you will see the ICCID listed for each active cellular plan.
If you need any more assistance, feel free to ask!
Manual Network Selection on Windows Devices
If you’re experiencing a poor-quality connection on a specific network, you can manually search for and select a different network. Please note that you can only connect to networks that we support.
Manually Selecting a Network
1. Open Settings.
2. Click on Network & Internet.
3. Select Cellular from the left-hand menu.
4. Under Mobile Plans, click on the eSIM you want to modify.
5. Scroll down to the Network selection section.
6. Click on Search for networks.
7. Your device will begin scanning for available networks. Once the scan is complete, a list of available networks will appear.
8. Click on the network you want to connect to.
9. You are now connected to your desired network.
If you need further assistance, feel free to ask!
Setting Up an APN on Windows Devices
While all our eSIMs come with an automatic Access Point Name (APN) configured, you can check or manually set it up if needed. Here’s how to do it:
Checking Your APN
1. Open the Settings app.
2. Click on Network & Internet.
3. Select Cellular from the left-hand menu.
4. Under Mobile Plans, click on the cellular plan you wish to modify.
5. Scroll down to the APN settings section.
6. Here, you should see the APN name, which should read data.esim. If it doesn’t display this name, proceed to the next step.
7. You can manually set the APN name by entering data.esim in the Name section. Leave all other fields blank.
If you have any further questions or need assistance, feel free to ask!
Turning Data Roaming On/Off on a Windows Device
To ensure your eSIM works properly, it’s essential to enable data roaming on your device. You can easily manage your data roaming settings in your device’s settings.
Turning Data Roaming On
1. Open the Settings app on your device.
2. Click on Network & Internet.
3. Select Cellular from the left-hand menu.
4. Scroll down to the Data roaming options section.
5. To enable data roaming, toggle the Data roaming switch to the On position. Your device may prompt you to confirm that you want to enable data roaming.
Turning Data Roaming Off
If you wish to disable data roaming:
1. Follow steps 1-4 above.
2. Toggle the Data roaming switch to the Off position.
If you need more help, feel free to reach out!
Laptops
Laptops which are compatible with eSIM
Microsoft Surface Pro X
Microsoft Surface Go 2
Microsoft Surface Pro LTE Advanced
Acer Swift 3
Asus Mini Transformer
Asus NovaGo
Asus VivoBook Flip 14
Samsung Galaxy Book 2
Lenovo Yoga 520
Lenovo Miix 630
Lenovo Yoga C630
HP Specter Folio 13
HP Probook G5
HP Elitebook G5
Notebooks which are compatible with eSIM
Acer Swift 7
HP Zbook G5
Setup guide
Find easy step-by-step instructions to install your eSIM on any device and get connected in minutes!
Alternatively you can dial *#06#. if you have an EID code your phone is eSIM compatible.
You can't install an eSIM if your device is network or carrier-locked. If you want to use an eSIM, please contact your mobile network provider or carrier to unlock your device.
Compatible Devices
Check if your device supports eSIM to get connected effortlessly!
Search for any devices
Got a question? Good to know
You asked, we answered. Browse our frequently asked questions!